How to Add Call-to-Actions with Button to WordPress Sites
If you’re looking to boost engagement, drive conversions, and guide your visitors toward specific actions, incorporating effective call-to-action (CTA) buttons is necessary.
A Call to action (CTA) is an instruction to your website readers, visitors, or audience created to provoke an immediate response from them, usually using an imperative verb that forms a command or requests such as “Sign up Now”, “Learn More” or “Download Now!” etc.
In this article, we’ll show you how to add Call-to-Actions to your WordPress site using MailOptin. Whether you’re a seasoned webmaster or just starting out, this guide will help you make the most of your WordPress site by leveraging the full potential of MailOptin.
Why Use Call-to-Actions on WordPress Sites?
Calls-to-Actions (CTAs) are essential elements on any website, including those built on WordPress. Here’s why you should use CTAs on your site:
Increasing Engagement: CTAs are essential for keeping your audience engaged. They prompt users to interact with your content, which can increase the time they spend on your site.
Driving Conversions: Whether your goal is to grow your email list, boost sales, or increase downloads, CTAs are crucial for driving conversions. They guide users towards taking specific actions that align with your business objectives.
Enhancing User Experience: Well-placed CTAs can improve the overall user experience by providing clear next steps. They help users navigate your site more effectively and find what they want.
Adding Call to Actions Button to your WordPress Site
Follow these steps to add a call to action button to your WordPress site.
Step 1: Install and Activate MailOptin Plugin
The first step is to install and activate the MailOptin plugin on your WordPress website.
Next, create your Optin campaign. Visit this guide to see how to create and customize your Optin campaign. When done, come back to this page.
Note: All MailOptin opt-in types, including notification bar, slide-in or fly-in, in-post, embedded, lightbox popup, and sidebar/widget, support the call-to-action feature.
Step 2: Enabling Call to Action Button
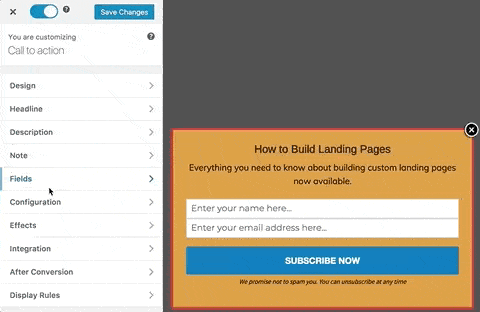
To enable the call to action button to replace the default opt-in form shown; click the title of the opt-in campaign or the custom button beside it to open the form builder.
Click the “Fields” and enable the “Display Only CTA Button” which reveals several controls, such as button action and options to customize the button to your heart’s content.
Actions are available when the call to action button is clicked. They are “Navigate to URL“, “Reveal Optin Form“, “Close optin” and “Close optin and reload page“.
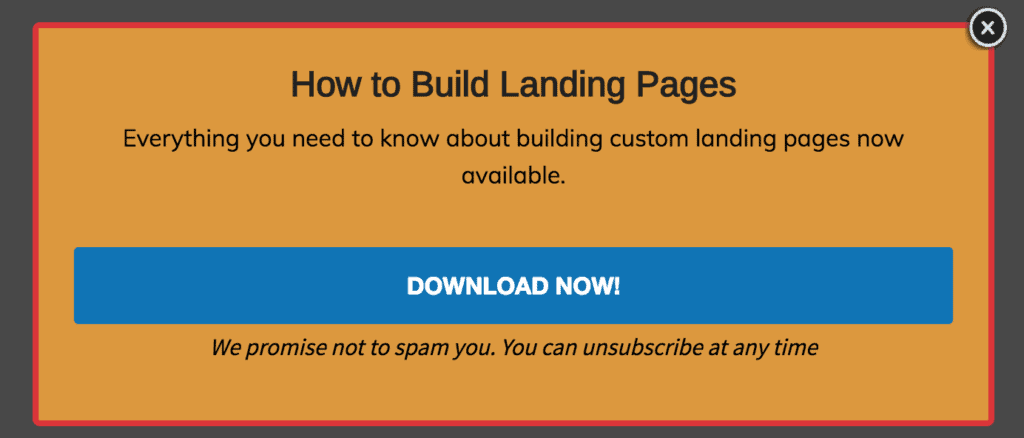
The “Navigate to URL” option takes visitors, readers, or users to another web page or website based on the URL you specify. See a demo below.
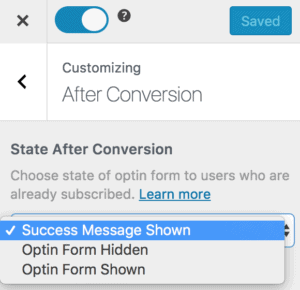
Note: when the CTA button is clicked, it is counted as a conversion and as a result, a success message is displayed the next time users who clicked the button encounter the CTA message again.
If you would love to display the CTA regardless of whether it has been closed (in case of the lightbox, notification bar, and slide-in optins) or the button has been clicked, or better still, hide it altogether, then the state after conversion feature is for you.
It’s also worth noting that activating test mode or setting the success cookie to 0 (zero) prevents button clicks from being counted as a conversion, thus causing the CTA message even after the button click.
When selected, the “Reveal Optin Form” option reveals or displays an opt-in form when the CTA button is clicked. Please take a look at the demo below.
Best Practices for Effective CTAs
Creating effective call-to-action (CTA) buttons can significantly impact your website’s engagement and conversion rates. Here are some best practices to ensure your CTAs are compelling:
Compelling CTA Text: The text on your CTA button should be clear, concise, and action-oriented. Use strong verbs that encourage immediate action, such as “Subscribe,” “Download,” “Get Started,” or “Learn More.” Avoid vague phrases like “Click Here” or “Submit.”
Strategic CTA Placement: Position your CTAs where they are easily noticeable and logically follow the content. Common places include above the fold, at the end of blog posts, within the content, and in the sidebar. Ensure they are not buried or overshadowed by other elements on the page.
Creating a Sense of Urgency: Encourage immediate action by creating a sense of urgency. Phrases like “Limited Time Offer,” “Sign Up Today,” or “Only a Few Spots Left” can motivate users to act quickly.
Incorporating Social Proof: Including social proof near your CTA can increase trust and credibility. Testimonials, reviews, and user counts (e.g., “Join 10,000+ subscribers”) can reassure visitors of the value they’ll receive by taking action.
A/B Testing: Test different versions of your button text, colors, placements, and sizes to see which combinations yield the best results.
Ready to add a CTA to your WordPress Site?
We hope this article helped you learn how to add a call-to-action button to your WordPress site using MailOptin. Now, it’s time to take action. Follow the steps outlined in this guide to create compelling CTAs that drive engagement and conversions.
Remember, the key to successful CTAs lies in their clarity, design, and strategic placement. Keep testing and optimizing to find what works best for your audience.