Do you want to know what email scrubbing is and how to clean your email list so your emails reach people who actually want them?
As your email list grows, some subscribers may stop opening your emails, change their email addresses, or become inactive. You may also have duplicate or invalid email addresses sitting on your list without realizing it.
Keeping these contacts can hurt your email marketing results and increase the number of emails that bounce. That is why regular email scrubbing matters. It helps you find inactive and invalid contacts, remove unnecessary addresses, and focus your emails on people who still want to hear from you.
In this guide, you will learn what email scrubbing means, why it matters, and how to clean your email list step by step. You will also learn email list cleaning best practices, how MailOptin can help prevent unwanted signups, and answers to common questions about email scrubbing.
What Is Email Scrubbing?
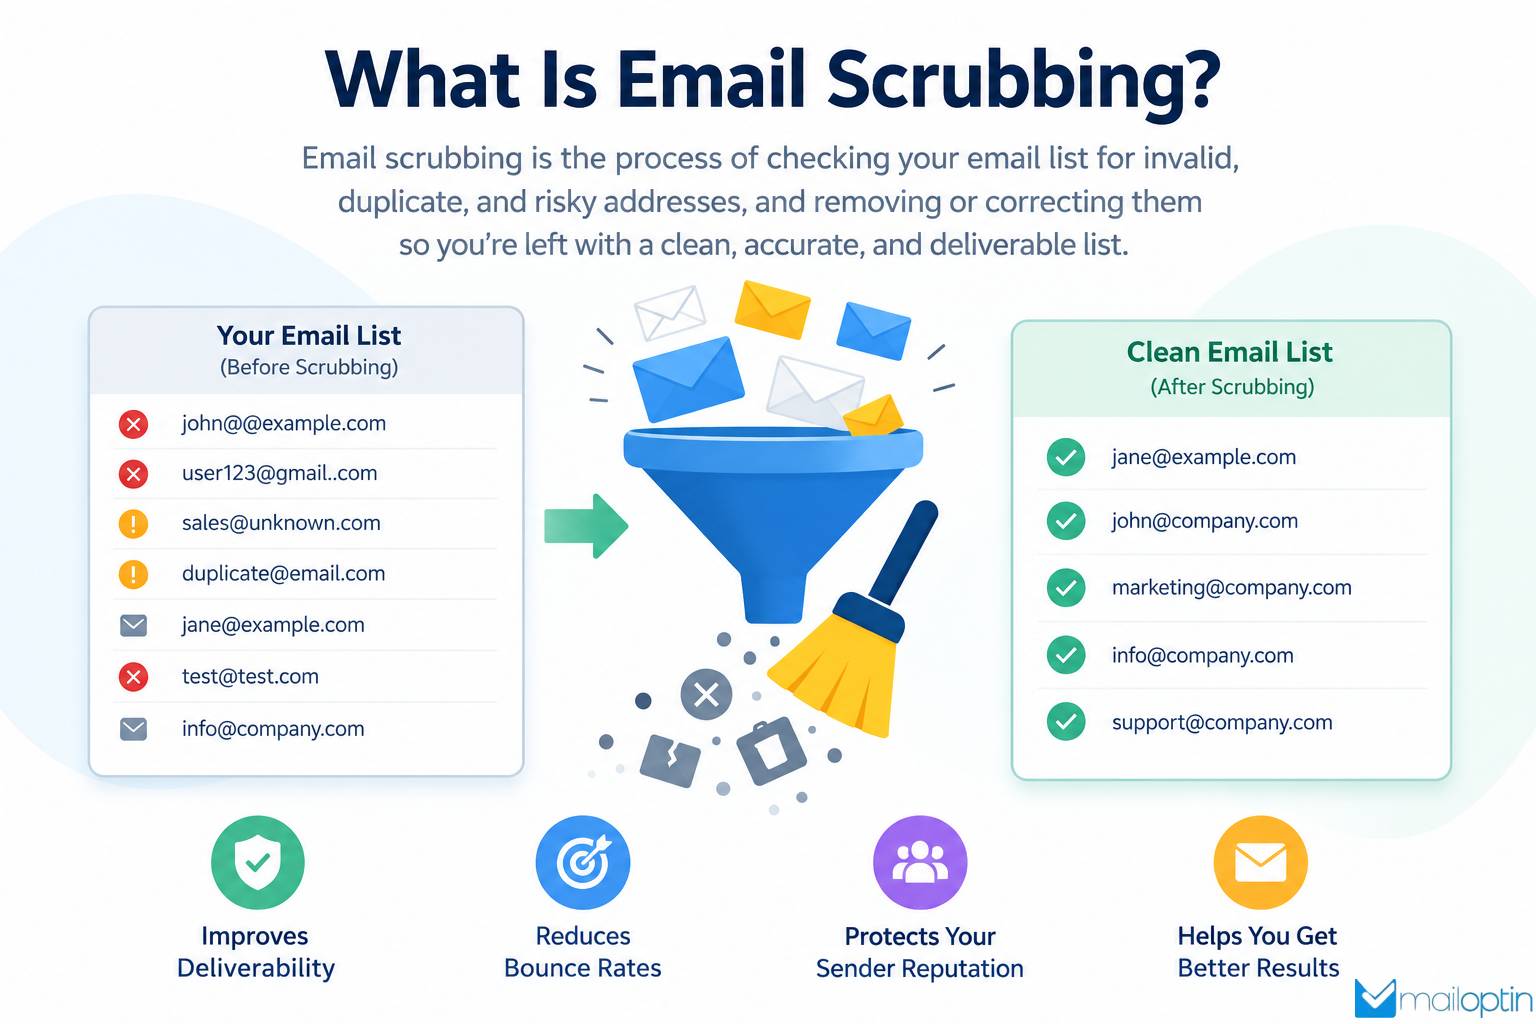
Email scrubbing is the process of checking your email list for invalid, duplicate, and risky addresses and removing or correcting them so you’re left with a clean, accurate, and deliverable list.
For example, imagine you have 10,000 subscribers. After checking your list, you discover that 500 email addresses have permanently bounced and another 1,000 subscribers have not opened an email from you in more than a year.
Your list may show 10,000 subscribers, but only a much smaller number may actually be interested in your emails.
Email scrubbing helps you identify these contacts and decide what to do with them. Depending on the situation, you may:
- Correct an email address with a simple typo.
- Remove a permanently invalid address.
- Remove duplicate contacts.
- Suppress inactive subscribers.
- Send a re-engagement campaign before removing inactive contacts.
- Review temporary or disposable email addresses.
This process is also called email list cleaning, email address scrubbing, or email list scrubbing.
The goal is not to have the biggest possible list. The goal is a list of people with valid email addresses who still want to hear from you.
Why Should You Clean Your Email List?
A large email list may look impressive, but size alone doesn’t determine an email campaign’s success.
If a large part of your list includes inactive or invalid contacts, your campaign data becomes less useful. You may also spend money sending emails to people who will never read them.
Below are reasons to clean up your email list regularly.
1. Improve Email Engagement: When you remove contacts that never open or click your emails, your engagement numbers can become more meaningful.
Picture this. You send to 10,000 subscribers. 1,000 open. That’s a 10% open rate. Now suppose 6,000 of those people haven’t opened anything in a year. They’re still on your list, still counting against you. Cut them, and you’re left with 1,000 opens out of 4,000. That’s 25%. Same campaign. Same engaged readers. Just a cleaner list and a real picture of how your audience responds.
2. Reduce Email Bounces: An email bounce happens when your message cannot be delivered to the recipient. There are two common types of bounces:
Hard bounce: This usually means the email cannot be delivered permanently. The address may not exist, the domain may no longer exist, or the recipient’s server may reject the message permanently.
Soft bounce: This is usually a temporary delivery problem. The recipient’s inbox may be full, their mail server may be temporarily unavailable, or another temporary issue may prevent delivery.
Hard bounces should generally be removed quickly. Soft bounces should be monitored before deciding whether the address should be removed. Regularly dealing with bounced emails is an important part of email list cleaning.
3. Protect Your Sender Reputation: Inbox providers like Gmail, Outlook, and Yahoo watch how people respond to your emails. Do they open them? Do they click? Do they mark them as spam?
When a large chunk of your list ignores you or bounces, those providers notice. They start to think your emails are unwanted. Before you know it, your messages land in the spam folder instead of the inbox. Once that happens, it is hard to climb back out. Cleaning your list protects that reputation.
4. Reduce Spam Complaints: Some inactive subscribers may eventually mark your emails as spam, especially when they no longer remember signing up or are no longer interested in your content.
Regular list cleaning helps you identify inactive subscribers before they become a bigger problem. First, try to re-engage these subscribers. If they still do not respond, you can stop sending marketing emails to them.
5. Save Money: Many email marketing platforms charge based on the number of contacts in your account, the number of emails you send, or both. Keeping thousands of inactive contacts can increase your email marketing costs without adding value.
When you clean your email list, you can spend your email marketing budget on contacts who are more likely to engage with your campaigns.
6. Get More Useful Marketing Data: Your email reports are only useful when you understand what the numbers represent. If your list includes many invalid and inactive addresses, your engagement reports may not clearly show how your active audience responds.
After you clean your list, you can more easily evaluate metrics such as opens, clicks, conversions, and unsubscribes.
How to Clean an Email List
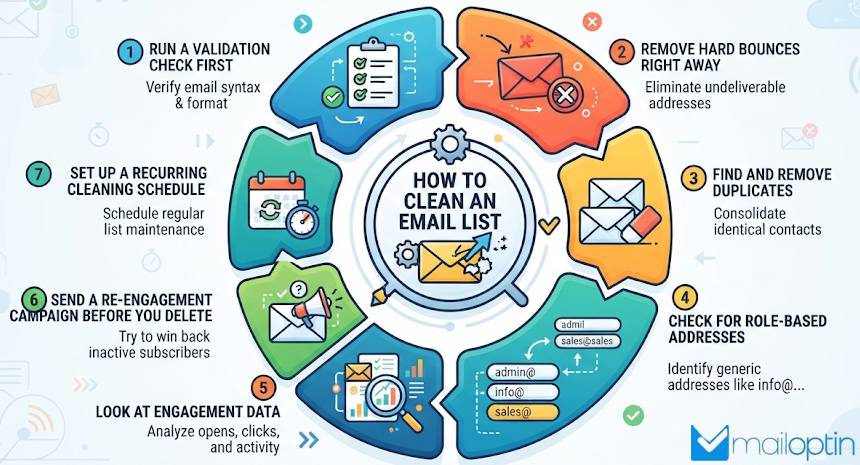
Now for the part you came here for. Cleaning your email list isn’t complicated, but it does require a clear process.
Follow these steps in order, and you will end up with a list full of real people who want to hear from you.
Step 1: Run a Validation Check First
Before you do anything else, run your list through an email verification service. These platforms check every address against real-time databases. They flag addresses that do not exist, addresses with typos, and addresses that are known spam traps.
Popular options include NeverBounce, ZeroBounce, and Hunter. Most let you upload a CSV and get results back in minutes.
Why start here, you may ask? Because there is no point in sending re-engagement emails to addresses that will bounce no matter what. Remove the invalid ones first. That way, every other step you take is working on addresses that could actually be real.
Step 2: Remove Hard Bounces Right Away
A hard bounce is a dead end. The address does not exist. The inbox is gone. The domain no longer works. When you see a hard bounce, remove that contact from your list that same day.
Why the urgency? Because every time you send to a dead address, you are hurting yourself. Inbox providers track your bounce rate closely. A bounce rate above 2% starts to raise eyebrows. Push it past 5%, and you are asking for trouble. Providers will throttle your sending, filter your emails to spam, or block you outright. One bad address does not sink you. Hundreds of them sent over and over will.
Most email platforms handle hard bounces automatically. They mark the address as undeliverable and stop sending to it. That sounds helpful, and it is, but do not rely on it blindly.
Check your settings. Some platforms keep hard bounces on your list and keep charging you for them. Others suppress them only temporarily, then let them back in. Know what your platform does and take control of it yourself.
Here is what to look for in your bounce report. A hard bounce usually comes with a code like 550 or a message that says “user unknown” or “mailbox not found.” Those are clear. Remove them. No second chances. No re-engagement email. They are gone.
Soft bounces are a different story. A soft bounce might say “mailbox full” or “server temporarily unavailable.” That address could still be real. Give it a few tries over the next week or two. If it keeps bouncing, treat it like a hard bounce and remove it. If it clears up, keep the contact.
One more thing. Do not just delete hard bounces and forget them. Keep a suppression list. That way, if the same address tries to sign up again, you can block it before it gets back on your list. Some platforms do this for you. If yours does not, keep a simple spreadsheet of removed addresses and check new signups against it.
The bottom line is simple. Hard bounces are trash. Take them out the moment you see them. Your sender reputation depends on it.
Step 3: Find and Remove Duplicates
Duplicates are sneaky. They hide in your list, sometimes for years, and you never notice until you look closely. Someone signs up with their work email on Monday, then forgets and signs up again with their personal email on Friday. Or they use the same address twice because they were not sure the first sign-up went through. Either way, you end up paying for the same person two or three times.
Why does this matter? For starters, it costs you money. Most email platforms charge by the number of contacts you have. If 500 of your 5,000 contacts are duplicates, you are paying for 500 people who aren’t separate subscribers. Over a year, that adds up.
It also messes with your data. When the same person gets counted twice, your open rates and click rates get skewed. You might think you have 5,000 subscribers when you really have 4,500 real people. That throws off every decision you make based on list size or engagement.
And there is another problem. Duplicates can make you look spammy. If someone gets two copies of the same email, they might mark one as spam. That one spam complaint hurts your reputation, even though the other copy went to the same person. Inbox providers do not care about your intentions. They just see a complaint.
Finding duplicates is easier than it sounds. Most email platforms have a built-in duplicate finder. Look in your list settings or contact management area. It usually takes one click to scan your list and flag matching addresses. If your platform does not have this feature, export your list to a CSV file and open it in a spreadsheet. Use the remove duplicates function. It will catch exact matches in seconds.
After you clean up the duplicates, set a rule for new signups. Use double opt-in so people confirm their address before they get added. That cuts down on accidental duplicates.
Step 4: Check for Role-Based Addresses
Role-based addresses are the ones that start with a job title or a department instead of a person’s name. You have seen them before. Info@. Support@. Sales@. Admin@. Billing@. Noreply@. These addresses exist for a reason, but that reason is rarely to read your marketing emails.
Think about who checks an info@ inbox. It could be a shared login used by five people. It could be a ticketing system that never lets a real human see your message. It could be an account nobody has touched in two years. The odds that your email gets opened by someone who cares are low. Very low.
There is another problem. Role-based addresses often come with spam traps attached. A spam trap is an address that inbox providers set up to catch senders who do not clean their lists. These traps are not real people. They never opt in. If you keep sending to one, providers mark you as a spammer. That can get your whole domain blacklisted. Many spam traps hide behind role-based addresses because they look official and harmless.
So how do you handle them? Start by pulling up your list and searching for the usual suspects. Look for anything that starts with info, support, sales, admin, billing, contact, help, office, team, hello, or noreply. Also check for postmaster@ and abuse@. Those are almost always traps or dead ends.
Now, do not delete every role-based address on sight. There are exceptions. If you run a B2B business and a small company uses info@ as their main contact, that address might reach a real person who makes decisions. The same goes for a solo business owner who uses hello@ as their personal inbox. You have to use judgment.
Here is a simple way to decide. Look at the engagement history for each role-based address. If it has opened or clicked your emails in the last 90 days, keep it. Someone real is on the other end. If it has never opened anything, remove it. No hesitation.
If you are not sure, send a single re-engagement email to that group. Ask if they want to stay on your list. Anyone who clicks stays. Everyone else goes. That way, you are not guessing. You are letting the data decide.
One last tip. When someone signs up with a role-based address, flag it in your system. Add a tag or a note. That way, you can review it later before it causes problems. A little attention now saves you a big headache down the road.
Role-based addresses look harmless. They are not. Clean them out, and your list gets healthier. Keep them, and you risk your sender reputation for people who will never become customers.
Step 5: Look At Engagement Data
This is the heart of email scrubbing. Validation checks catch broken email addresses. Engagement data catches the ones that are alive but no longer interested. That second group is bigger than most people realize, and it does more damage than a bad address ever could.
Here is why. A hard bounce is obvious. The address fails; you remove it, done. But what about a subscriber who signed up two years ago and hasn’t opened an email since? That address still works. Your emails get delivered. No bounce. No error. Nothing tells you anything is wrong. So you keep sending, month after month, to someone who deleted your last twenty emails without reading a single one.
Inbox providers see this. They track how people interact with your emails. When a large share of your list never opens, never clicks, and never replies, providers decide your emails are not wanted. They start routing you to spam. It does not matter that some of your subscribers love your content. The inactive ones drag everyone down with them.
So how do you find them? Pull up your engagement reports. Most email platforms show you the last open date and last click date for every contact. Export that data or view it in your dashboard. Then sort your list into buckets.
Here is a simple way to break it down:
Opened in the last 90 days: These are your active subscribers. Keep them. They want to hear from you.
Opened 90 to 180 days ago: They are slipping. They still know who you are, but you are not top of mind. Put them in a re-engagement campaign.
No opens in 180 days or more: They are gone. They may not have unsubscribed, but they have checked out. Give them one last chance with a re-engagement email, then remove them if they do not respond.
Those time frames are a starting point, not a rule. Adjust them based on how often you send. If you email every day, 90 days of silence is a long time. If you send once a month, give them a bit more room. The principle stays the same. The longer someone ignores you, the less likely they are to come back.
One thing to watch out for: Apple’s Mail Privacy Protection. It can make it look like someone opened your email when they did not. If a large chunk of your list uses Apple Mail, opens are not as reliable as they used to be. Clicks are better. If someone clicked a link in the last 90 days, they are engaged. If you are not sure, lean on clicks over opens.
Do not skip this step because it feels harsh. Removing inactive subscribers is not losing people. They were already lost. You are just cleaning up the record so you can see the truth about your list. A smaller list of engaged people will outperform a bigger list of ghosts every single time.
Step 6: Send a Re-Engagement Campaign Before You Delete
You have found your inactive subscribers. Your first instinct might be to delete them and move on. Do not do that yet. Some of them are not gone. They are just distracted. A re-engagement campaign gives them one clear chance to come back before you show them the door.
Think about why someone stops opening your emails. It is rarely personal. They got busy. They changed jobs. Their inbox got flooded. They meant to read your last email and forgot. Life happens. A single email that asks a simple question can wake some of them up.
Here is how to build a re-engagement campaign that actually works.
1. Make the subject line honest: Do not trick them. Do not use clickbait. Tell them exactly what the email is about. Something like “Do you still want to hear from us?” or “Should we stop emailing you?” works better than a clever headline. The honesty cuts through the noise and gets attention.
2. Keep the email short: Two or three sentences. Ask if they still want to hear from you. Give them one clear button to click if the answer is yes. Do not bury the button under paragraphs of text. Respect their time.
3. Give them a reason to stay: A small incentive helps. A discount. A free guide. Early access to something new. It does not have to be big. It just has to be worth one click. If you have nothing to offer, that is fine too. Some people will stay just because you asked.
4. Send two or three emails, not one: One email gets missed. Two emails get noticed. Three emails get a decision. Space them out over a week or two. Keep each one short and direct. By the third email, make it clear that this is the last one. Something like “This is our final email unless you tell us otherwise.” That line gets clicks.
5. Watch the results closely: Anyone who opens or clicks stays on your list. Anyone who does nothing after the final email gets removed. No exceptions. Do not keep them around because you feel bad. They had their chance. They made their choice.
One more thing. Make the opt-out easy. If someone wants to leave, let them leave in one click. Do not make them log in. Do not ask them to update preferences. Do not send them to a survey. One click and they are gone. The harder you make it to leave, the more likely they are to mark you as spam instead. That hurts far more than losing one subscriber.
Step 7: Set Up a Recurring Cleaning Schedule
Cleaning your email list once is not enough. Think about what happens after you finish. New people sign up. Some of them use fake addresses. Others sign up with good intentions and then stop opening your emails six months later. People change jobs. They abandon old inboxes. They forget they ever subscribed. The mess does not stay gone. It builds back up, slowly, whether you notice it or not.
That is why you need a schedule. A one-time cleanup is like going to the dentist once and never brushing your teeth again. It helps for a while, then everything falls apart. Regular scrubbing keeps your list healthy all year round, not just on the day you decide to fix it.
Here is a rhythm that works for most email marketers. Adjust it to fit how often you send and how fast your list grows.
Every month: Handle the basics.
This is your quick pass. Remove hard bounces. Remove unsubscribes. Remove spam complaints. Check for new duplicates. This should take less than an hour once you know your way around your platform. Do it on the same day each month so it becomes a habit. The first of the month works well. So does the last Friday. Pick a day and stick to it.
Every three months: Run a full validation check.
Upload your list to a verification service. Let it flag invalid addresses, typos, spam traps, and risky contacts. Remove whatever it finds. This deeper check catches problems that slip past your monthly routine. It also gives you a fresh baseline for your list quality.
Every six months: Review engagement data and run a re-engagement campaign.
Pull up your open and click reports. Find the subscribers who have gone quiet. Send them a win-back campaign. Give them two or three emails to respond. Anyone who does not reply gets removed. This keeps your active list sharp and your sender reputation clean.
Once a year: Do a full audit.
Look at the big picture. How has your list size changed? Are your open rates improving or sliding? Are there segments you have been ignoring? Is your signup process letting in junk addresses? A yearly audit helps you spot trends before they become problems. It also gives you a chance to update your forms, your welcome emails, and your opt-in settings.
Put every one of these tasks on your calendar. Set reminders. Treat them like meetings with a client. If you leave list cleaning to chance, it will not happen. Something else will always feel more urgent. But a dirty list quietly damages everything you do. The emails you send to dead addresses are emails you could have sent to real people.
One more tip. Write down what you do each time. Keep a simple log. Note the date, what you cleaned, and how many contacts you removed. After a year, you will see patterns. Maybe your bounce rate spikes every January when people change jobs. Maybe your inactive list grows fastest in the summer. That knowledge helps you plan ahead and stay on top of things.
Email List Cleaning Best Practices
1. Use double opt-in from day one: Double opt-in means someone signs up, then confirms their address through a link in a welcome email. It adds one extra step. That step is worth it. It filters out typos, fake addresses, and bots. It also gives you proof that the person actually wants your emails, which matters for legal compliance and for your sender reputation. Yes, you will lose a few signups. The ones you keep will be far more engaged.
2. Send a welcome email right away: The first email is the most important one. Send it within minutes of signup. If the address is bad, it bounces right away, and you catch the problem before it reaches the rest of your list. The welcome email also sets expectations. Tell people what they will get from you and how often. That cuts down on unsubscribes later.
3. Ask people to whitelist you: In your welcome email, ask subscribers to add your address to their contacts or safe sender list. This tells inbox providers that your emails are wanted. It is a small request with a big payoff. People who whitelist you are far more likely to see your emails in their inbox than in their spam folder.
4. Make unsubscribing easy: This sounds backward. Why make it easy for people to leave? Because the alternative is worse. If someone cannot find the unsubscribe link, they will mark your email as spam instead. A spam complaint hurts your reputation far more than a clean unsubscribe. One click and they are gone. Everyone wins.
5. Never buy an email list: This is the fastest way to destroy your sender reputation. Bought lists are full of people who never asked to hear from you. They will not open your emails. They will mark you as spam. Some of those addresses are spam traps. There is no shortcut here. Build your list the slow, honest way.
6. Set expectations at signup: Tell people exactly what they are signing up for. How often will you email? What will you send? A weekly newsletter is different from daily promotions. If people know what to expect, they are less likely to feel tricked and more likely to stay engaged.
7. Watch your bounce rate like a hawk: Check it every month. A bounce rate under 2% is healthy. Anything above that needs attention. If it spikes, stop and figure out why. Maybe you imported a bad batch of contacts. Maybe your signup form is letting in junk. Catch it early and fix it before it damages your reputation.
8. Segment your list: Not everyone wants the same thing. Some people want your weekly tips. Others only want discount codes. Segment your list by interest, engagement, or signup source. Then send relevant emails to each group. Relevant emails get opened. Irrelevant emails get ignored or marked as spam.
9. Keep an eye on your spam complaint rate: Most platforms show this in your reports. Anything above 0.1% is a warning sign. Above 0.3% and you have a real problem. If your complaint rate climbs, look at what you are sending and who you are sending it to. The fix is usually a mix of better content and a cleaner list.
10. Re-engage before you remove: Do not delete inactive subscribers without giving them a chance. A short win-back campaign gives them a voice. Some will come back. The rest confirm that they are done. Either way, you get a clear answer.
11. Keep a suppression list: When you remove hard bounces, spam complaints, and unsubscribes, keep a record of those addresses. That way, if one of them tries to sign up again, you can block it. Some platforms handle this automatically. If yours does not, keep a simple spreadsheet and check new signups against it.
12. Review your signup forms regularly: Bots and pranksters find ways to slip through. Check your forms every few months. Make sure your CAPTCHA is working. Look at recent signups for patterns that look fake. A little attention here saves you a lot of cleaning later.
Prevent Bad Signups With MailOptin
This guide comes down to one idea. The best email list is a clean email list. You can scrub, verify, and re-engage all you want, but if junk keeps pouring in through your signup forms, you are fighting a losing battle. You clean the list today, and tomorrow the bots and fake addresses are back. That is where MailOptin comes in.
MailOptin is an excellent popup maker, email newsletter, user registration, and form builder plugin for WordPress. It lets you build popups, subscribe forms, notification bars, slide-ins, and sidebar widgets without touching a line of code.
You can connect those forms to Mailchimp, AWeber, Constant Contact, Kit (ConvertKit), ActiveCampaign, Brevo, Klaviyo, and dozens of other email platforms and CRMs.
But here is the part that matters for this article. MailOptin helps you stop bad addresses before they ever reach your list. Here is how it does it:
1. Honeypot Protection: Every form you build with MailOptin comes with Honeypot protection out of the box. Honeypot works by hiding a field that real people never see. Bots fill it in anyway. When they do, MailOptin quietly blocks the submission. No CAPTCHA puzzle. No friction for your visitors. Just a clean, invisible layer of defense.
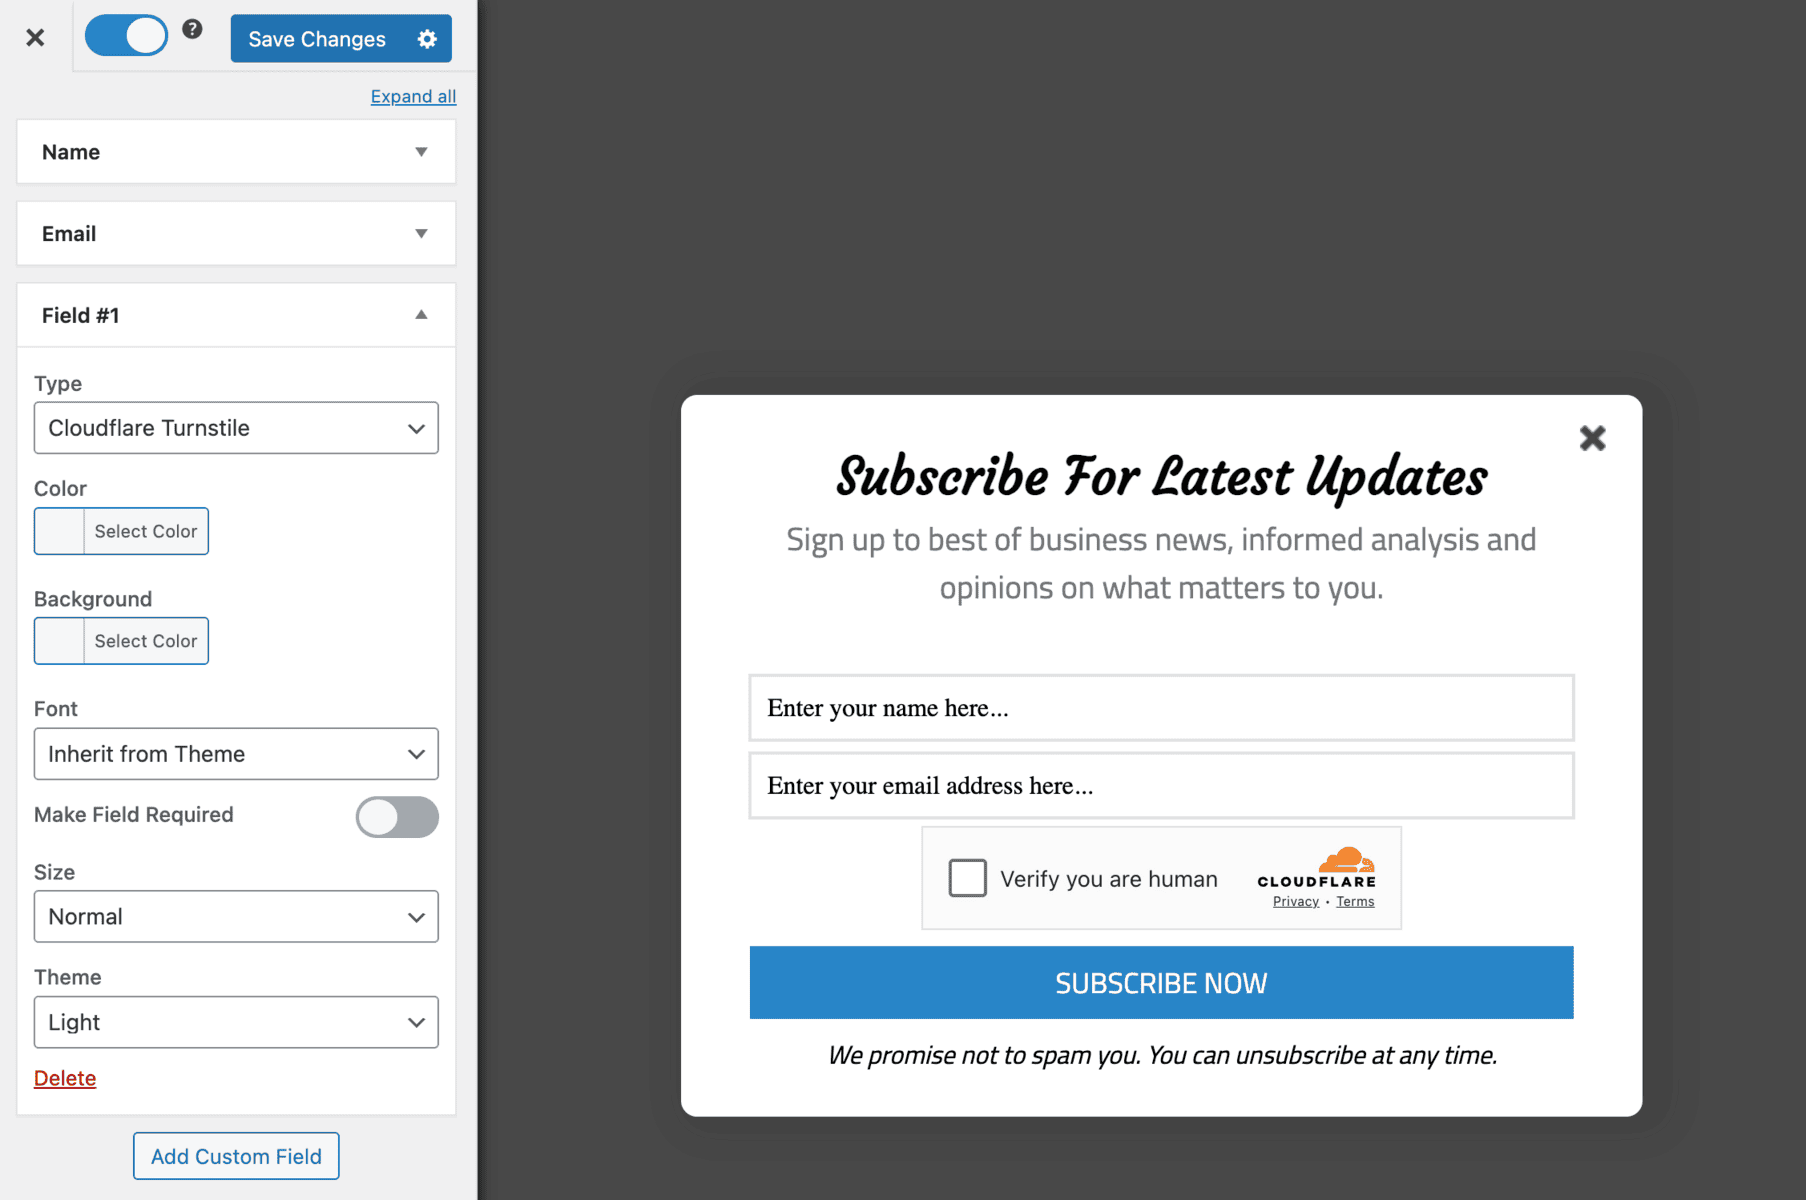
2. Cloudflare Turnstile: Cloudflare Turnstile is a modern alternative to the old CAPTCHA experience. It checks whether a visitor is human without asking them to click fire hydrants or type squiggly letters. Most of the time, it runs in the background and visitors never even know it is there.
With MailOptin, you can add Turnstile protection to any optin form in a few clicks. You grab your site key and secret key from Cloudflare, paste them into MailOptin’s settings, and turn it on. That is it. The protection runs silently, and real subscribers sail through while bots get stopped at the door.
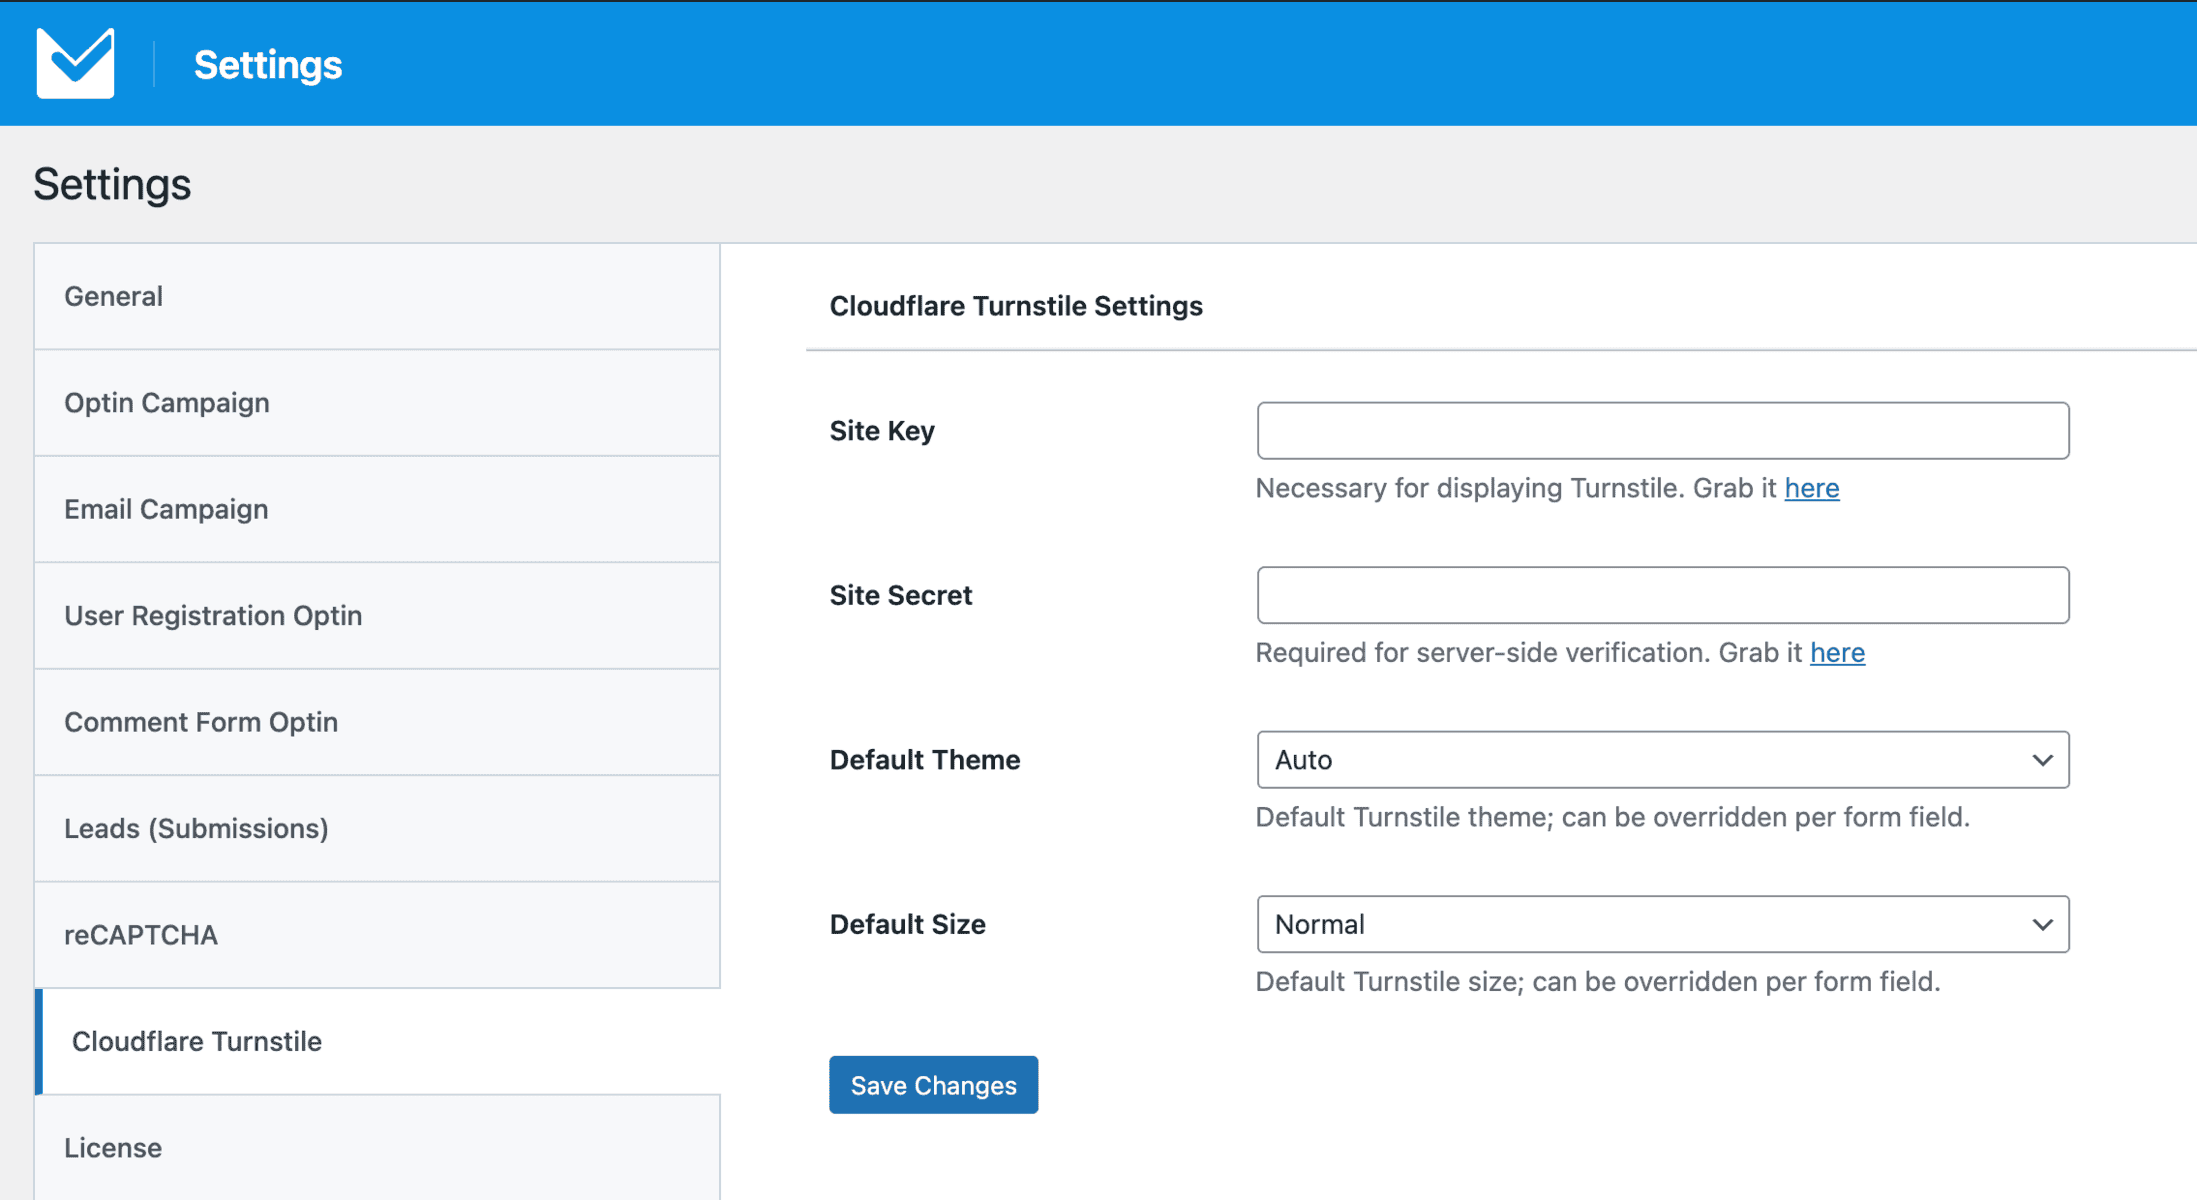
For a detailed setup guide, see our guide on protecting WordPress forms with Cloudflare Turnstile.
3. Google reCAPTCHA: Google reCAPTCHA is the option most people already know. MailOptin supports both reCAPTCHA v2 and v3. Version 2 gives visitors a checkbox or a quick challenge. Version 3 runs invisibly and scores each visitor based on their behavior. Low scores get blocked. High scores pass through without any interaction.
Setting it up works the same way as Turnstile. You register your site with Google, copy your keys, and paste them into MailOptin.
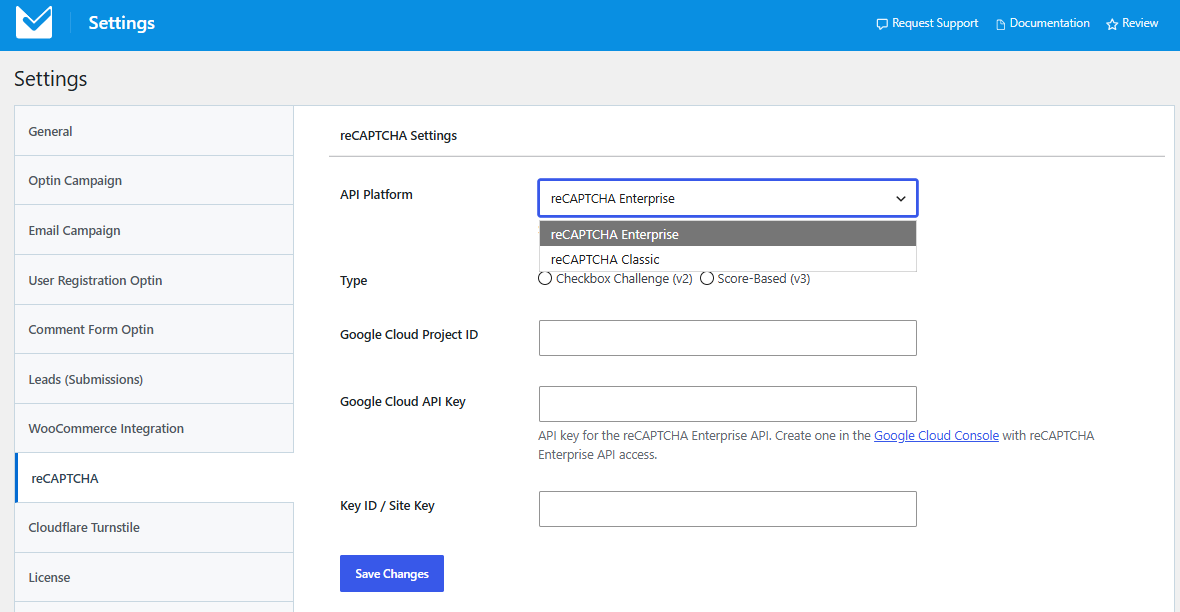
Learn how to set it up in our guide to adding Google reCAPTCHA to WordPress forms.
Frequently Asked Questions About Email Scrubbing
Q1. What is email scrubbing in simple terms?
Email scrubbing is the process of cleaning your email list. You remove addresses that are invalid, inactive, or risky. The goal is to keep only the contacts who are real people and who still want to hear from you. Think of it as housekeeping for your list. You clear out what is broken or unwanted so the healthy part can work the way it should.
Q2. How often should I clean my email list?
At minimum, handle the basics once a month. Remove hard bounces, unsubscribes, and spam complaints. Run a full validation check every three months. Review engagement data and send a re-engagement campaign every six months. Do a complete audit once a year. If your list grows fast or you send often, tighten that schedule. The busier your list, the more often it needs attention.
Q3. What is the difference between a hard bounce and a soft bounce?
A hard bounce means the address is dead. The inbox does not exist. The domain has failed. You can’t reach it. Remove it right away. A soft bounce means the address is real, but the message could not be delivered at that moment. The inbox might be full, or the server might be down. Give soft bounces a few tries. If they keep failing, treat them like hard bounces.
Q4. Can I re-engage inactive subscribers instead of deleting them?
Yes, and you should. Before you remove anyone, send a short win-back campaign. Ask if they still want to hear from you. Give them a reason to stay. Anyone who opens or clicks gets to remain on your list. Anyone who ignores two or three emails gets removed. This is the fairest way to clean a list because you let the subscriber decide.
Q5. Will cleaning my list hurt my subscriber count?
Your count will drop. That is the point. But a smaller list of engaged people will always outperform a bigger list of ghosts. You will see better open rates, click rates, deliverability, and conversions. You may also save money if your email platform charges by contact count. Losing dead weight is not a loss. It is a gain.
Q6. How do I know if my list needs cleaning?
Watch for these signs. Your bounce rate is above 2%. Your open rate keeps sliding. You are paying for contacts who never engage. You see duplicates in your reports. You spot role-based addresses like info@ or support@. Any one of these means it is time to scrub. Two or more means you should have started weeks ago.
Q7. What is the best way to keep my list clean from the start?
Prevention beats cleanup. Use double opt-in so people confirm their address before they join. Add a captcha to your signup forms. MailOptin offers Cloudflare Turnstile, Google reCAPTCHA, and Honeypot protection to block bots. Send a welcome email right away so bad addresses bounce early. Make unsubscribing easy, so people leave instead of marking you as spam. Do these things, and your list stays healthier with less effort.
Q8. Can cleaning my list improve my deliverability?
Yes. This is one of the biggest benefits. Inbox providers watch your bounce rate, your engagement rate, and your spam complaint rate. A clean list keeps all three in good shape. When providers see that people open, click, and reply to your emails, they trust you. That trust puts your messages in the inbox instead of the spam folder.
Q9. Is email scrubbing the same as email verification?
No. Email verification checks whether an email address is valid and can receive messages. Email scrubbing is a broader process that involves reviewing your entire list and deciding what to do with invalid, inactive, duplicate, or unwanted contacts.
Q10. Does email scrubbing help with GDPR compliance?
Yes. Laws like GDPR and CAN-SPAM require you to handle subscriber data with care and to honor opt-outs. A clean list makes compliance easier. When you know everyone on your list opted in, you do not have to worry about sending to people who never gave consent. Regular scrubbing also helps you remove contacts who asked to be forgotten.
Q11. Is email list cleaning the same as email scrubbing?
Yes. Email list cleaning, email list scrubbing, email address scrubbing, and email scrubbing generally refer to the same overall process of maintaining a healthy email list.
Final Thoughts on Email List Scrubbing
A clean email list is not about having fewer subscribers. It is about having the right ones. People who open your emails. People who click. People who actually want to hear from you. That is what email scrubbing gives you.
You started this article wondering what scrubbing means. Now you know. You know how to spot dead addresses. You know how to remove hard bounces and duplicates. You know how to read engagement data and win back the subscribers who drifted away. You know the habits that keep a list healthy instead of letting it rot.
The hard truth is most marketers skip this work. They keep sending to the same bloated list, month after month, watching their results slide. Do not be that marketer. A little effort now saves you a mountain of trouble later.
So open your list. Run the process. Remove the dead weight. Treat your email list like a garden that needs weeding, not a warehouse that just collects dust.
And once it’s clean, keep it that way. Build your forms with MailOptin, turn on spam protection, and let the right people in.