Do you want to create a WordPress registration form with user role selection so visitors can pick the type of account they need when they sign up?
WordPress does not ask. It just hands everyone the same role, usually “Subscriber,” and moves on; for a personal blog, that works fine. For anything bigger, it turns into a headache fast.
Picture this. You run a course platform and need to tell students apart from instructors. Or a marketplace where buyers and sellers need separate access. Or a blog with guest writers who should be able to draft posts while regular readers should not. When every new signup lands in the same bucket, you end up fixing roles by hand. Over and over again.
Role selection fixes that. Users pick an approved role when they register. WordPress assigns it right away. You stop babysitting your user list, and your visitors get where they need to go without waiting on you.
In this guide, I will show you how to set this up with MailOptin. We will build an inline registration form, add a role selection field, hook it into the WordPress User Registration integration, and place the form on your posts or pages. I will also walk you through doing the same thing with ProfilePress if that is the route you prefer.
Let’s get started.
Why Let Users Select Their WordPress User Role?
1. Better user organization: Users can be automatically placed into the appropriate role when they create an account. This makes it easier to keep different user types organized.
2. Less manual work: Without role selection, you may need to check new accounts and manually update their roles. Letting users choose their role can reduce this extra administrative work.
3. A better registration experience: Users can select the account type that matches how they plan to use your website. This makes the signup process more relevant.
4. Useful for different types of websites: Role selection can be particularly useful for membership sites, marketplaces, online communities, learning platforms, and websites where users have different responsibilities.
5. Easier account management: Assigning the right role during registration helps ensure users have the appropriate permissions from the start, making user management easier as your website grows.
6. More efficient onboarding: Users can receive the appropriate access immediately after creating their account, rather than waiting for an administrator to assign their role manually.
Using MailOptin to Create a WordPress Registration Form With User Role Selection
MailOptin is an excellent WordPress form builder, popup, and lead generation plugin that lets you create optin forms, user registration forms, popups, and email newsletters.
In the steps below, we’ll show you how to use MailOptin to create a WordPress registration form with user role selection, allowing users to choose their preferred account type when registering.
Step 1: Install and Activate MailOptin
Start by downloading a copy of MailOptin from the pricing page to your computer.
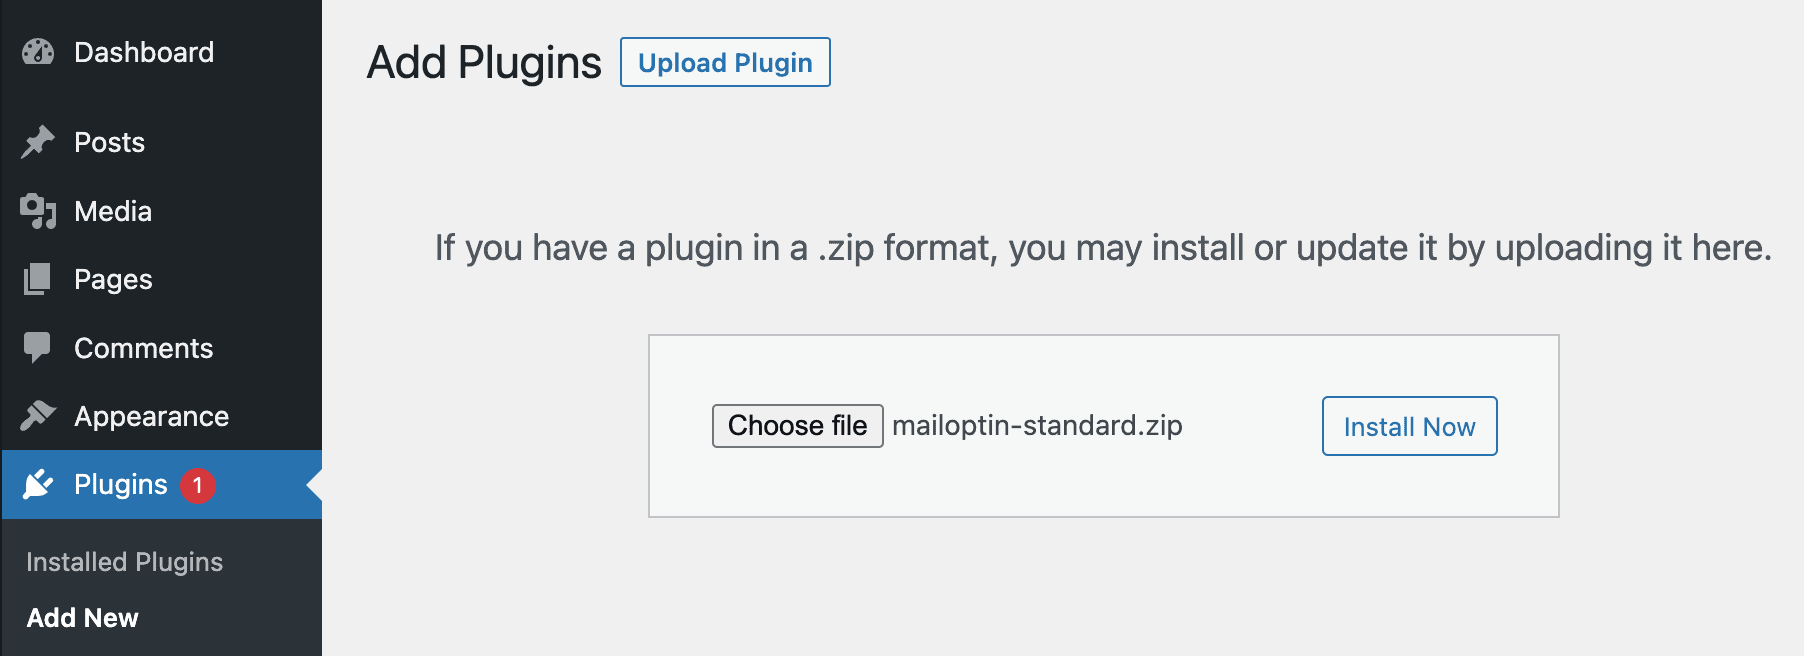
Next, log into your WordPress admin area. Go to Plugins > Add New, then click the Upload Plugin button near the top. Click it, select the ZIP file you saved earlier, and click Install Now.
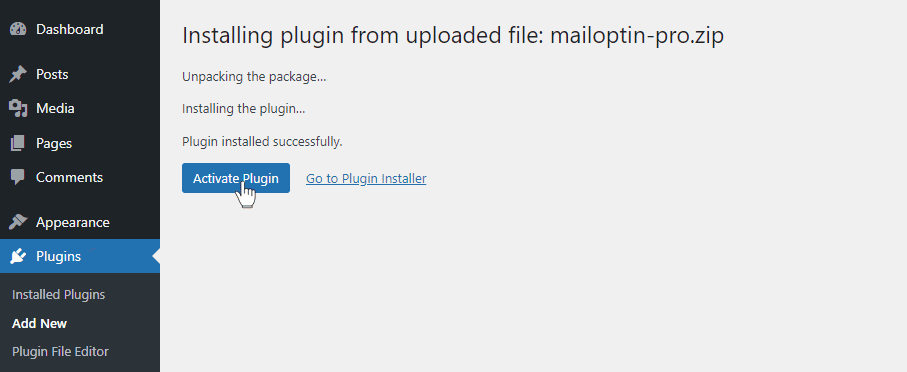
WordPress will handle the rest. Once the installation finishes, click Activate, and we’re good to go.
Step 2: Create an Optin Campaign
MailOptin offers several optin campaign types, including lightboxes, popups, in-post forms, slide-ins, scroll-triggered boxes, notification bars, and sidebar widgets.
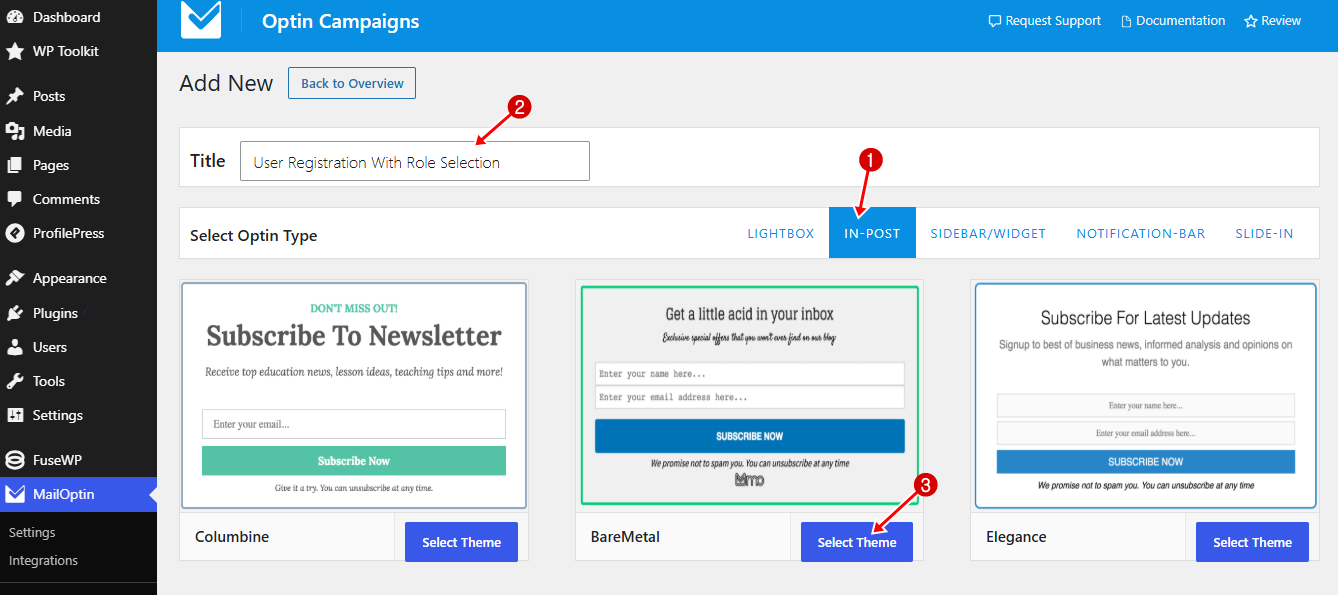
For this guide, we’ll create an in-post optin so you can place the registration form directly inside your WordPress content.
To do this, go to MailOptin > Optin Campaigns > Add New from your WordPress dashboard.

Name your campaign so you can easily identify it later. For example: “User Registration With Role Selection”.
Next, select In Post as the optin type and choose a template that matches your website’s look and feel.
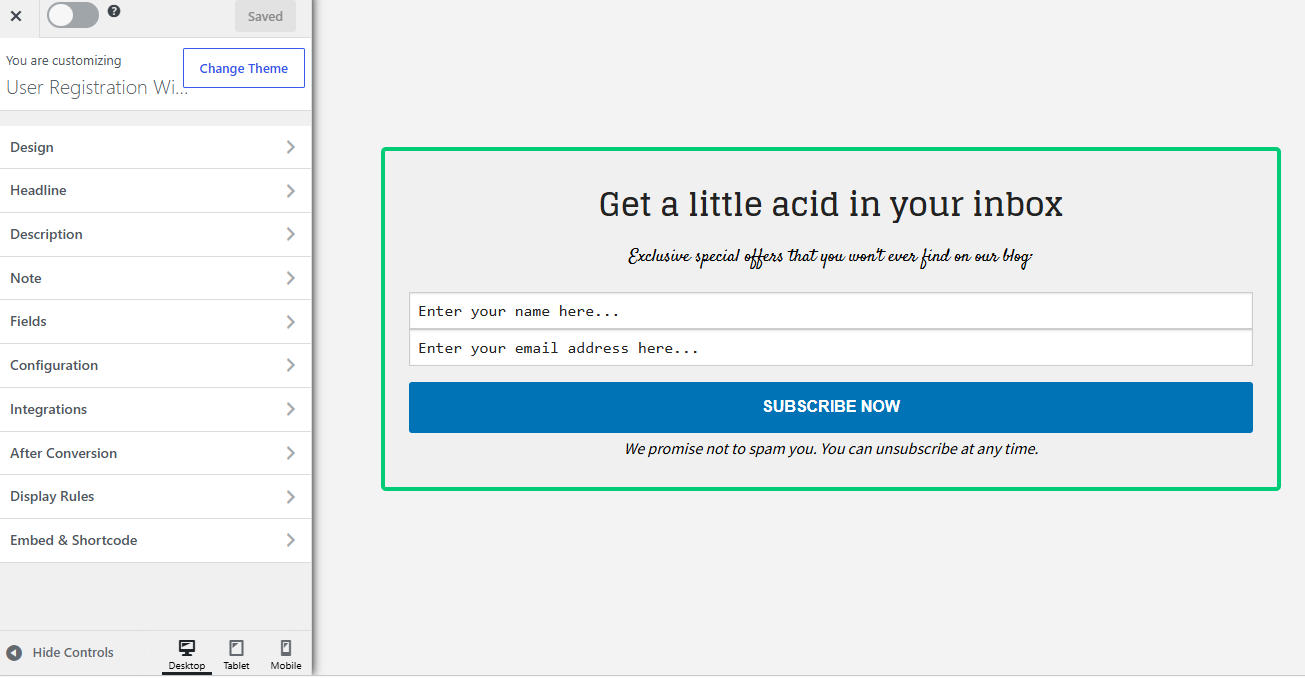
Once you select a template, MailOptin will open the form builder. From there, you can customize the registration form, including user role selection, to your heart’s content.
You can change the headline, description, note, fields, and other elements to suit your needs.
Step 3: Add Your Registration Fields
Now that you have created your optin campaign, the next step is to add the fields you want visitors to complete when creating their account.
Depending on the type of website you run, your registration form may include fields such as:
- Name
- Username
- Email Address
- Password
- Confirm Password
- User Role
You don’t necessarily need to add all of these fields. Choose the ones that make sense for your registration process.
To add a field, open the Fields section in the MailOptin builder and select the field you want to use.
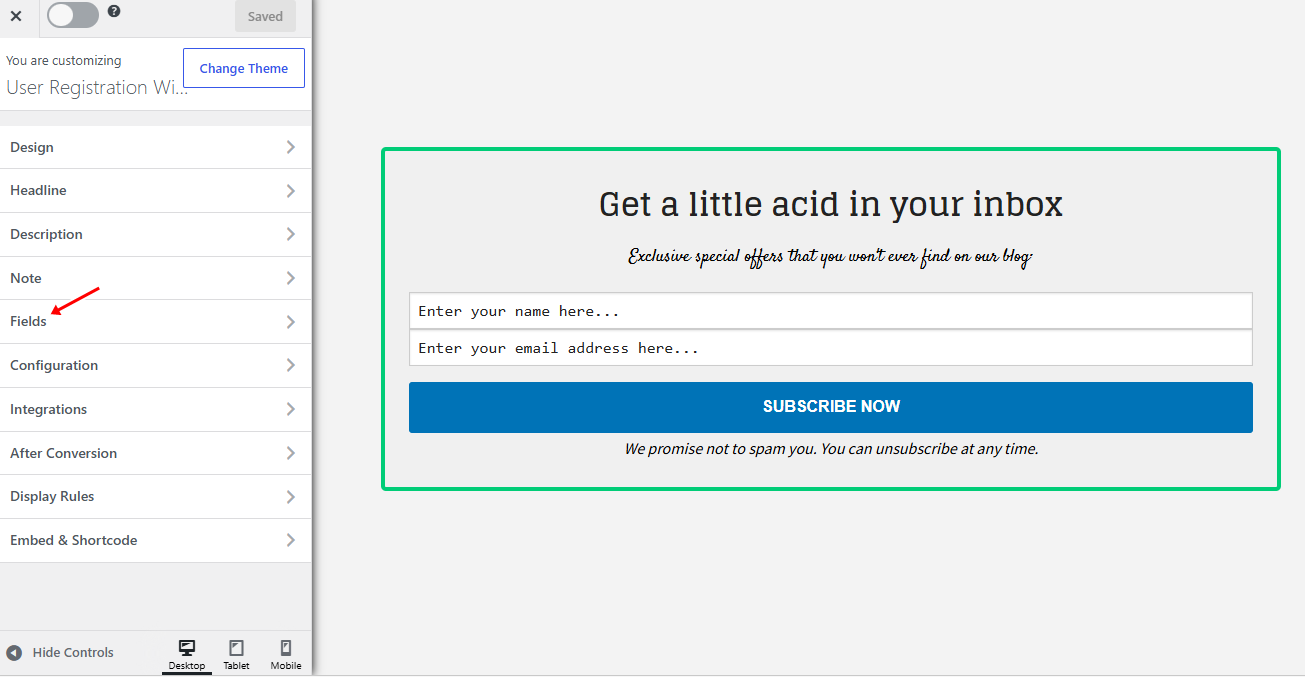
You can add, remove, or rearrange the fields to create a registration form that works for your website.
To add the user role field and let visitors choose the account type they want when registering, create a custom field and name it User Role.
Then, select List Selection as the field type. For the integration, choose WordPress User Registration.
Then configure the options users can select, such as Subscriber, Author, Contributor, or Editor, depending on the roles you want to make available on your website.
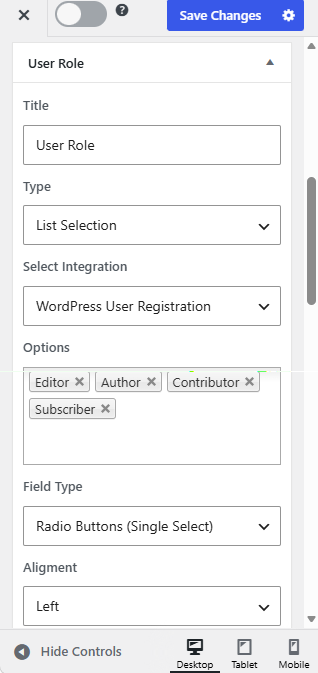
Next, choose how you want the role options to appear in your custom WordPress registration form, such as a dropdown or another field type, and configure the remaining settings as needed.
Step 4: Connect the Form to WordPress User Registration
With your registration fields in place, the next step is to connect the signup form to WordPress so submitted information can create a user account with their selected user role.
To do this, open the Integration panel and select WordPress User Registration.
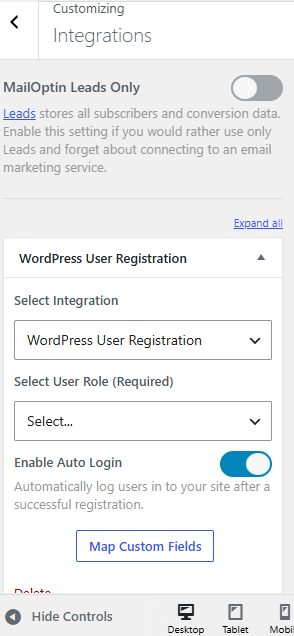
You can also enable Autologin if you want users to log in automatically after completing the registration form.
If you added any custom fields to the form, click Map Custom Fields to connect them to the corresponding WordPress user profile fields. This ensures that the information users provide is saved to the right place in their account.
Step 5: Set Display Rules
MailOptin’s Display Rules let you control where and when your registration form appears on your website. This is useful if you only want the form to show on specific pages, posts, or sections of your site.
To configure this, open the Display Rules panel and set the conditions according to your needs.
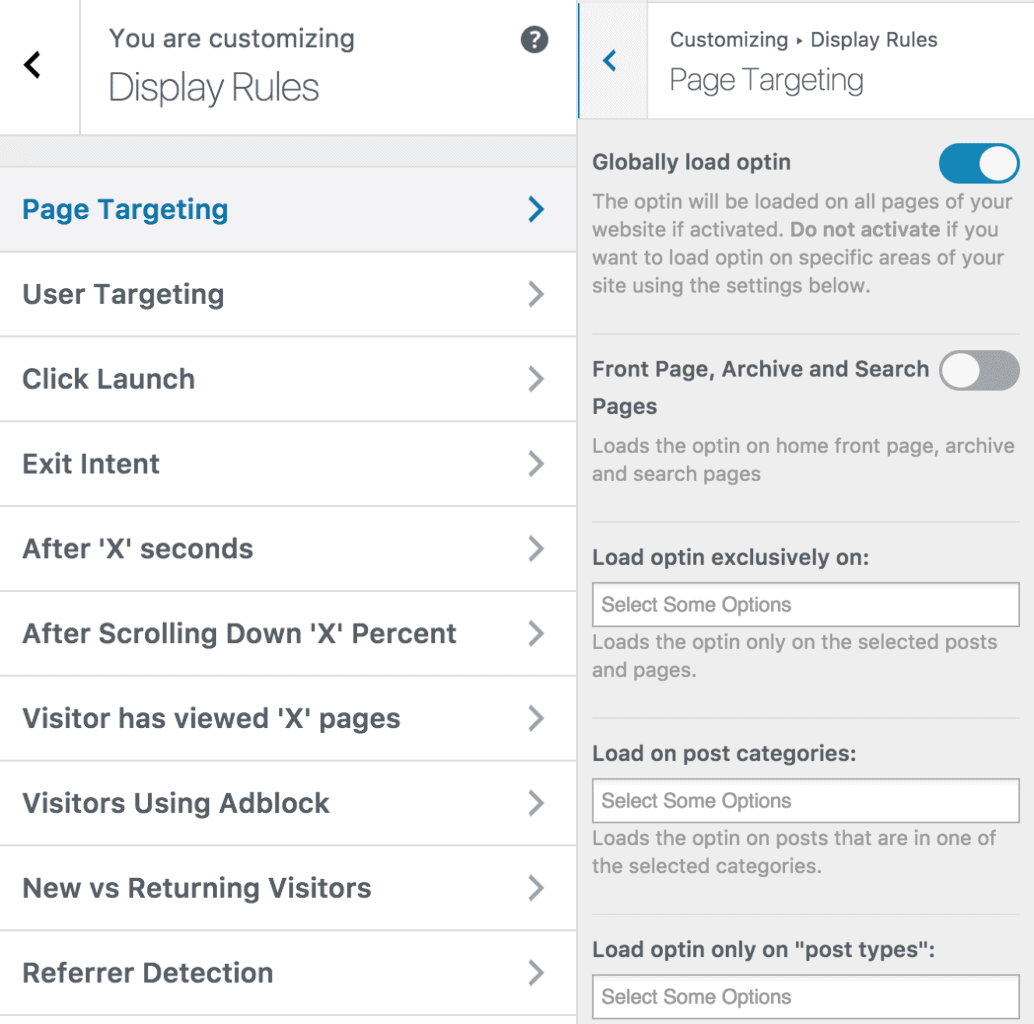
If you want the registration form to appear across your entire WordPress website, enable Globally Load Optin. This will make the optin available throughout your site.
If you want it to appear only in specific locations, use MailOptin’s page-level targeting options to choose the pages or posts where the form should appear. You can also configure the available triggers to control when the optin should appear.
Once you’ve set your preferred display rules, move to the next step.
Step 6: Save and Activate the Form
Now that you’ve configured the fields, integration, mappings, and display rules, click Save, then activate the optin campaign using the toggle at the top of the builder.
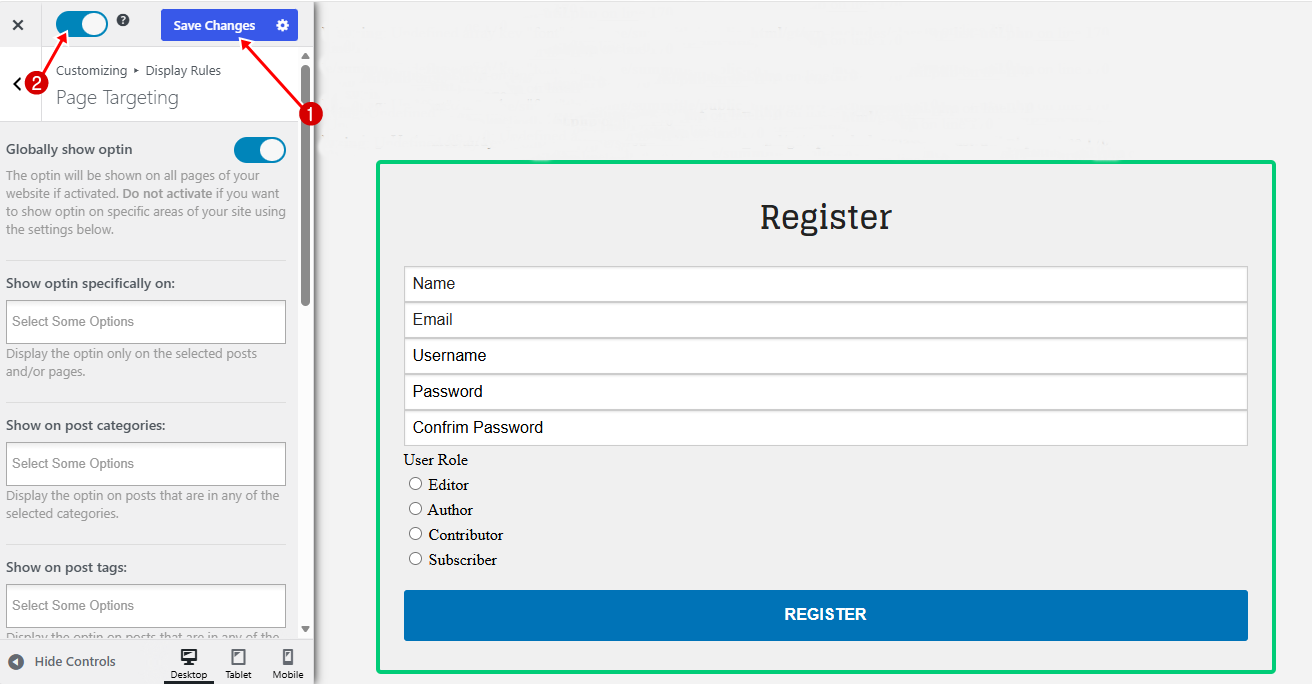
With this done, your WordPress registration form with user role selection is now active and ready for visitors to use.
Step 7: Test Your Form
Before you consider the setup complete, test the registration form with user role selection yourself. This helps you catch any issues with the fields, user role selection, or registration process before real visitors start using it.
Open the page or post where you added the form and submit a test registration. Make sure that:
- All required fields work as expected.
- The user role selection field displays the correct options.
- The selected role is assigned to the new user.
- The account is created successfully.
- Users are logged in automatically if you enabled Autologin.
- Any custom fields you added are saved correctly.
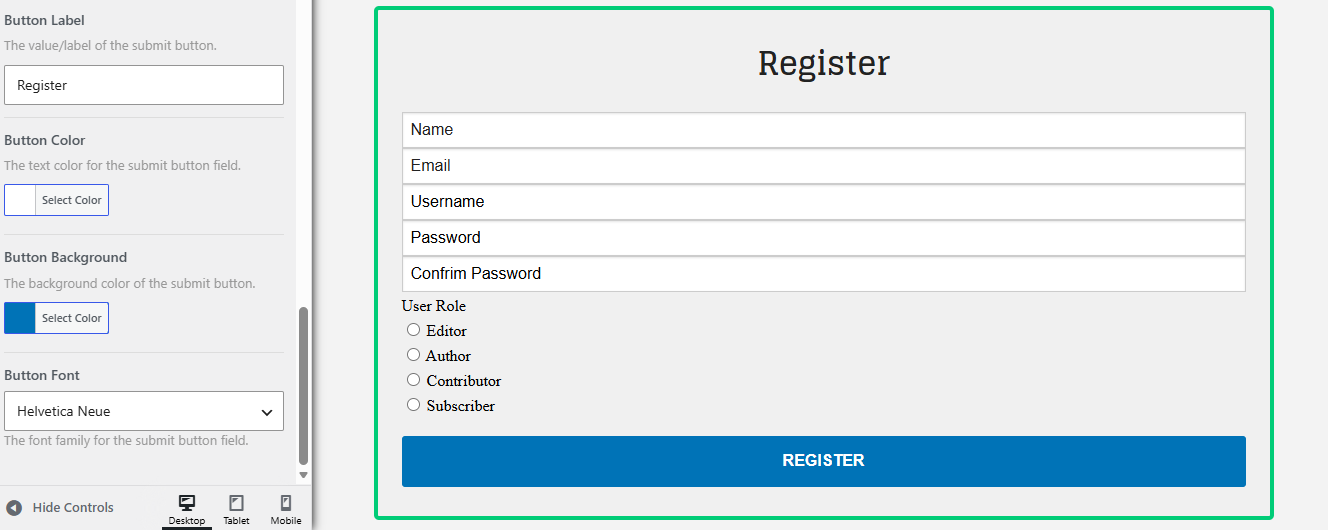
Below is a screenshot of our registration form
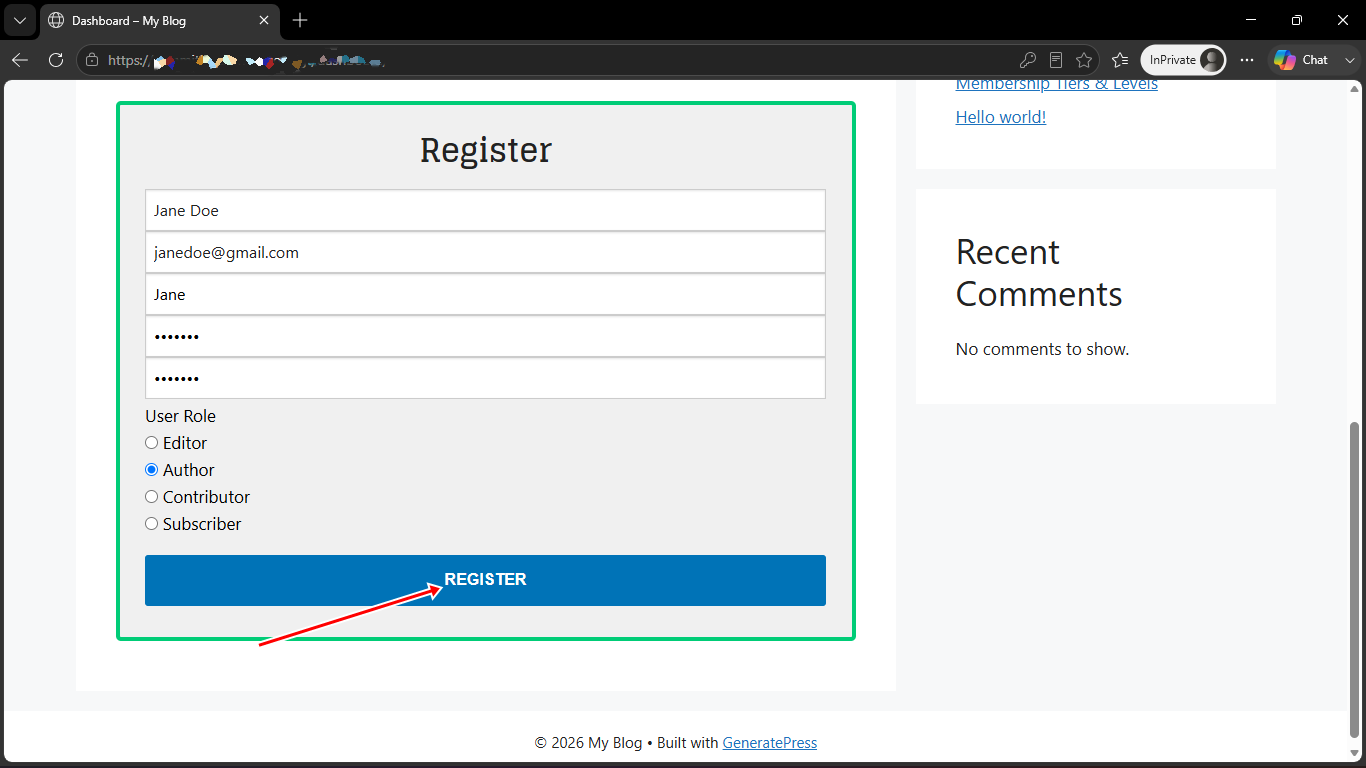
You can also check Users > All Users in your WordPress dashboard to confirm that the test account was created with the selected role.
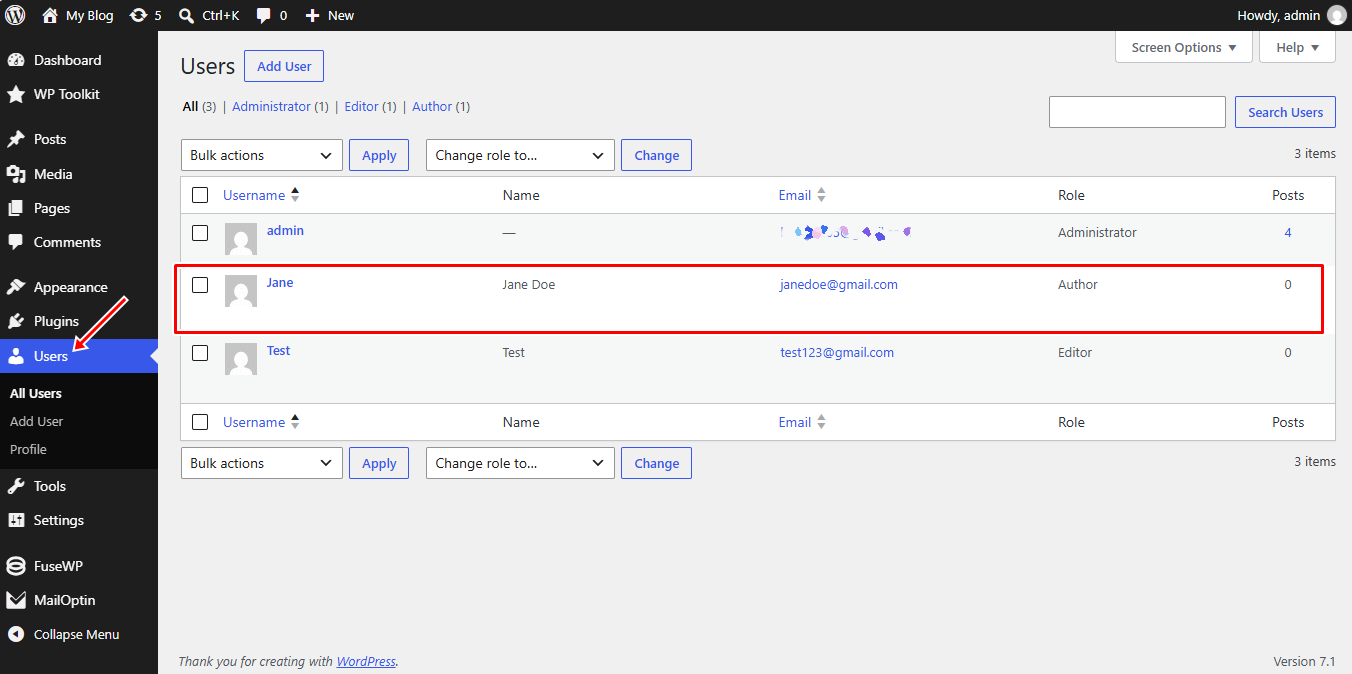
If everything works as expected, your registration form is ready for visitors. But what if something doesn’t work?
Don’t panic. Most issues boil down to one of three things:
- Caching problems: Clear your site cache and browser cache, then test again.
- Integration settings: Double-check that you selected WordPress User Registration as the integration and that all mappings are correct.
- Display rules: Make sure your form’s visibility settings aren’t accidentally hiding it from certain users or devices.
Once you’ve checked these settings and confirmed that the registration process works correctly, your form is ready to accept real users.
Using ProfilePress to Create WordPress Registration Form With User Role Selection
ProfilePress is a powerful WordPress membership plugin that helps you create paid membership sites, set up an online store, and control access to your content. It also lets you add a user role selection field to your registration forms.
With ProfilePress, you can create a frontend user registration form for your WordPress website with a user role selection field using its drag-and-drop builder.
Below, we’ll walk you through setting it up so users can select their preferred role during registration.
Step 1: Install and Activate ProfilePress
To do this, purchase a suitable ProfilePress license. After you purchase it, you’ll receive an email with your plugin download link and license key. You can also download it from your ProfilePress account.
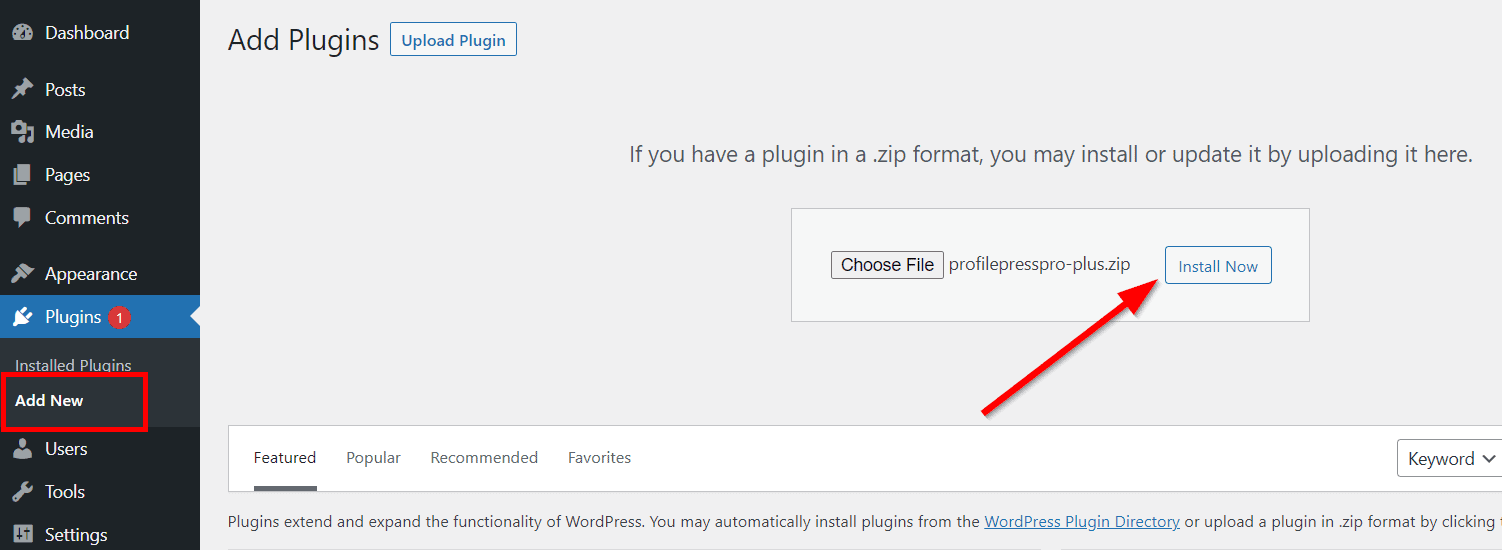
After downloading the ProfilePress plugin, log in to your WordPress dashboard and go to Plugins > Add New > Upload Plugin.
Click Choose File, select the downloaded ZIP file, then click Install Now and Activate.
Step 2: Creating a Custom Registration Form
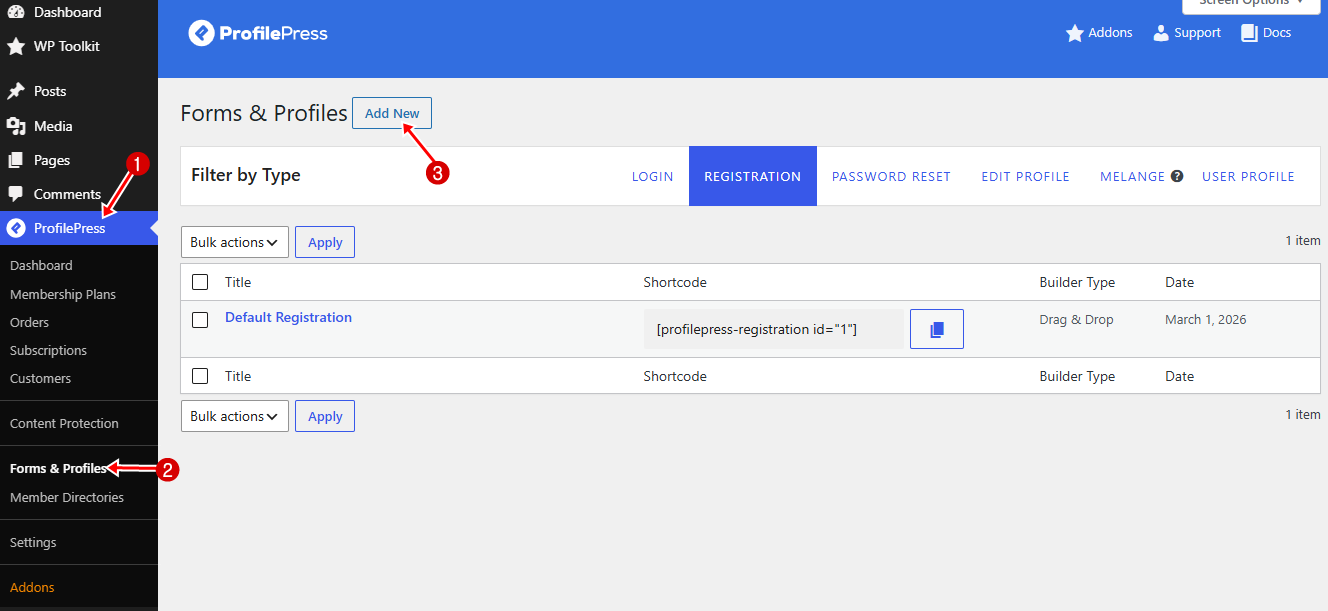
Navigate to ProfilePress > Forms & Profiles, and click on Add New.
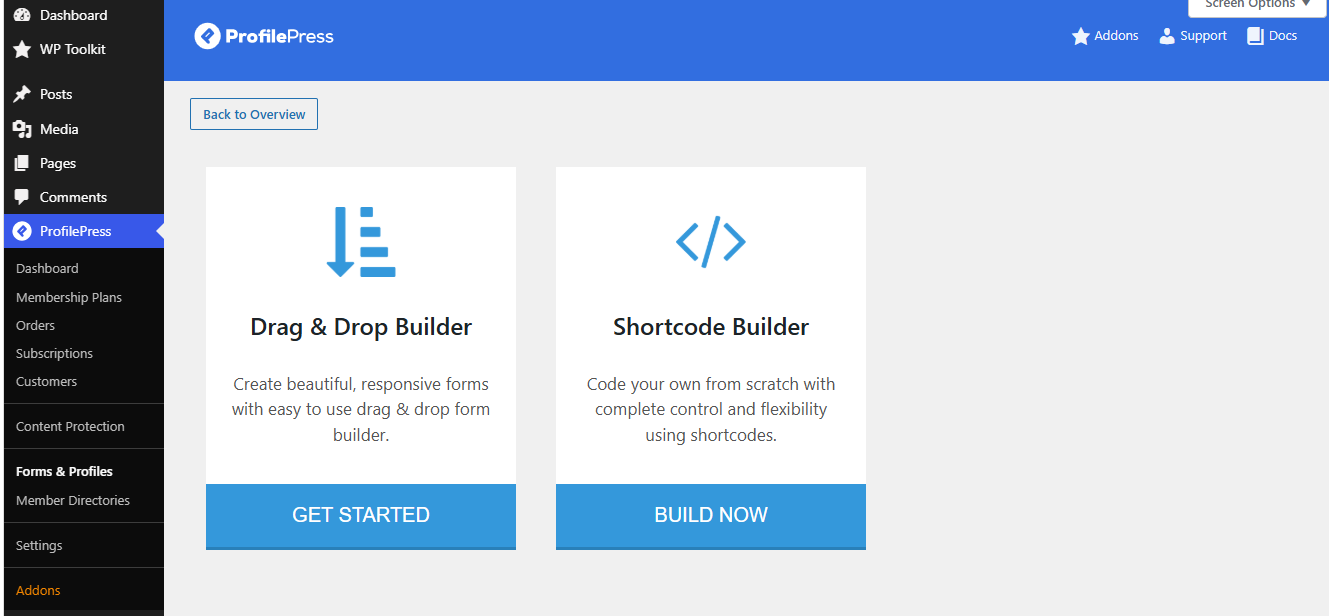
Then you will need to select a builder type, and for this article, we will show you how to use both the Drag & Drop Builder and the Shortcode Builder.
Using Shortcode Builder
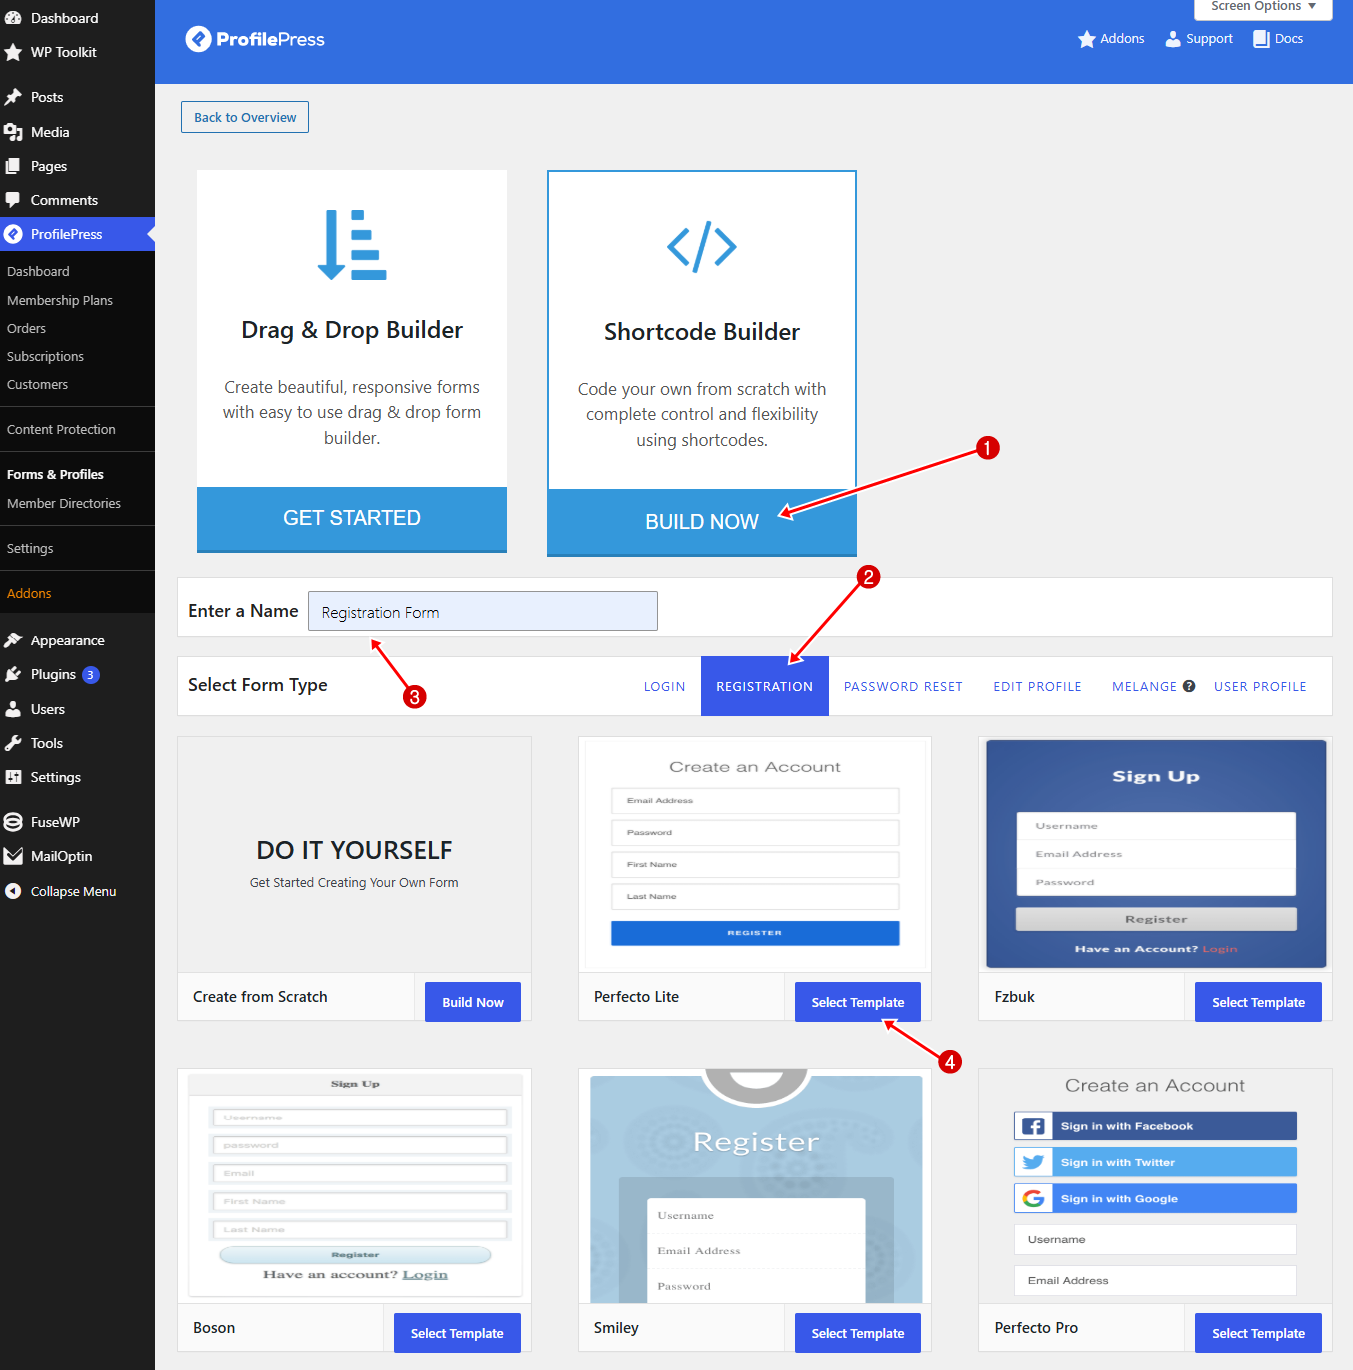
Click Build Now, then select the Registration tab and enter a name for the WordPress registration form with user role selection.
Next, you can choose from the templates provided by ProfilePress or create your form from scratch. For this guide, we’ll use the Perfecto Lite template.
The Shortcode Builder gives you more control over how your registration form looks and works. You can use HTML and CSS to customize the form’s design while adding the required fields with ProfilePress shortcodes.
To view all the available shortcodes, click the Available Shortcodes button.
To let users select their preferred role during registration, add the shortcode to your form. This will display a role selection field that allows users to choose from the roles you have made available.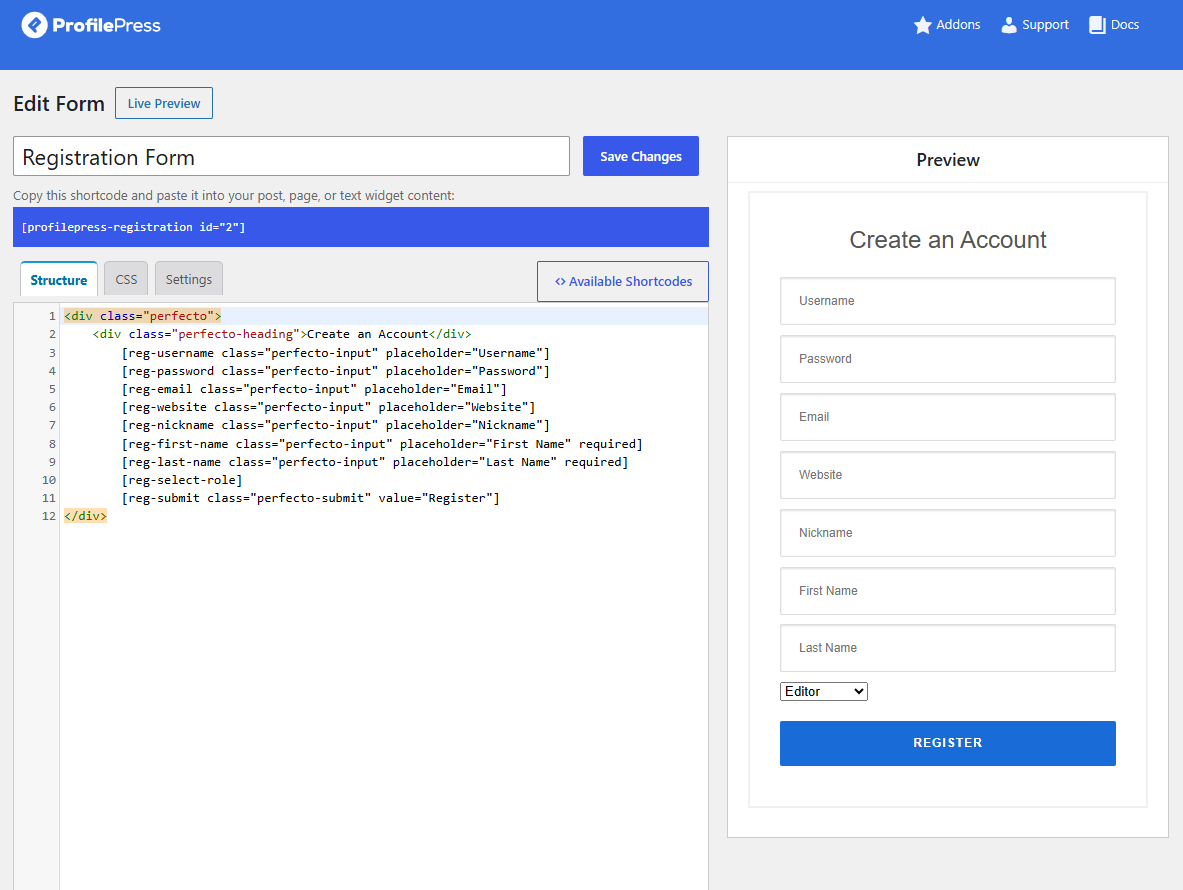
Once done, click on Save Changes.
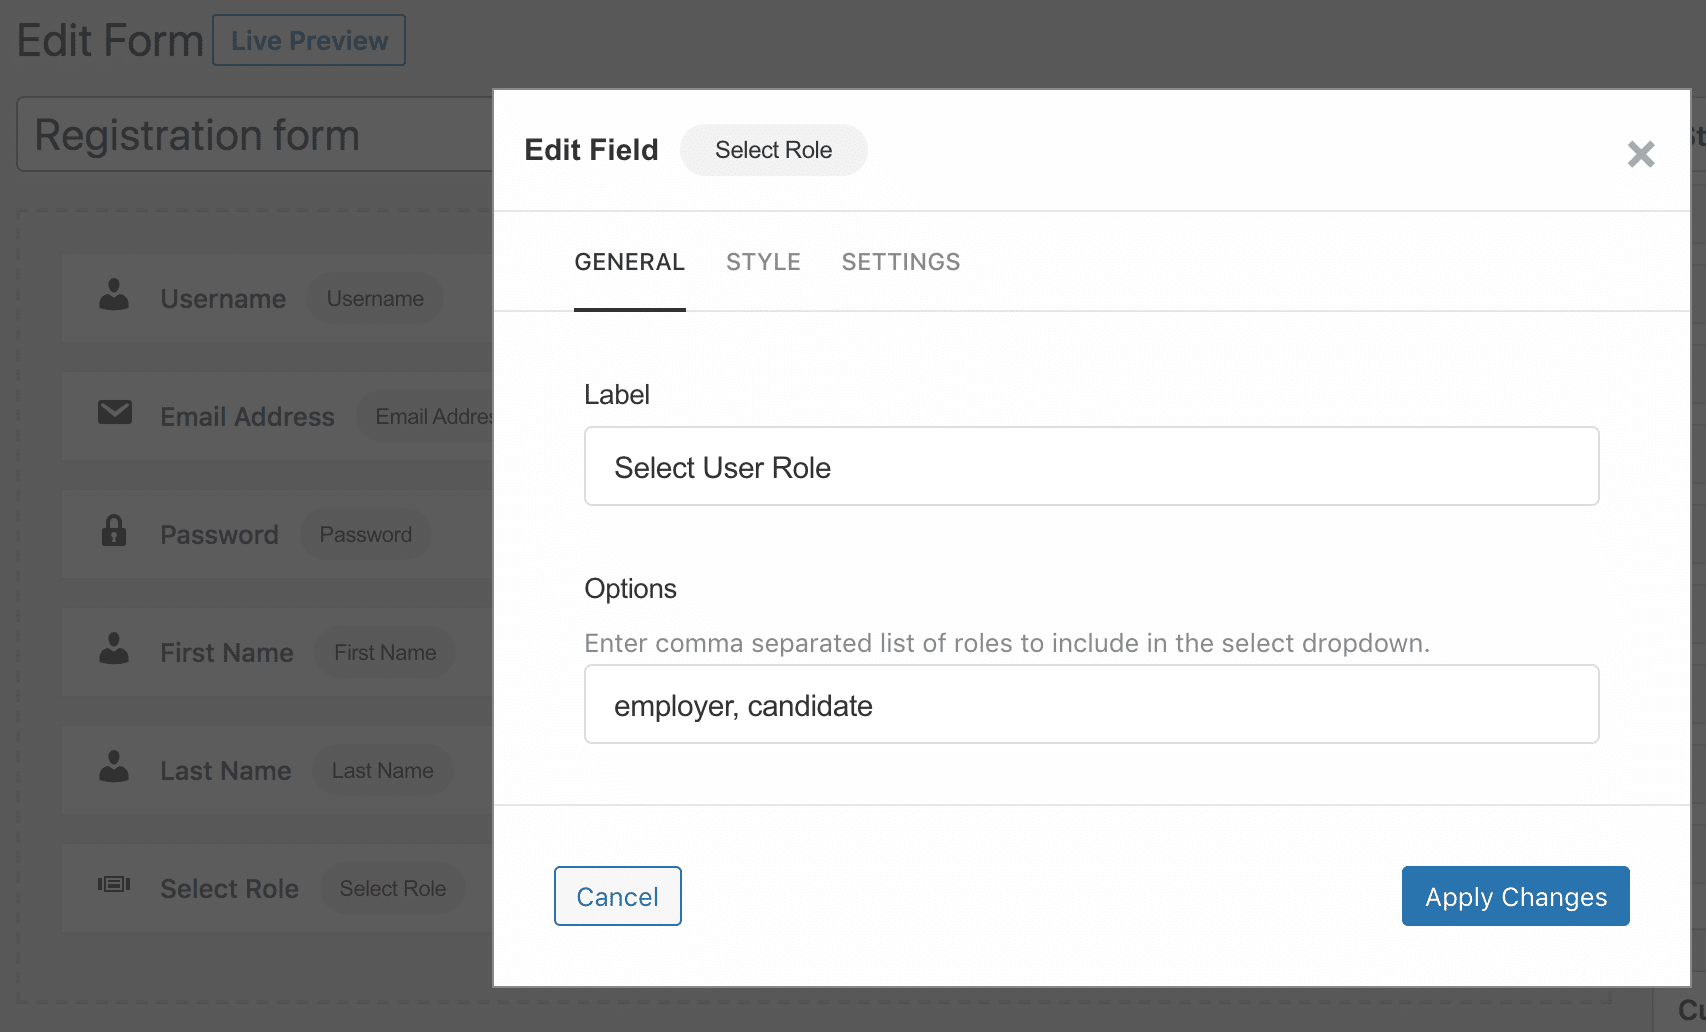
Note: By default, the Select Role field displays the user roles available to the registration form. If you only want users to choose from specific roles, you can limit the options by adding the roles as a comma-separated list in the block settings or using the options shortcode attribute.
For example, if you’re creating a job listing website and want users to choose whether they are registering as an Employer or Candidate, you can use the following shortcode . This will limit the role selection field to the specified options.
Using Drag & Drop Builder
If you prefer a visual way to build your registration form, ProfilePress’s Drag & Drop Builder lets you add and arrange fields without writing code.
To use it, click Get Started under the Drag & Drop Builder. Enter a name for your form, such as Registration Form, and select the Registration tab to set the form type.
Next, choose a template from the options ProfilePress provides, or start with a blank form. For this guide, we’ll use the Tulip template.
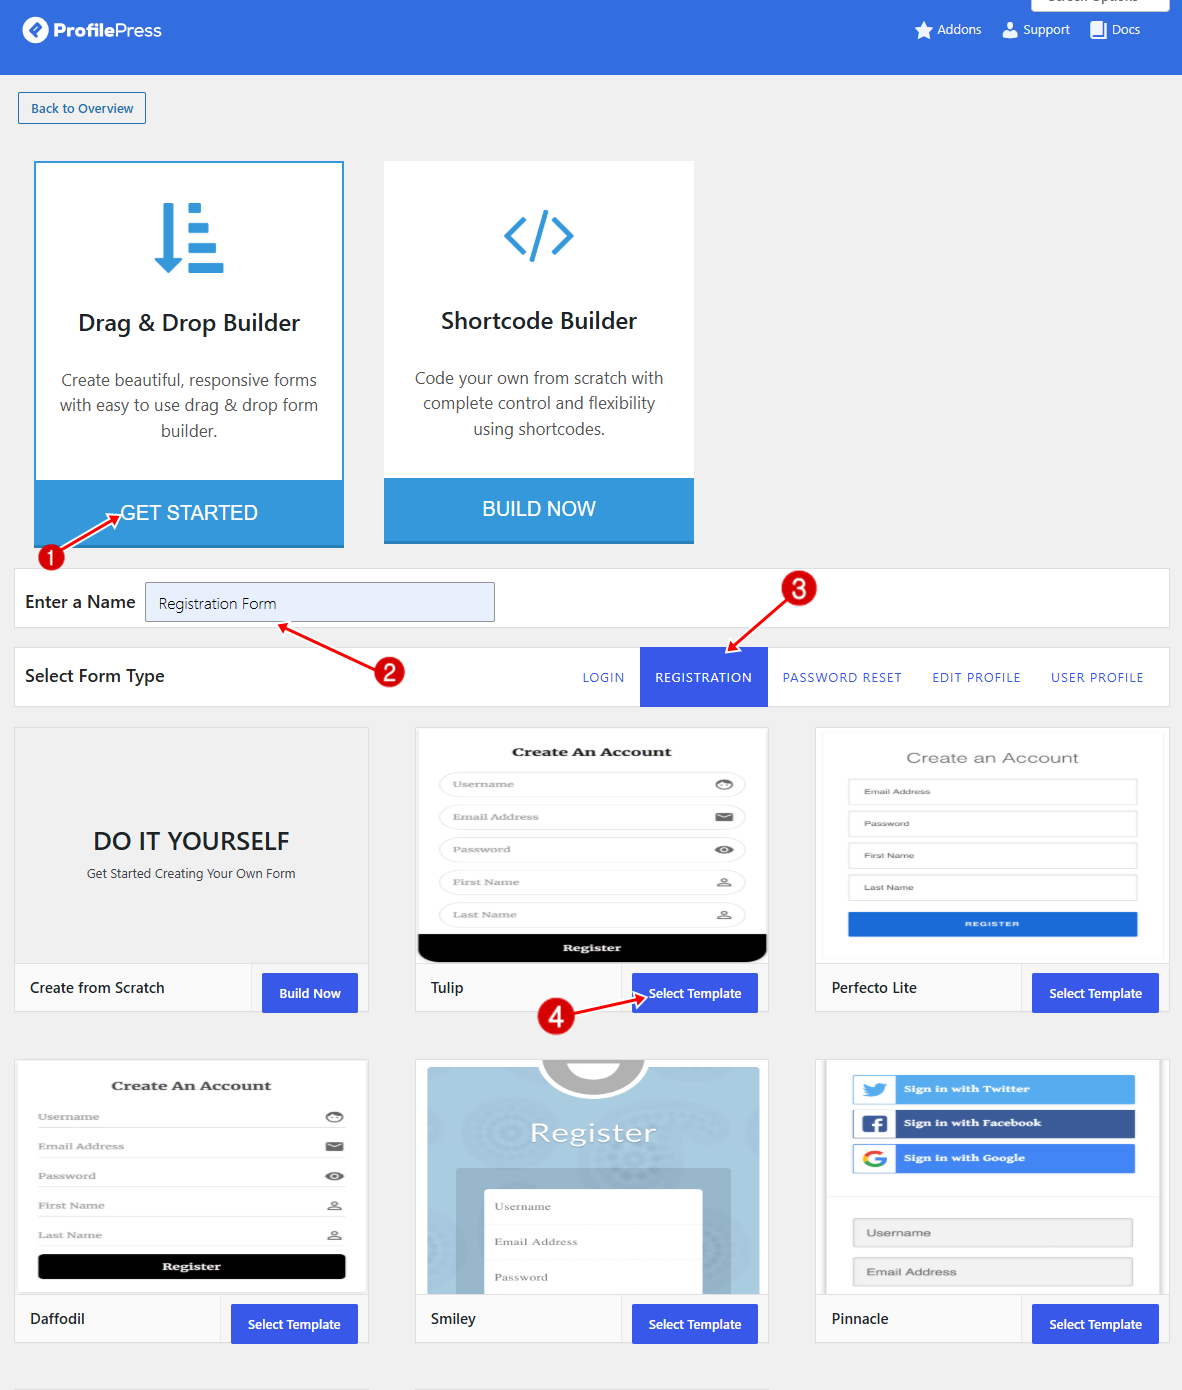
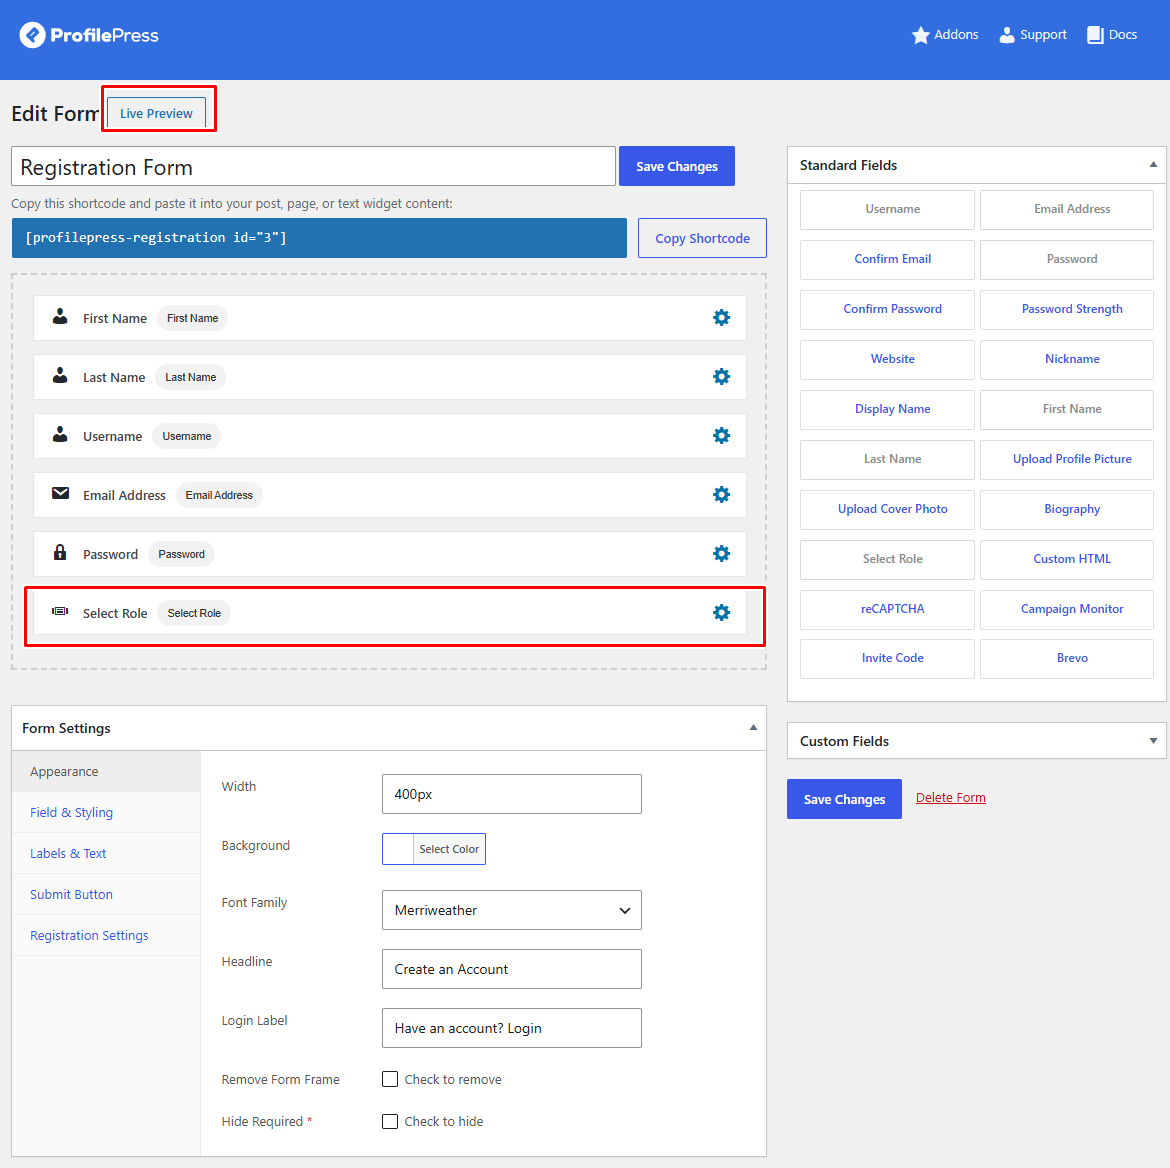
You’ll then go to the form builder, where you can add and arrange the fields you want in your WordPress registration form.
At the top, you’ll also find the form shortcode and a Live Preview option that lets you see your changes as you build.
To add a field, drag it from the Standard Fields section in the right sidebar and drop it into the form builder area.
Since we want users to choose their role during registration, drag the Select Role field into the form and place it below the Password field. This lets users select from the roles you’ve made available.
If you don’t need a field, remove it by hovering over it and clicking the Trash icon.
You can also customize individual fields by clicking the Gear icon. This opens a settings panel where you can adjust options related to the field’s appearance and behavior.
Once you’ve finished customizing the form, click Save Changes to save your registration form.
To restrict the registration form to specific user roles, add those roles as options. Doing this ensures users can only be one of the specified user roles.
Step 3: Publish Your Registration Form
Once you’ve finished creating your registration form with the Shortcode Builder or Drag & Drop Builder, add it to a page where visitors can register.
To do this, copy the form shortcode displayed at the top of the form builder.
Then, go to Pages > Add New and give the page a title, such as Register.
If you’re using the WordPress block editor, click the + icon, add a Shortcode block, and paste the shortcode you copied into it.
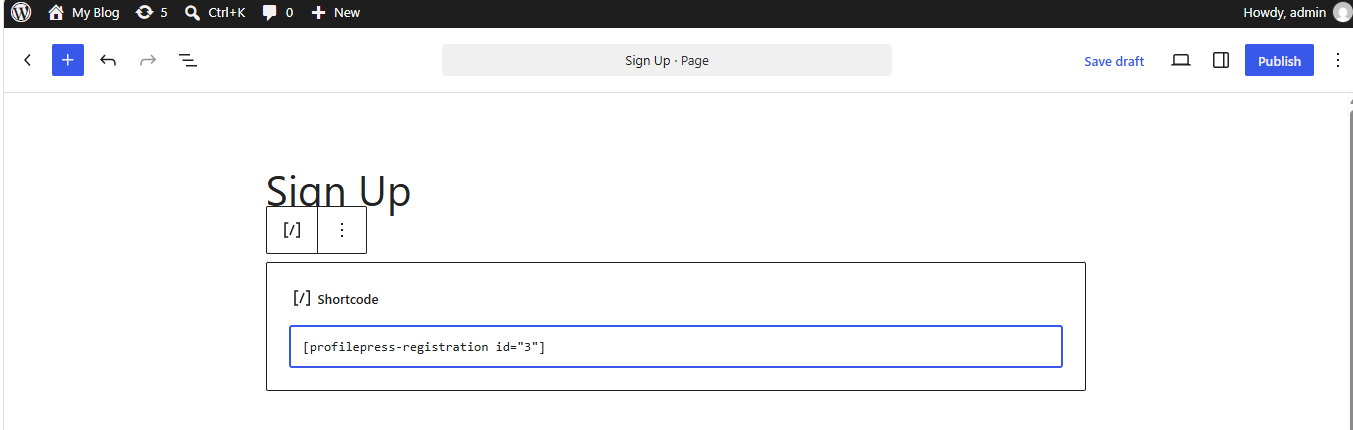
For the Classic Editor, just paste the shortcode into the text editor.
Finally, click Publish to make your registration page available to visitors.
Step 4: Test Your Form
Before you start sending visitors to your new registration page, take a moment to test the form. Submit a test registration and make sure everything works as expected.
Check that the Select Role field displays the correct options and that the role selected during registration is assigned to the new user. Confirm this by going to Users > All Users in your WordPress dashboard and checking the new account.
Also, make sure the other form fields work correctly and that the registration process completes without any errors.
If everything looks good, your WordPress registration form with user role selection is ready for your visitors.
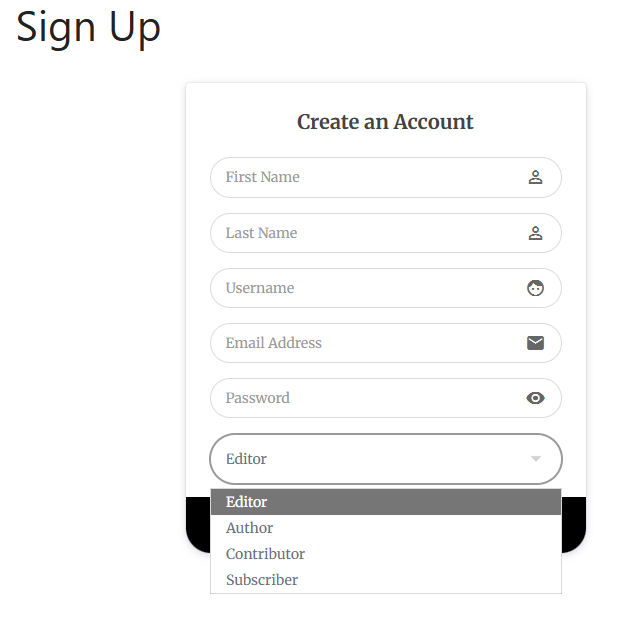
Here’s a screenshot of what our registration form looks like.
MailOptin vs. ProfilePress for User Role Selection
Both approaches can work, but they serve slightly different purposes.
MailOptin is useful when you want to create a registration form as part of an optin campaign and use MailOptin’s form, targeting, and integration capabilities. Its WordPress User Registration integration can create user accounts and map additional form fields.
ProfilePress, on the other hand, is more focused on WordPress membership and user management. Its registration form builder includes a dedicated role-selection feature, with options for restricting which roles users can select.
So, if you’re already using MailOptin for your optin campaigns and want registration functionality within those campaigns, MailOptin is a natural fit. If your primary focus is building custom membership and registration experiences, ProfilePress provides dedicated functionality for this purpose.
FAQs About WordPress Registration Forms With User Role Selection
Q1. Can users choose their own role during WordPress registration?
Yes, but only if you set it up that way.
By default, WordPress doesn’t offer any role selection during signup. Every new user gets the same default role, usually “Subscriber.” That’s fine for a simple blog, but it falls apart fast if you’re running a membership site, course platform, or anything with multiple user types.
The good news? With the MailOptin and ProfilePress plugins, you can add a role-selection field to your registration form in minutes.
Q2. Is it safe to let users select their own WordPress role?
Yes, it’s safe as long as you control the options. Never include “Administrator” unless you have an extremely specific reason and a highly controlled environment.
Q3. Can I change a user’s role after they’ve registered?
Of course. You’re never locked into a user’s initial choice.
As an admin, you can change anyone’s role at any time. Just go to Users > All Users in your WordPress dashboard, find the user, and update their role.
Final Thoughts
So there you have it. You now know how to build a WordPress registration form with user role selection from scratch, using either MailOptin or ProfilePress.
Let’s take a quick step back and look at what you have actually accomplished here.
Before this guide, your registration process probably looked like this. A new user signs up. WordPress gives them the same default role as everyone else. You then log into your dashboard, hunt down their profile, and change their role by hand. Maybe you remember to do it right away. Maybe you forget for a few days, and they email you asking why they cannot access something.
Now? That whole cycle is gone. Users pick their role when they register. WordPress assigns it on the spot. You do nothing. The system just works.
That is a small change on paper, but the payoff adds up. Fewer support emails. Less time in your dashboard. A signup experience that feels intentional, not generic. And a user base that is organized from day one, not weeks later after you finally get around to sorting it out.
If this guide saved you time, pass it along to someone else still assigning roles by hand. They will appreciate it more than you know.