Do you want to grow your email list faster? Add a newsletter signup form after the WordPress post content.
Adding a newsletter signup form after your WordPress post content lets you capture readers when they are most engaged.
They have just finished reading your article, they see the value you provide, and they are more likely to take the next step.
Instead of letting them leave your site and possibly never return, you give them a clear opportunity to stay connected.
In this guide, we will explore the benefits of adding a newsletter signup form after WordPress post content and walk through how to set it up using MailOptin.
By the end, you will have a fully working newsletter form positioned perfectly at the bottom of every WordPress post, ready to convert engaged readers into loyal subscribers.
Benefits of Adding a Newsletter Signup Form After WordPress Post Content
Adding a newsletter signup form after WordPress post content might seem like a small change, but it can have a real impact on how your audience grows and stays connected to you.
Below are some of the benefits:
- First, you capture readers at the perfect moment. When someone finishes reading your post in WordPress, they are already engaged. They found value in what you shared. That is the exact point where interest is highest. Placing your signup form right there gives them an easy next step while your content is still fresh in their mind.
- Second, you create a direct connection with your audience. Search engines and social media platforms control how often your content is seen. Email is different. When someone joins your list, you can reach them directly in their inbox. You are no longer waiting and hoping they find your next article on their own.
- Another benefit is increased return visits. Most people do not remember to come back to a website, even if they liked what they read. But when you send them an email about your latest post, they are reminded. Over time, those reminders build familiarity, and familiarity builds trust.
- It also improves your chances of generating leads and sales. Readers rarely take action on their first visit to a site. However, over time, when they receive helpful emails from you, they become more comfortable with your brand. That trust makes them more likely to sign up for a service, purchase a product, or click a recommended link.
- Finally, this placement feels natural. You are not interrupting their reading experience with popups or distractions. Instead, you are offering a gentle invitation at the end of the conversation. It feels respectful, and readers appreciate that.
Inserting Newsletter Signup Form After WordPress Post Content
There are several ways to add a newsletter signup form after your WordPress post content.
One method is embedding a form directly from your email marketing service. Most platforms allow you to generate HTML embed codes that you can paste into your posts or theme templates. While this works, managing design, targeting, and display conditions can become limiting over time.
A better approach is to use a WordPress plugin that allows you to control placement, design, targeting, and automation without touching code. It also gives you access to advanced display rules and analytics that help improve conversions. And one of such newsletter signup form plugins for WordPress is our MailOptin.
MailOptin helps you grow your email list through lightbox forms, in-post optin forms, notification bars, slide-ins, sidebar forms, and call-to-action campaigns.
You can add opt-in forms before, in the middle of, or after post content with MailOptin, and you can also control which posts or pages they appear on. It also integrates with all major email marketing platforms, allowing you to connect it to your preferred CRM and email marketing software.
Follow the steps below to learn how to add a newsletter signup form after your post content in WordPress.
Step 1: Install and Activate MailOptin
Firstly, purchase a MailOptin license. After completing your purchase, you will receive an email with the plugin download link and your license key.
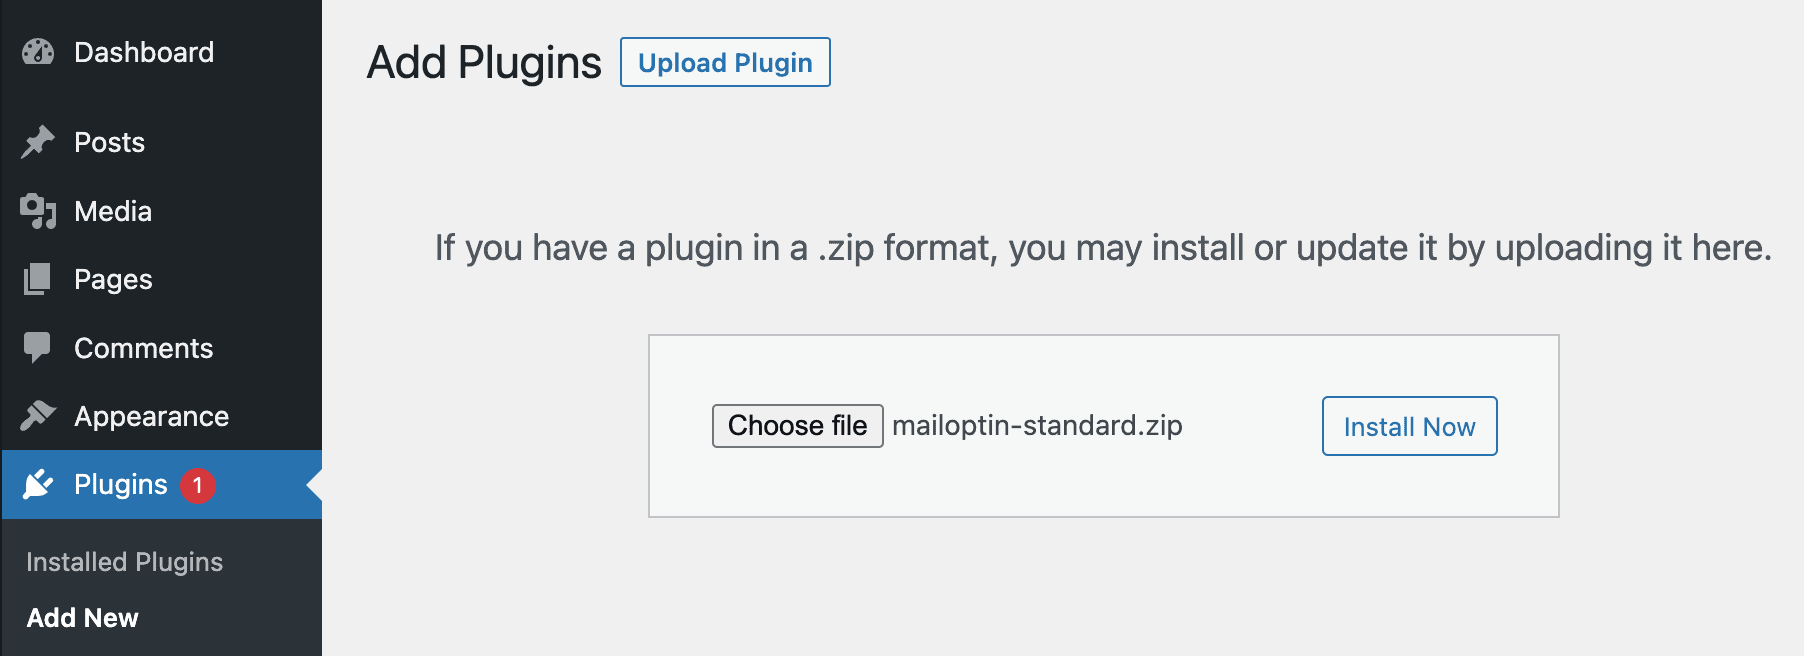
Once downloaded, log in to your WordPress dashboard and go to Plugins > Add New, then click Upload Plugin.
Select the plugin zip file from your computer and click Install Now.
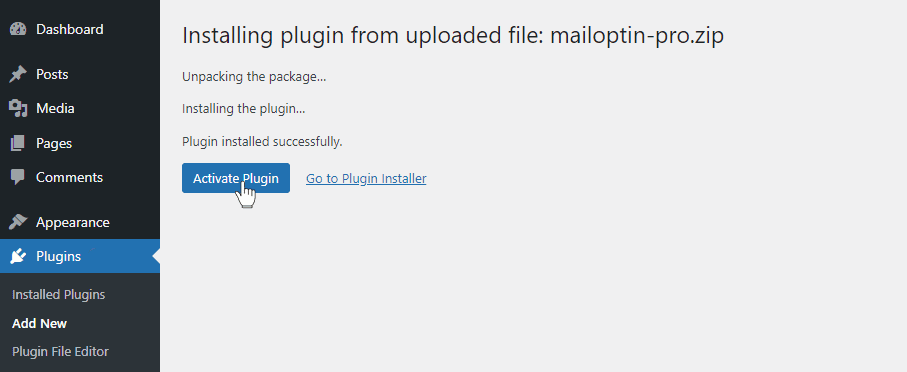
Give it a few seconds while WordPress installs the plugin. Once the installation is complete, click Activate Plugin.
Step 2: Connect MailOptin to Your Email Marketing Service
The next step is to connect MailOptin to your email marketing software or CRM, where leads from the WordPress newsletter signup form will be stored.
MailOptin integrates with popular email marketing platforms, including Mailchimp, Salesforce, Microsoft Dynamics 365, Drip, AWeber, Google Sheets, Kit (ConvertKit), MailerLite, Constant Contact, GetResponse, Sendy, Campaign Monitor, ActiveCampaign, Brevo (Sendinblue), Gist, Klaviyo, Sendlane, Mailster, Vertical Response, Mailjet, HubSpot, Ontraport, Moosend, MailPoet, Zoho CRM, Zoho Campaigns, Keap Max Classic (Infusionsoft), HighLevel, Omnisend, Flodesk, Beehiiv, Benchmark Email (Classic), SendFox, iContact, Mailgun, Ortto, E-goi, SendGrid Email Marketing, Elastic Email, Encharge, Sender.net, SendPulse, Bento, weMail, FluentCRM, Groundhogg, CleverReach, Mailercloud, Copper CRM, NewsMAN, Facebook custom audience.
To set this up, go to MailOptin > Integrations in your WordPress admin area.
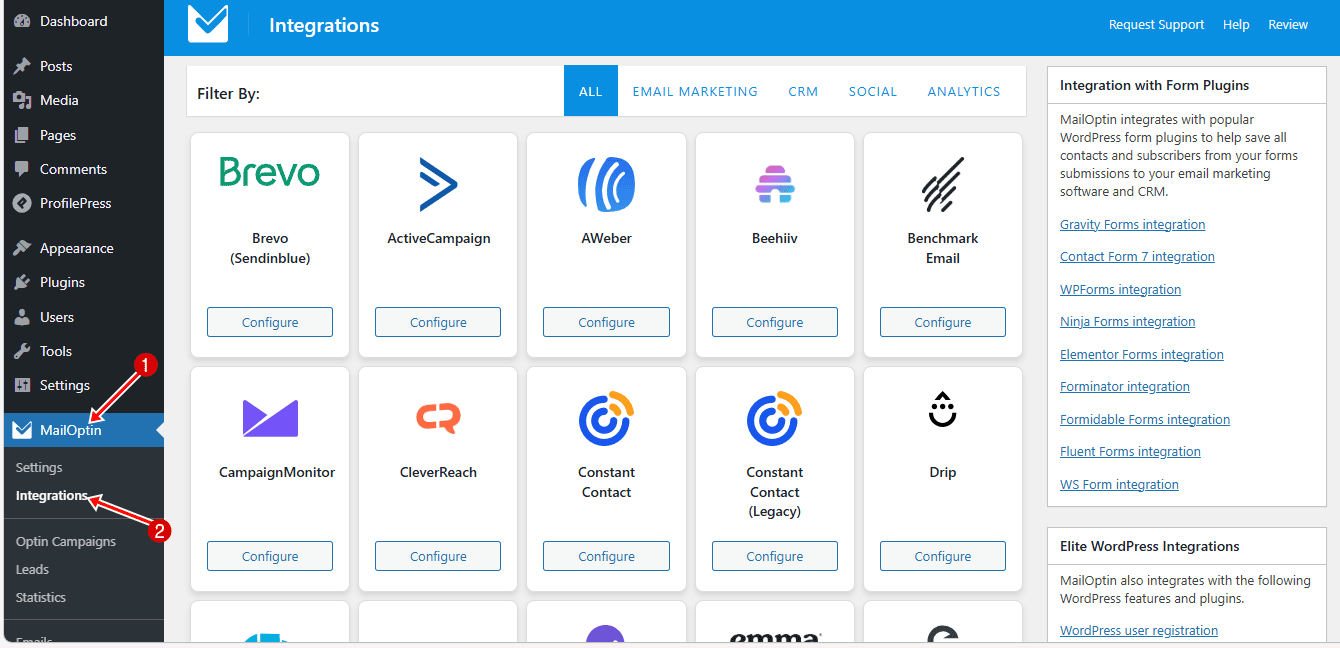
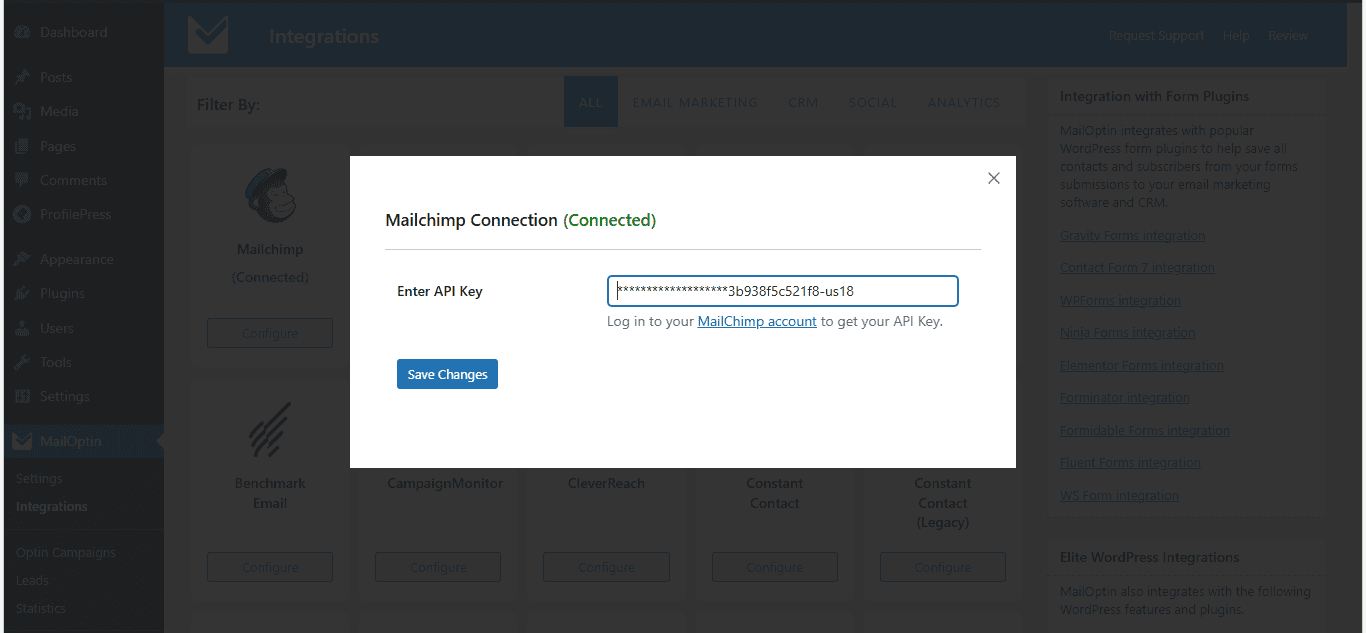
Select your preferred CRM or email marketing software and follow the connection instructions. In most cases, you’ll just need to copy and paste an API key from your account.
If you prefer, you can skip this step and use the MailOptin Leads feature to store subscribers directly inside WordPress instead.
Step 3: Create a WordPress Newsletter Signup Form
Next is to create the actual newsletter signup form that readers and users of your WordPress website will use to optin to your marketing list.
Navigate to MailOptin > Optin Campaigns and click Add New.

Enter a name for the newsletter form. Next, choose the In-Post optin type since we want the form to appear within your content area. After that, select the theme you would like to use.
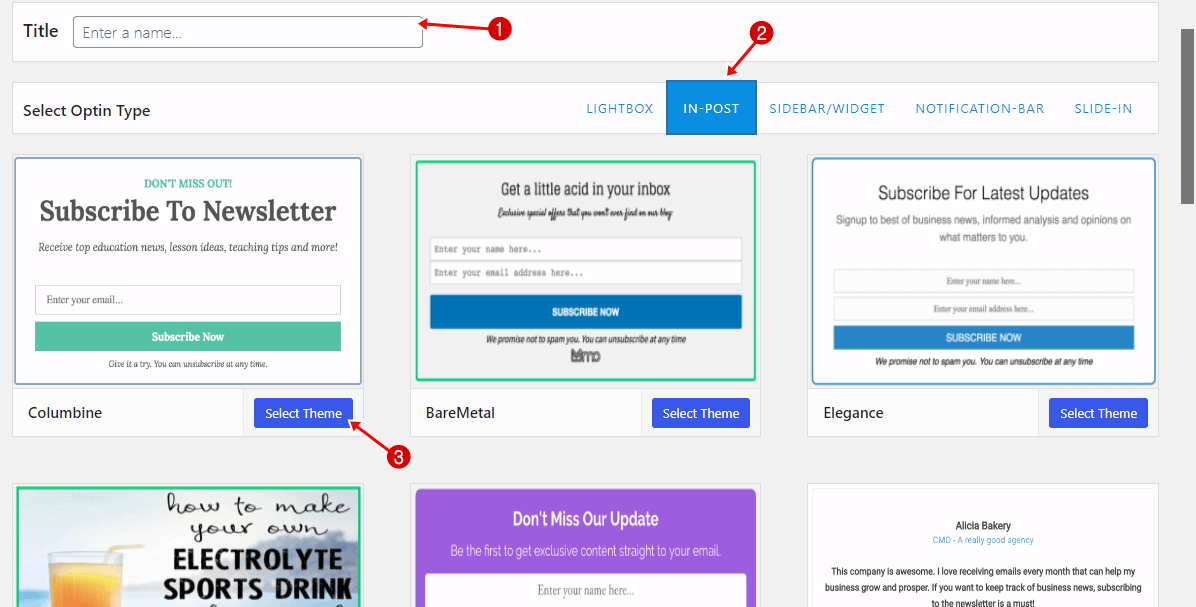
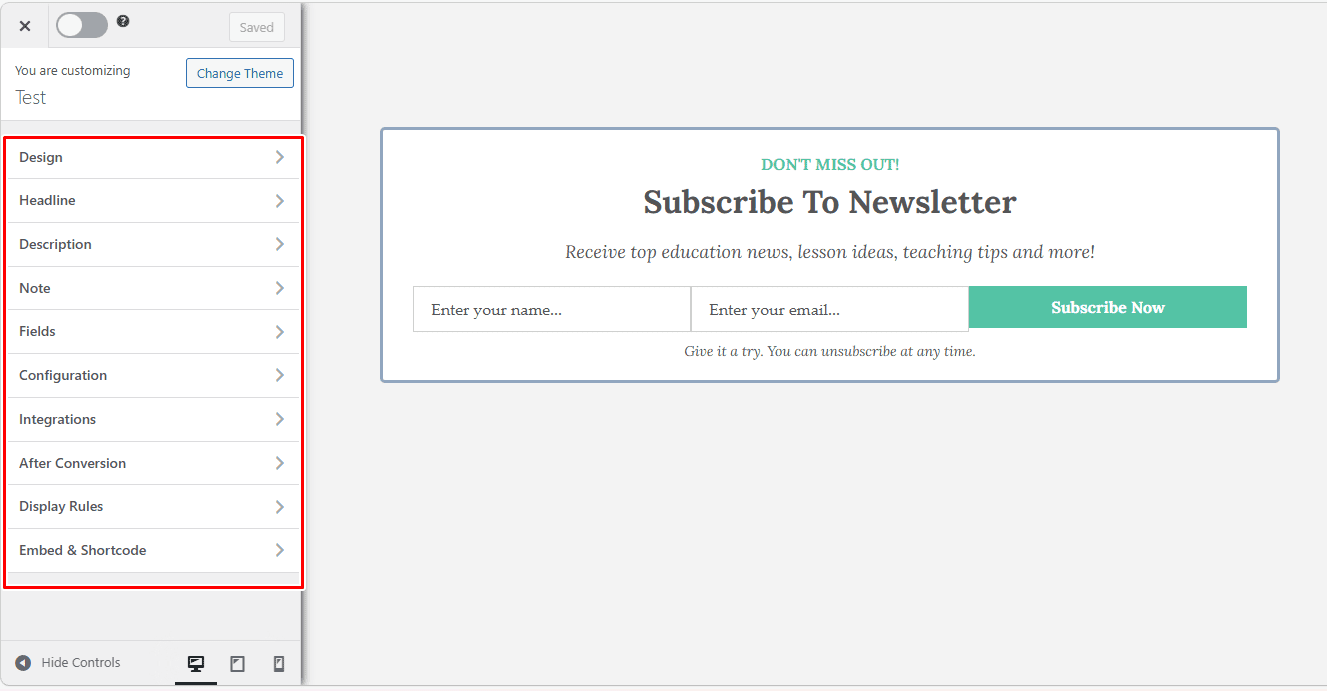
Once you select a theme, you’ll be taken to the optin campaign builder, where you can customize the WordPress newsletter form.
Step 4: Customizing the Newsletter Signup Form
Before changing anything, pause and ask yourself one simple question: what information do you really need from your subscribers?
In most cases, less is more. Asking only for an email address keeps the process quick and increases the chances that someone will sign up.
The shorter the form, the easier it feels. However, you might also want to include a first name field. This allows you to greet subscribers by name in your emails, making your messages feel more personal and engaging.
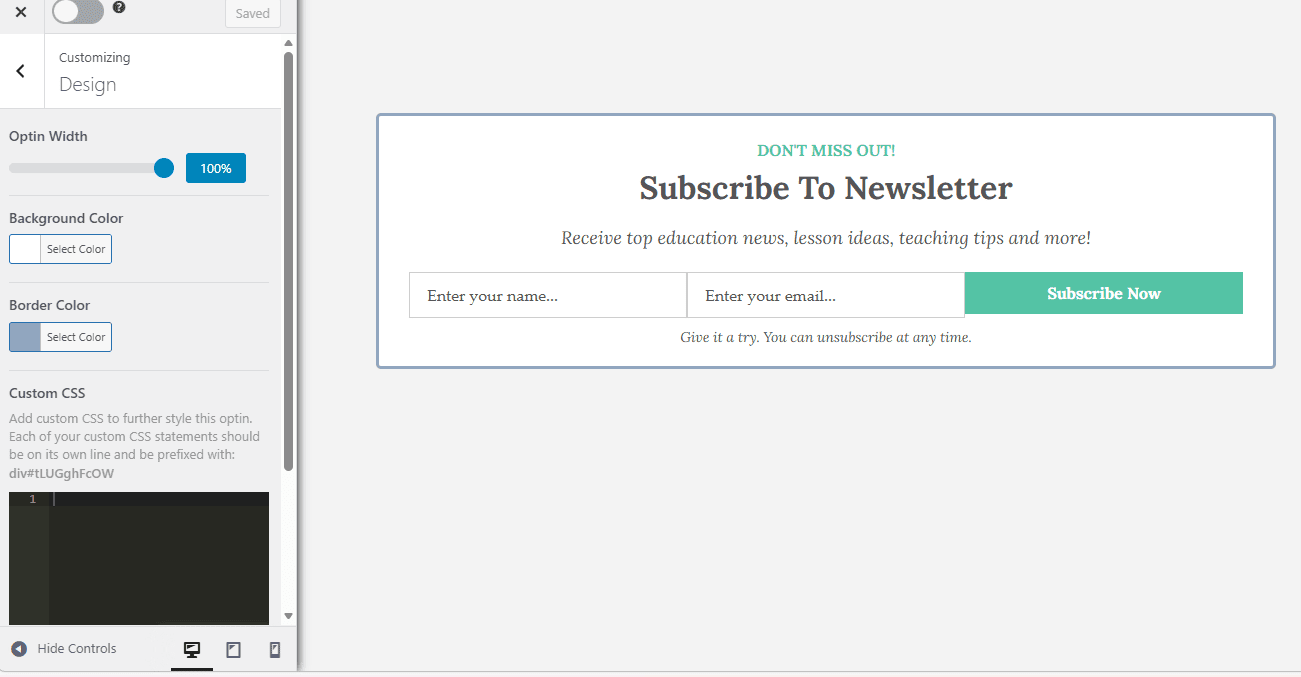
Design
This section gives you control over how your optin form looks on your website.
Here, you can adjust the form width to fit your post layout. You can also change the background color and border color to match your website’s branding.
Headline
The Headline section is where you grab attention. You can hide the headline if you prefer a minimal layout, but in most cases, keeping it visible improves conversions.
You can also edit the headline text, adjust the font size and font family, and change the text color to match your brand.
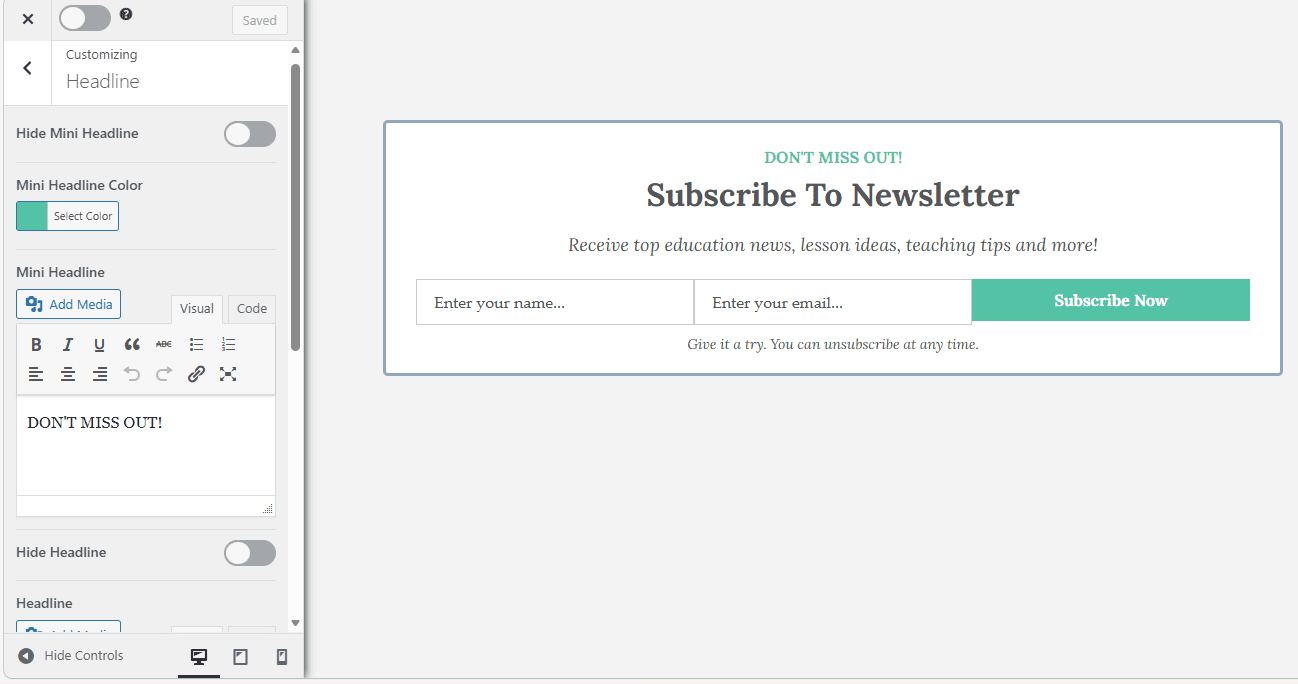
You can also add media to include a small image or icon, making the form more visually appealing. A clear, benefit-focused headline often makes the biggest difference, so take your time crafting it.
Description
Right below the headline section is the Description section.
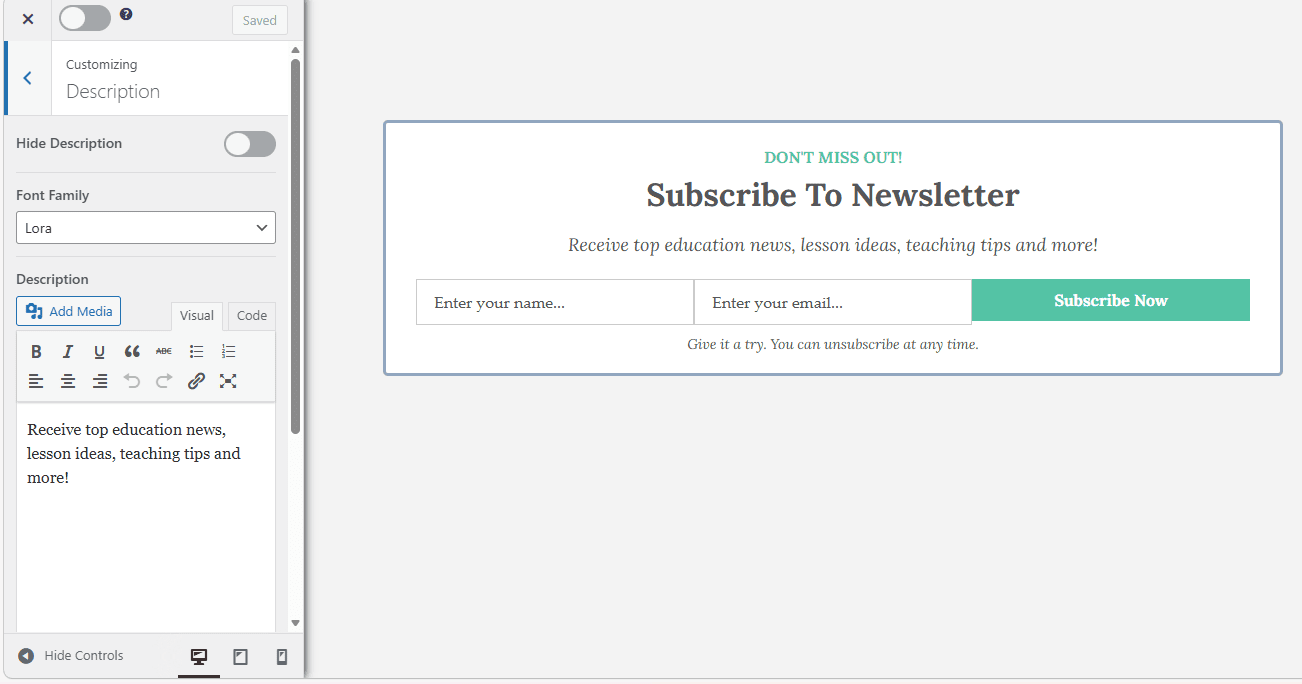
This is where you briefly explain why someone should subscribe. You can hide this section if you want a shorter form, or you can edit the text to highlight what subscribers will receive.
Just like the headline settings, you can adjust the font size, font family, and text color. You can also insert media if needed.
Keep the description short and focused. A few clear sentences that explain the benefit of joining your list are usually enough.
Note
The Note section is placed beneath the main form fields. It’s often used for small details, such as privacy messages, disclaimers, or short reassurances like “We respect your privacy.”
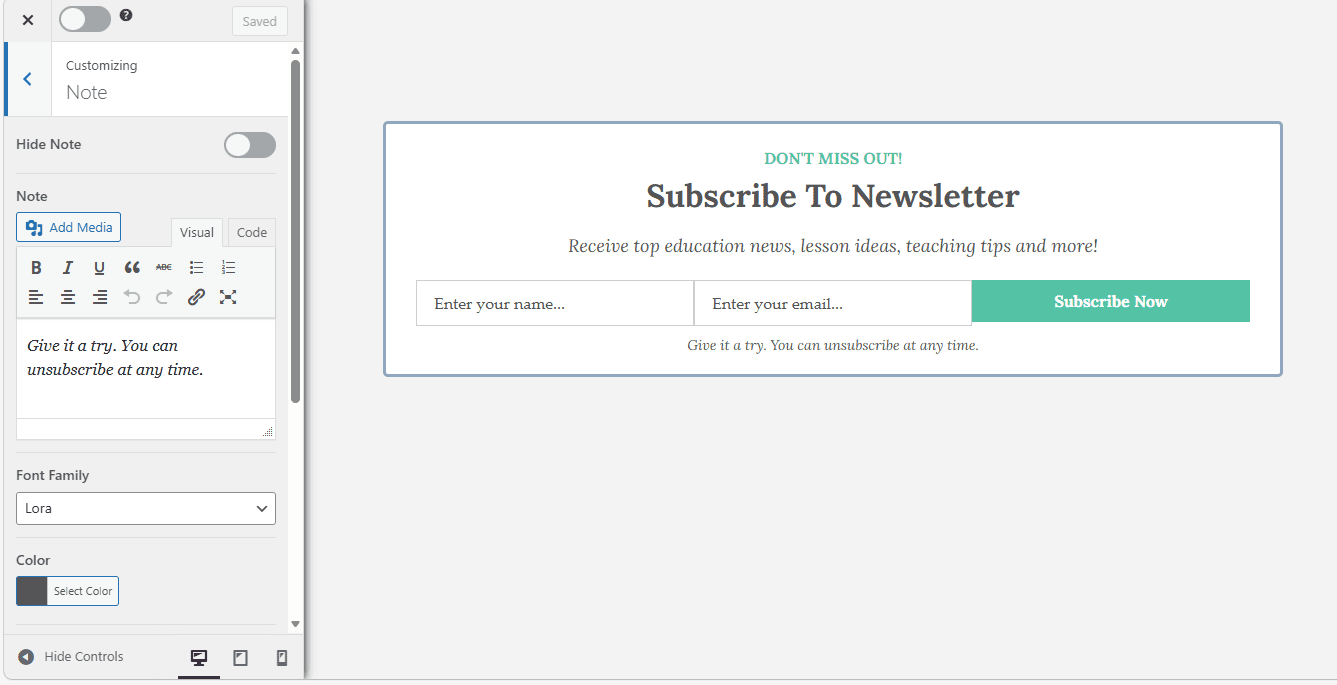
You can choose to hide this section if you don’t need it. If you decide to use it, you’re free to edit the text, adjust the font size and style, change the text color, and even add media. There’s also an option to enable “close optin on click,” which allows the form to close when someone clicks the note text.
Another useful feature here is the acceptance checkbox. This can be helpful if you need users to agree to terms or confirm consent before subscribing.
Fields
The Fields section lets you control what visitors actually enter in the newsletter signup form.
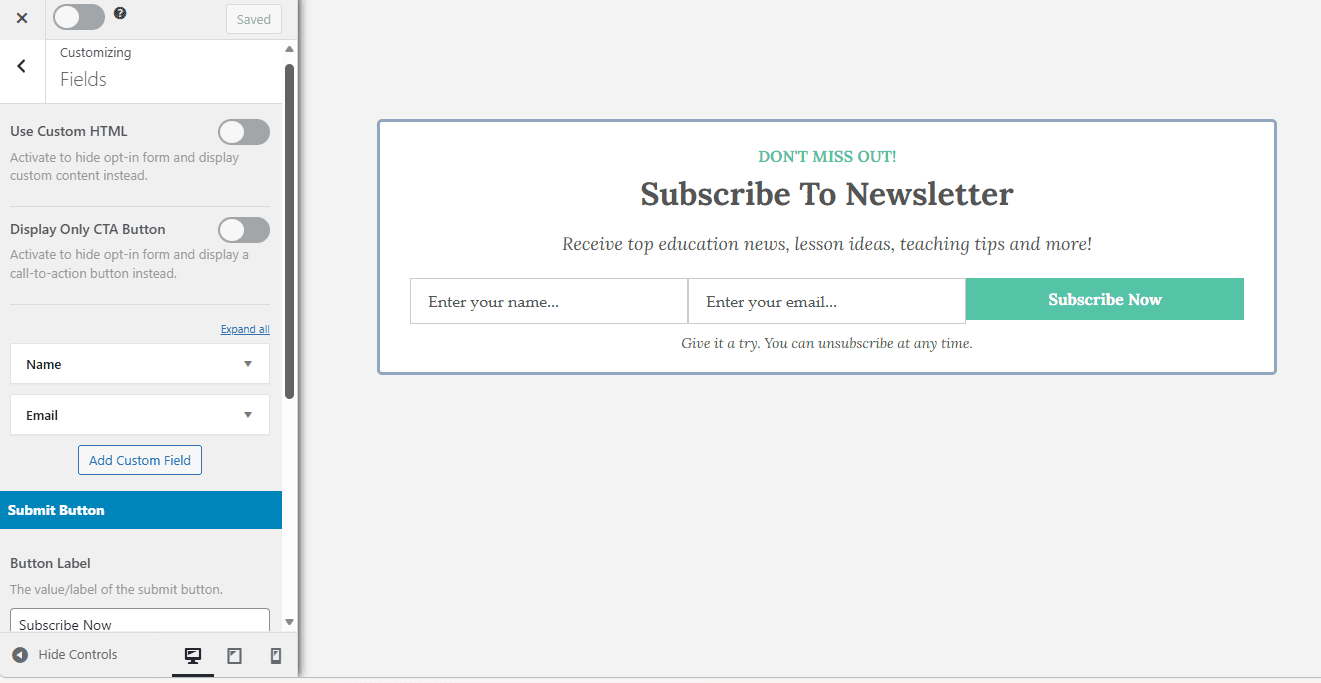
You can add or remove fields depending on the information you want to collect. For most websites, an email address field is enough. If you want to address subscribers by name, you can add a first name field as well. You can also make certain fields you need.
Beyond that, you can edit the submit button text, adjust field colors, change fonts, and modify the background to match your site’s design. If you need advanced customization, you can insert custom HTML or even replace the optin form with a call-to-action button.
This section gives you full control over how the form looks and functions, so take a few minutes to review each setting carefully.
Configuration
The Configuration section allows you to control how the optin form behaves within your post.
Here, you can choose the exact position where the optin form will appear inside your content. Since we want the newsletter signup form to appear after your WordPress post content, select the option that places it after the content.
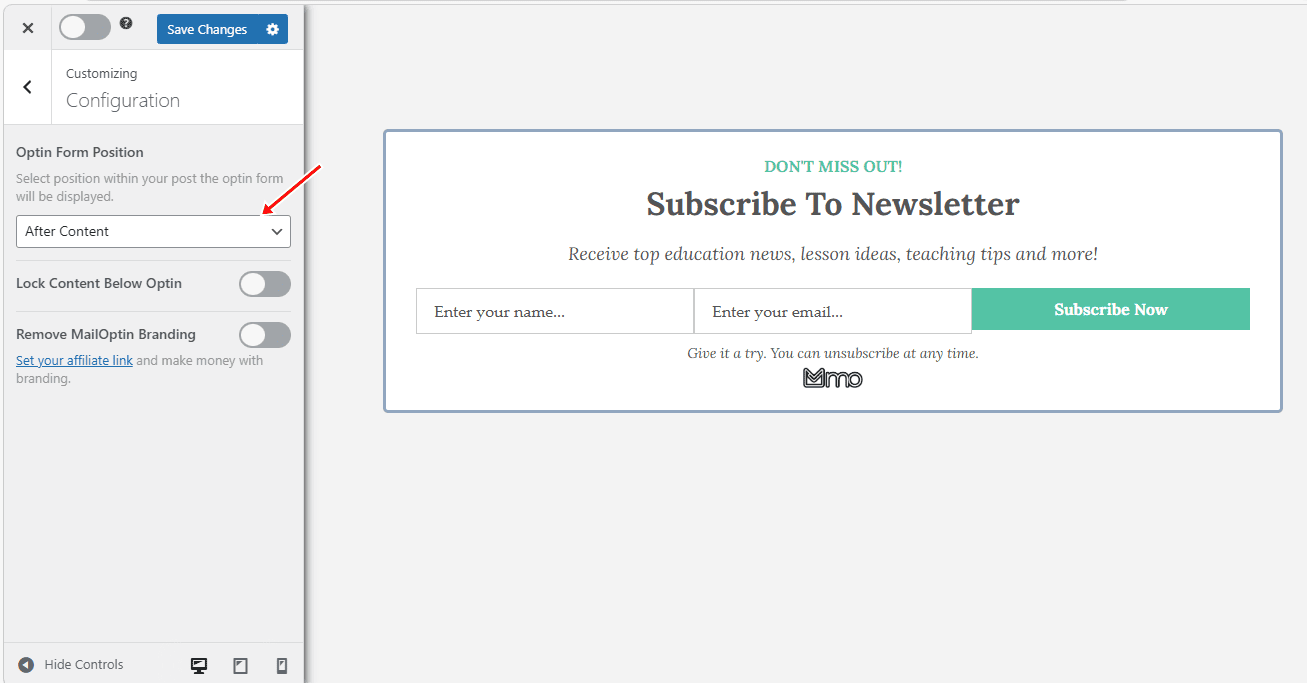
You will also find additional settings, such as Lock Content Below Optin, which restricts access to content until a user subscribes, and the option to remove MailOptin branding.
Integration
Now that your form looks the way you want, the next step is deciding where your subscribers will be stored. Click on the Integration tab and select the email marketing service provider you connected in Step 2.
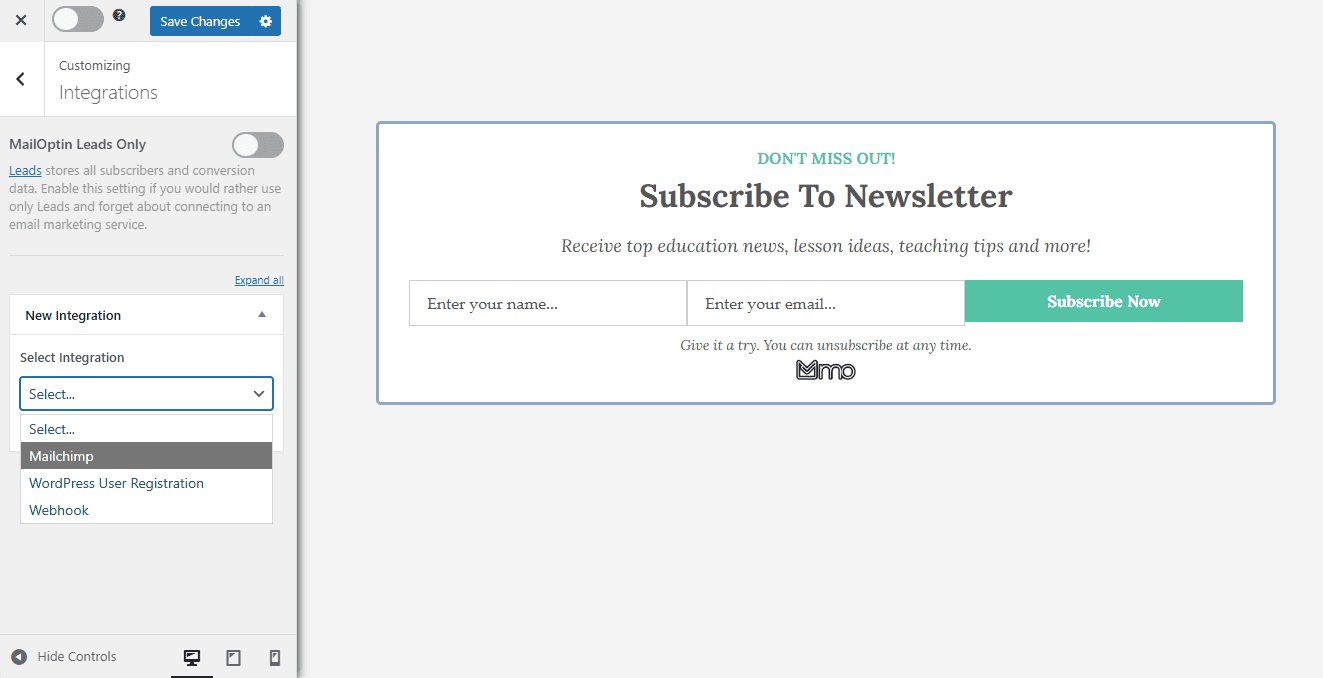
If you prefer, you can also use the built-in MailOptin Leads feature by turning on the MailOptin Leads Only option. This allows you to collect and manage subscribers directly within your WordPress dashboard.
After Conversion
This section controls what happens once someone subscribes. Instead of leaving visitors with a generic response, you can decide exactly what they see next. For example, you can display a success message or redirect them to a thank-you page.
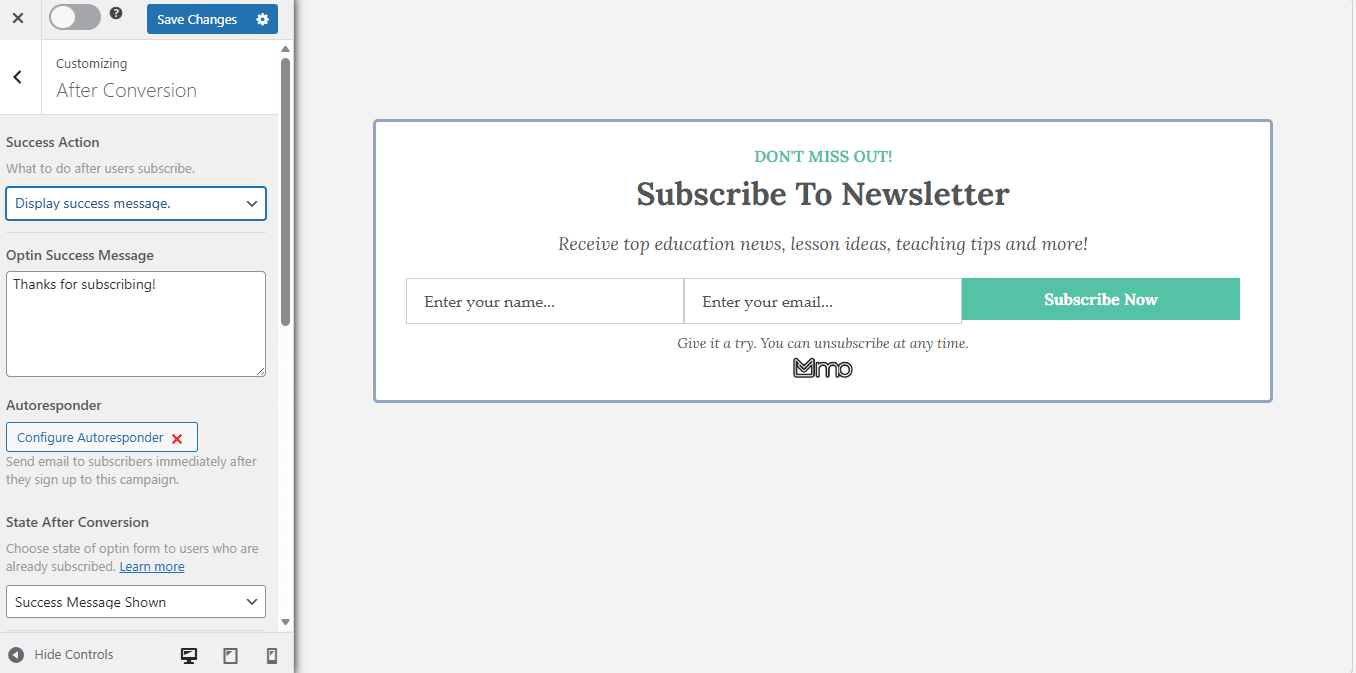
Redirecting to a custom page is often a good idea. You can use that page to welcome new subscribers, explain what they should expect from your emails, or even offer a free resource.
Display Rules
This section controls where your optin form appears on your website. Since we already configured the form to display after post content in WordPress through the Configuration section, the next step here is to choose where it should load.
If you want your newsletter signup form to appear on every post and page across your site, go to Page-Level Targeting and select Globally load optin.
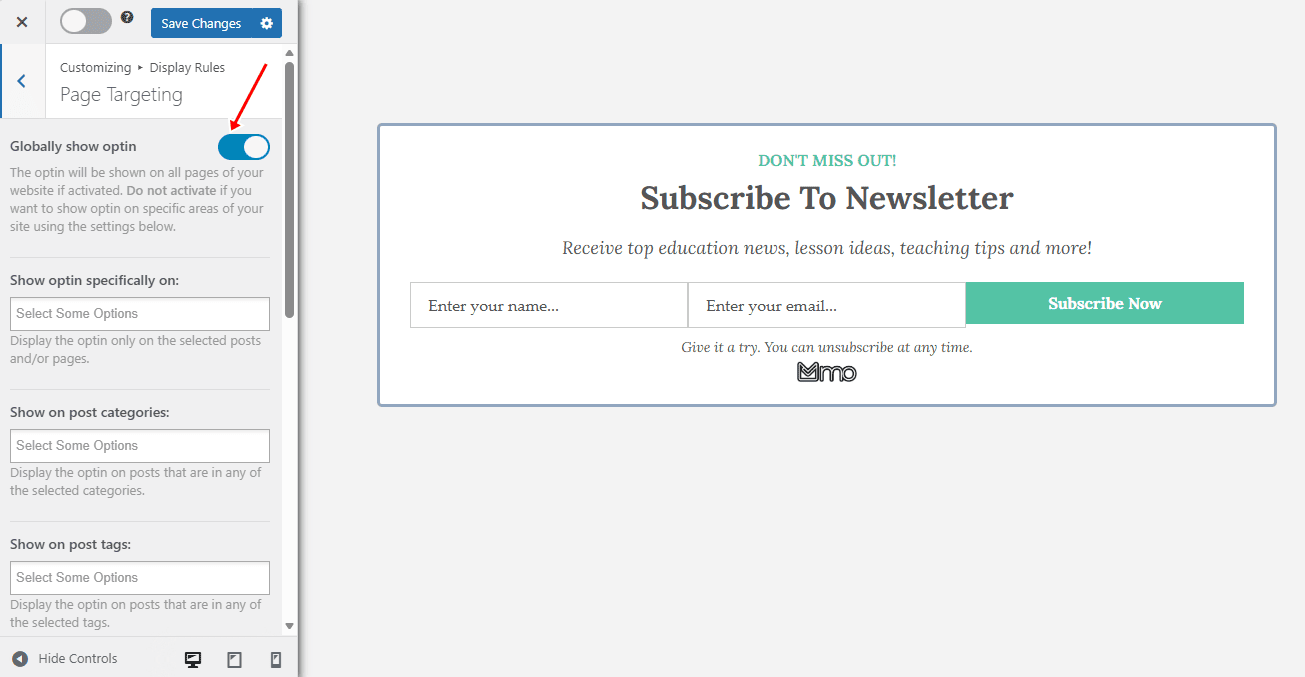
However, if you prefer to show it only in specific areas, you can use the page-level targeting options instead.
Embed & Shortcode
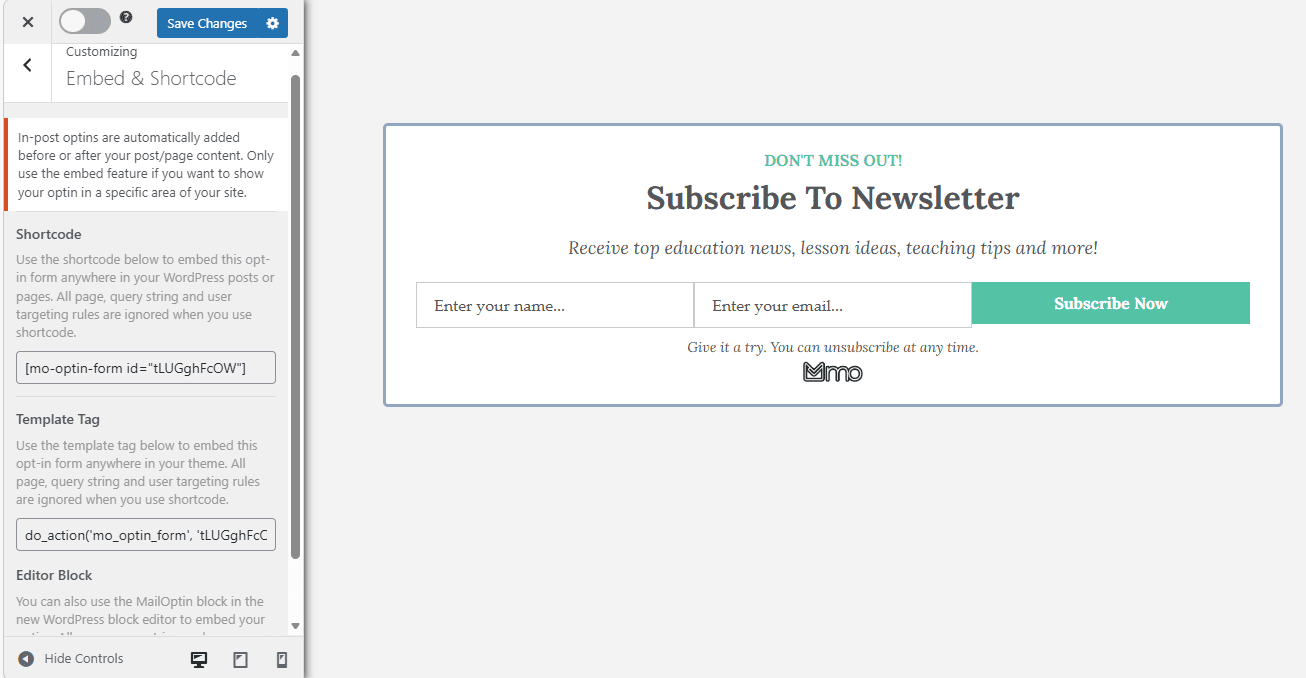
This section gives you alternative ways to display the WordPress newsletter signup form outside the display rules through the use of a shortcode or template tag.
Step 5: Publish the Campaign
After you’ve finished customizing your newsletter signup form and setting the display settings, it’s time to make it live.
To publish the campaign, go to the top right corner of the screen and click Save Changes, then toggle the activation switch to the “On” position. This tells the system that your optin form is ready to go live on your site.
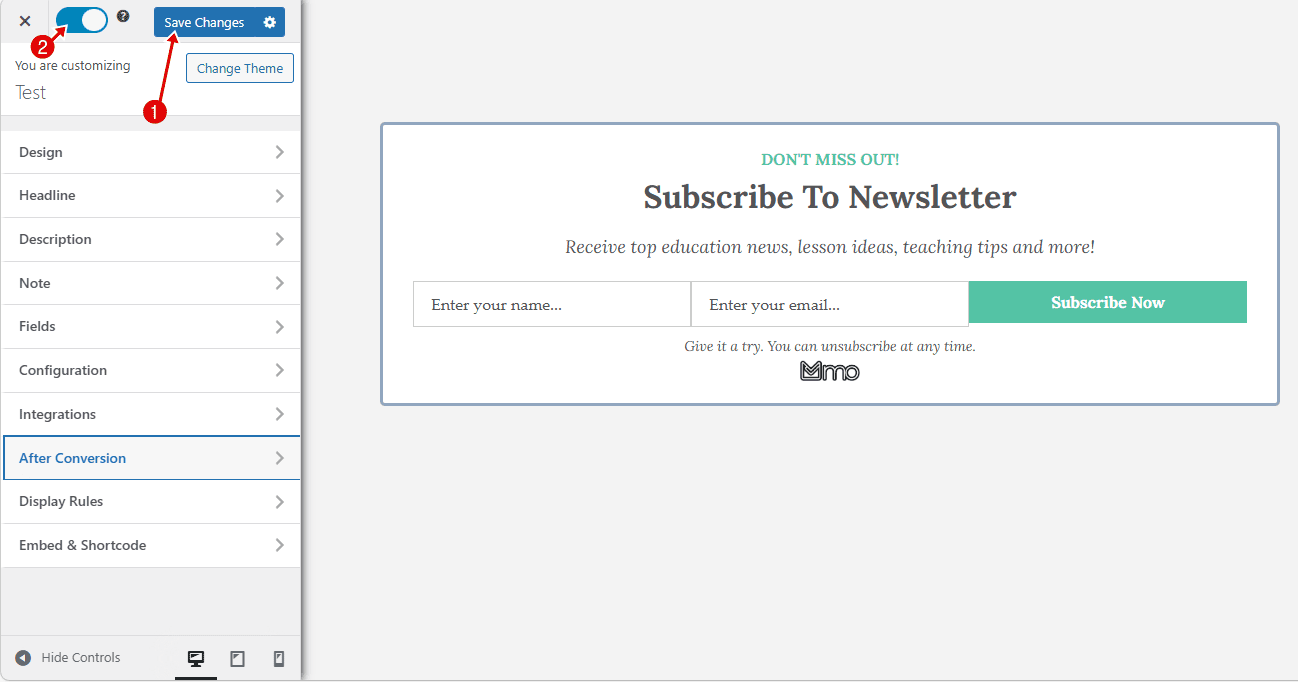
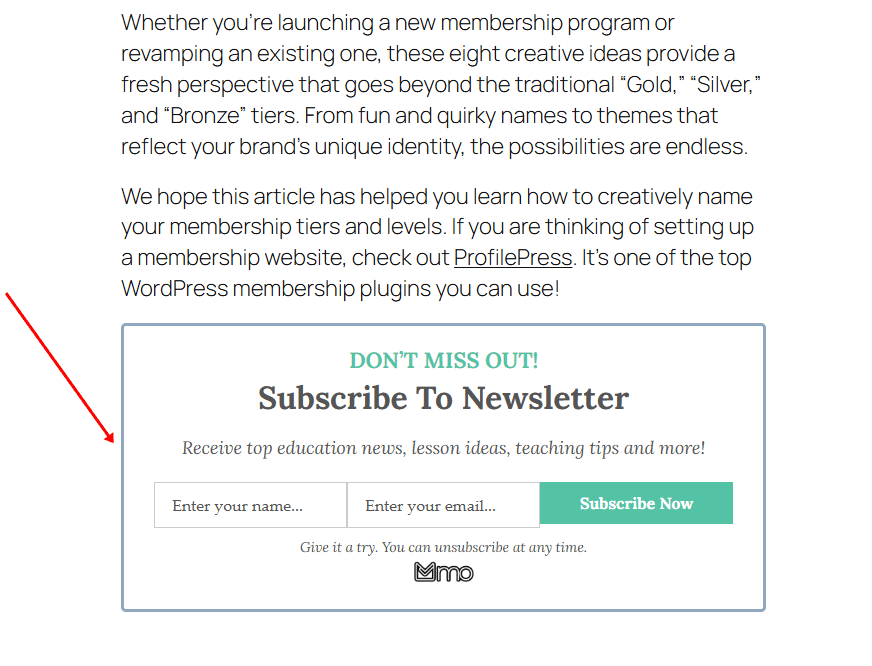
Once everything is activated and saved, visit any of your blog posts and scroll to the bottom of the article. You should now see the newsletter signup form appearing below every WordPress post’s content.
Below is an example of how it appears on our sample website.
FAQs
1. Why should I add a newsletter signup form after WordPress post content?
Adding a newsletter signup form after your post content in WordPress helps you capture readers when they are most engaged. At this point, they have already read your article and are more likely to subscribe if they found your content helpful. It is a great way to grow your email list and build a direct connection with your audience.
2. Do I need coding skills to add a newsletter signup form?
No. You do not need coding skills. You can use MailOptin, which provides an easy-to-use form builder, display rules, and integration settings to set everything up.
3. Will adding a newsletter signup form slow down my website?
Usually, using a well-optimized plugin will not significantly affect your website’s speed. Plugins like MailOptin are designed to be lightweight and efficient.
4. How can I increase my newsletter signup rate?
You can increase your signup rate by keeping your form simple, using a clear and attractive headline, offering value to subscribers, and placing the form where readers are most engaged. Testing different designs and messages can also help you improve results over time.
Conclusion
And that’s it! You now know how to add a newsletter signup form after WordPress post content on your website.
With this setup, you can turn your blog posts into powerful lead generation opportunities without disrupting your readers’ experience.
Using MailOptin makes the process easier because you can design attractive signup forms, control when and where they appear, connect to your email marketing service, and even automate newsletters to keep your subscribers engaged.
The best approach is to keep everything simple, make your form easy to notice, and always highlight the benefit readers will get by subscribing.
Start applying these steps today, and you will be well on your way to building a loyal audience that keeps coming back to read more of your content.