Do you want to grow your email list without guessing what your audience wants?
You can use AI chatbot conversations to find the questions visitors ask most often, then turn those questions into targeted lead magnets and optin campaigns. These tools work together: your chatbot tells you what people want, and your optin form gets them to subscribe.
Most lead magnets start with an assumption. You pick a topic that seems useful, create a guide, and hope it resonates, but by reviewing visitors’ conversations with your chatbot, you’ll understand exactly what they’re looking for.
In this guide, we explain why chatbot conversations are so useful for lead generation and walk through the full process using two WordPress plugins: Resolver and MailOptin (both downloadable for free).
Why Chatbot Conversations Are a Valuable Source of Lead Generation Ideas
Chatbot conversations reveal what visitors want, right when they want it. A pageview tells you that someone landed on a page. A chat tells you what they were looking for in their own language.
That makes chat history useful for lead generation in four ways:
- Visitors tell you what they need: People ask direct questions, which often reveals information they couldn’t find on your website.
- You get their exact language: The words visitors use can shape your headlines, button text, and offers.
- Patterns show real demand: One question may not mean much, but the same question asked repeatedly points to a topic worth building around.
- Objections appear early: Questions about cost, compatibility, and fit show you what might stop people from taking the next step.
An optin form works best when the offer feels relevant to the person seeing it. Basing your offer on real questions makes that relevance much easier to achieve.
How to Grow Your Email List With AI Chatbot Conversations
Follow these six steps to turn your chatbot conversations into a repeatable lead generation process.
Step 1: Set Up Resolver on Your WordPress Site
The first step is to install a WordPress AI chatbot plugin and train it on your content.
Resolver can be installed like any other plugin from the Plugins > Add New menu. It requires WordPress 7.0 or later because it uses the Connectors menu that WordPress added in that version.
Next, visit the Settings > Connectors menu and add an API key for OpenAI, Google, or Anthropic. Then, go to the Resolver > Model menu to select your AI platform and choose a model.
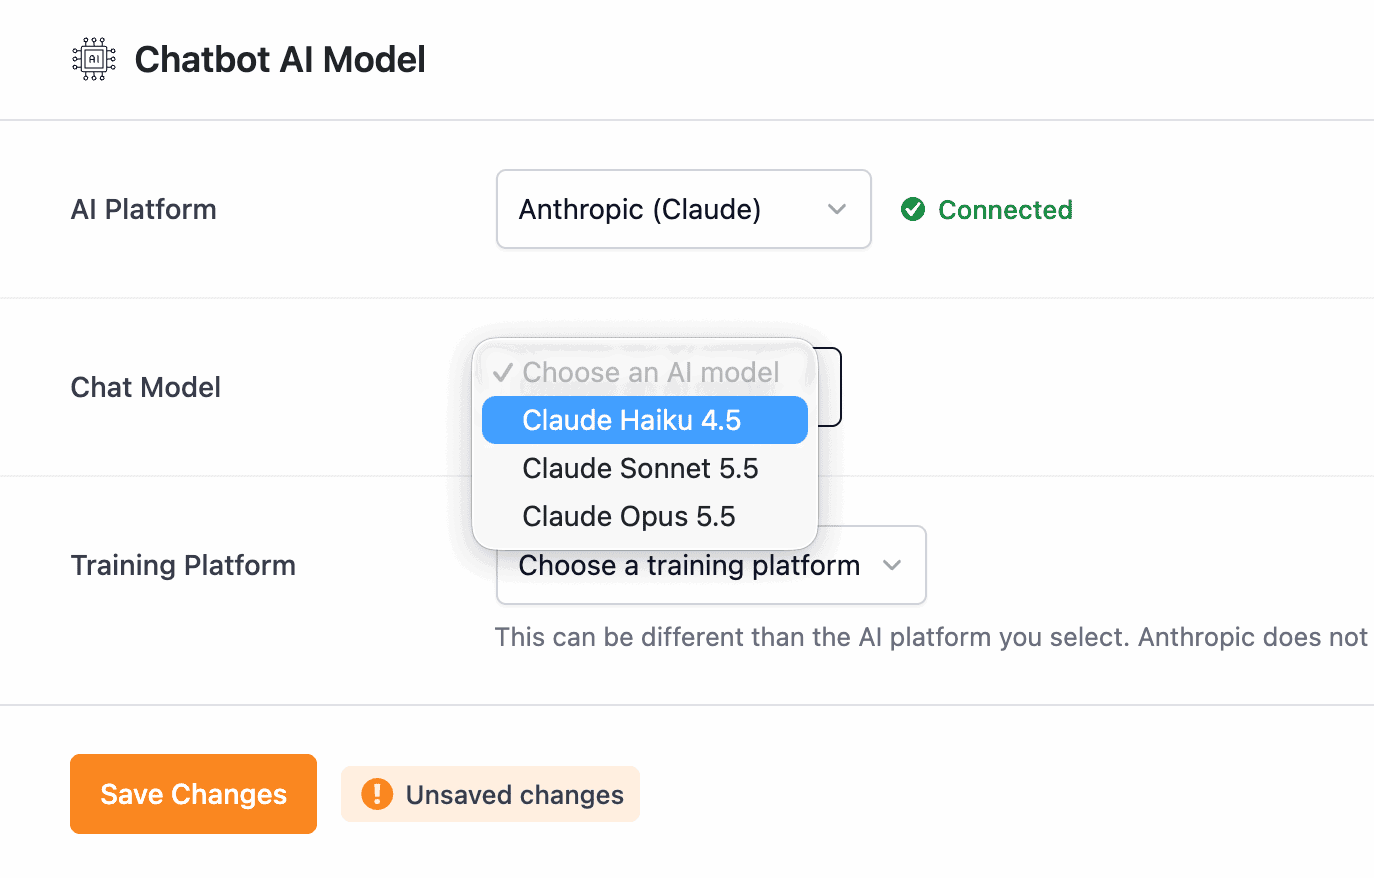
You’ll also choose a training platform, which must be OpenAI or Google. If you want to use a Claude model, you’ll need an API key from one of those platforms for training as well.
Now you’re ready to train your chatbot. Visit the Training menu, click the Add Pages button, select the pages you want Resolver to learn from, and click Train. Training usually finishes within seconds.
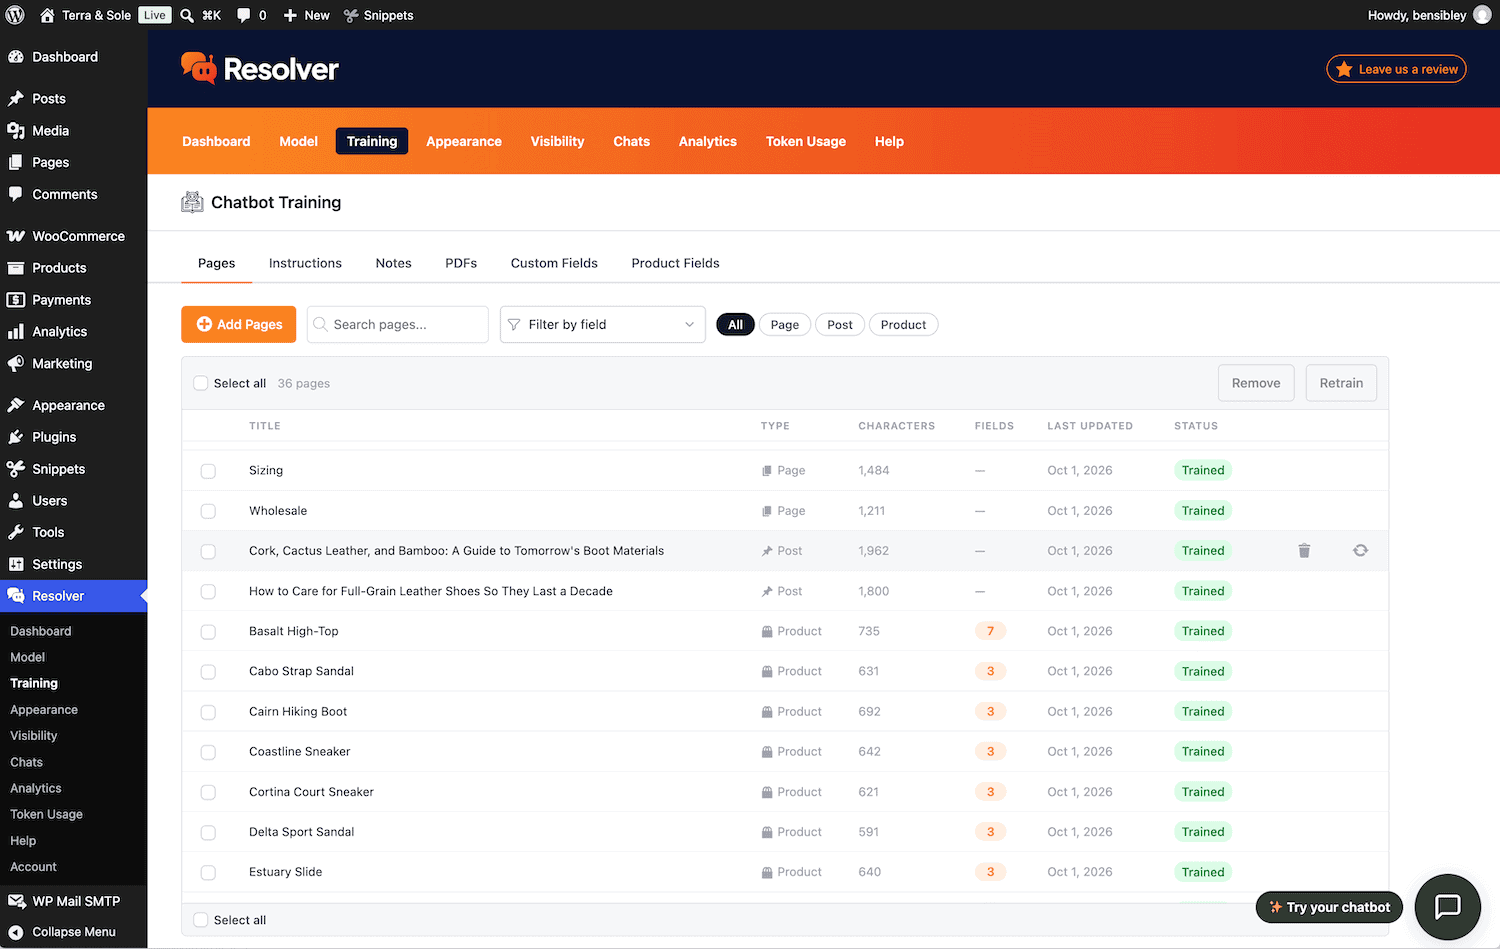
At this point, your chatbot is fully trained and prepared to answer questions. You can customize its appearance and then set it live via the Visibility menu when you’re ready.
For more detailed steps, follow the Getting Started guide.
Step 2: Review Your Conversations and Find Recurring Questions
Once visitors start using your chatbot, open the Chats menu in Resolver. This is where you can read every conversation visitors have had with your bot.
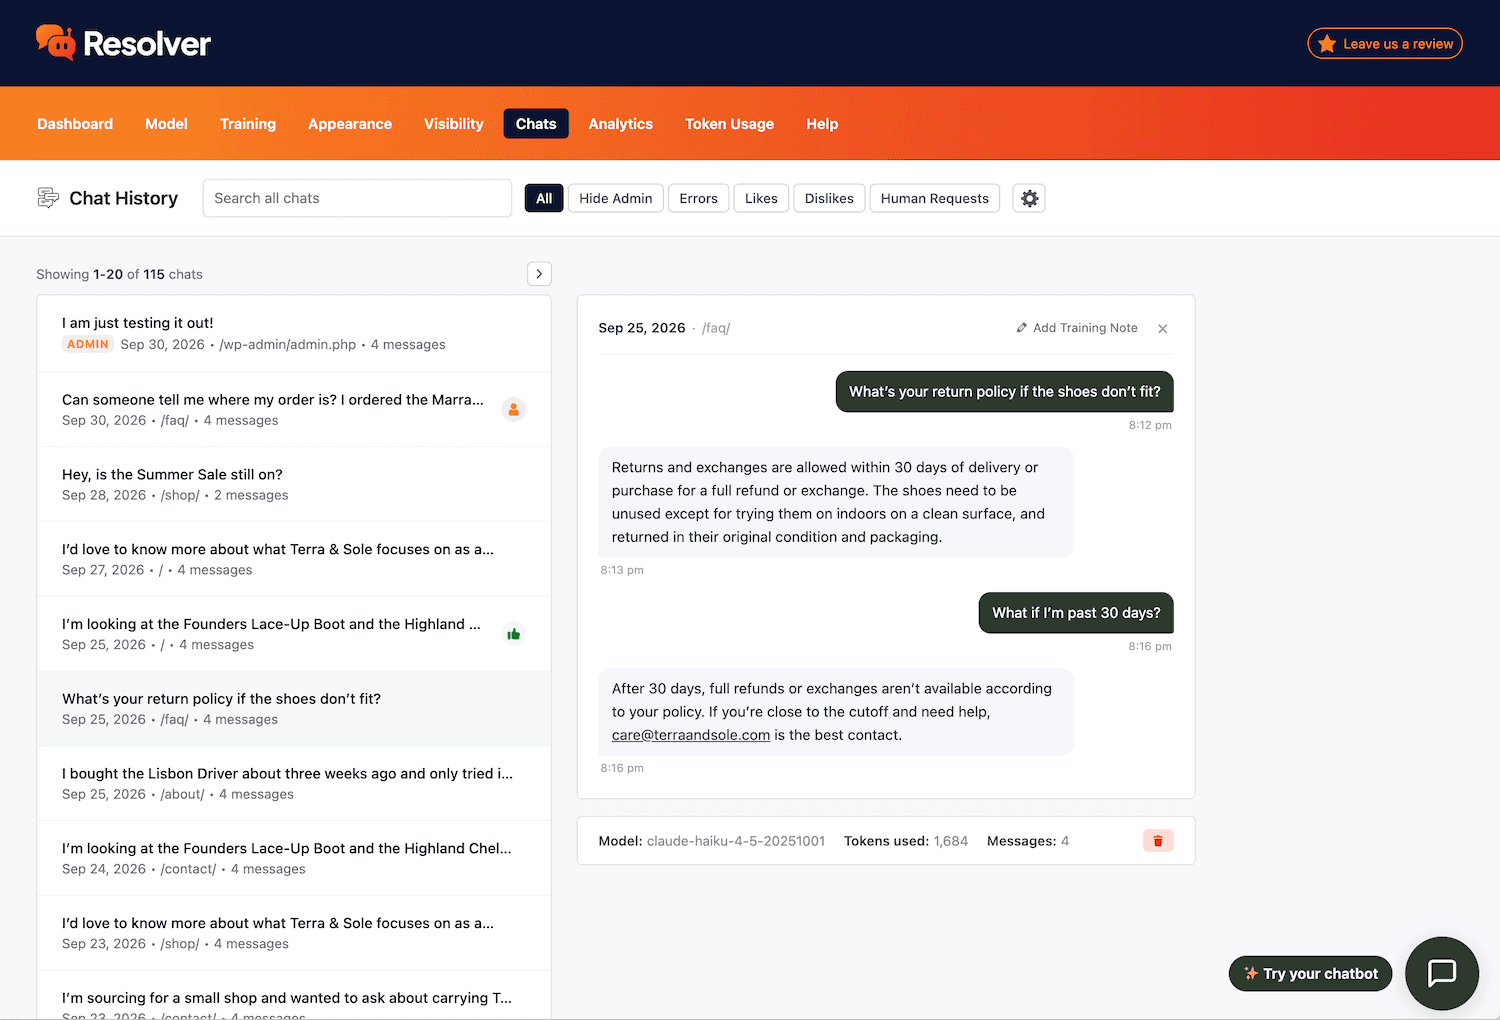
Create a simple spreadsheet and record the following details for each useful chat:
- The question the visitor asked
- The broader topic it belongs to
- The page or product it relates to, if that’s clear from the conversation
- The exact wording that stands out
After reviewing a batch of chats, group similar questions together and count how often each topic appears. You’re looking for clusters. Ten differently worded questions about choosing the right plan are really one topic, and that topic may be a strong candidate for a lead magnet.
Step 3: Choose a Lead Magnet Based on What Visitors Asked
The best lead magnet is the one that solves a problem your visitors keep raising. Pick one of your largest question clusters and match it to a format that fits.
| What visitors keep asking | Lead magnet idea |
| “How do I…?” | Step-by-step guide |
| “Which option is right for me?” | Comparison chart or buyer’s guide |
| “What should I check before…?” | Checklist |
| “Can you give me an example?” | Templates or example pack |
Here’s a hypothetical example. Imagine you run a gardening store and your chatbot keeps hearing questions like these:
- “What soil should I use for raised beds?”
- “How much soil do I need for a 4×8 bed?”
- “Can I reuse soil from last year?”
These questions all point to the same need, so a generic “Subscribe for gardening tips” offer would miss the mark. A much stronger offer would be “The Raised Bed Soil Checklist: Choose the right soil, calculate how much you need, and refresh it each season.”
Keep your lead magnet narrow enough to solve one problem well. For more ideas, read our guide on how to grow your email list with lead magnets.
Step 4: Create a Targeted Optin Campaign in MailOptin
Now it’s time to turn your lead magnet into an optin campaign.
Install and activate MailOptin, then connect it to your email marketing service. Next, create a new optin campaign and choose a format that suits your offer:
- Lightbox popup: Best for grabbing attention with a high-value offer.
- Slide-in: A less intrusive option that appears based on visitor behavior.
- Inline form: A natural fit inside or after related content.
- Notification bar: A lightweight way to keep your offer visible as visitors scroll.
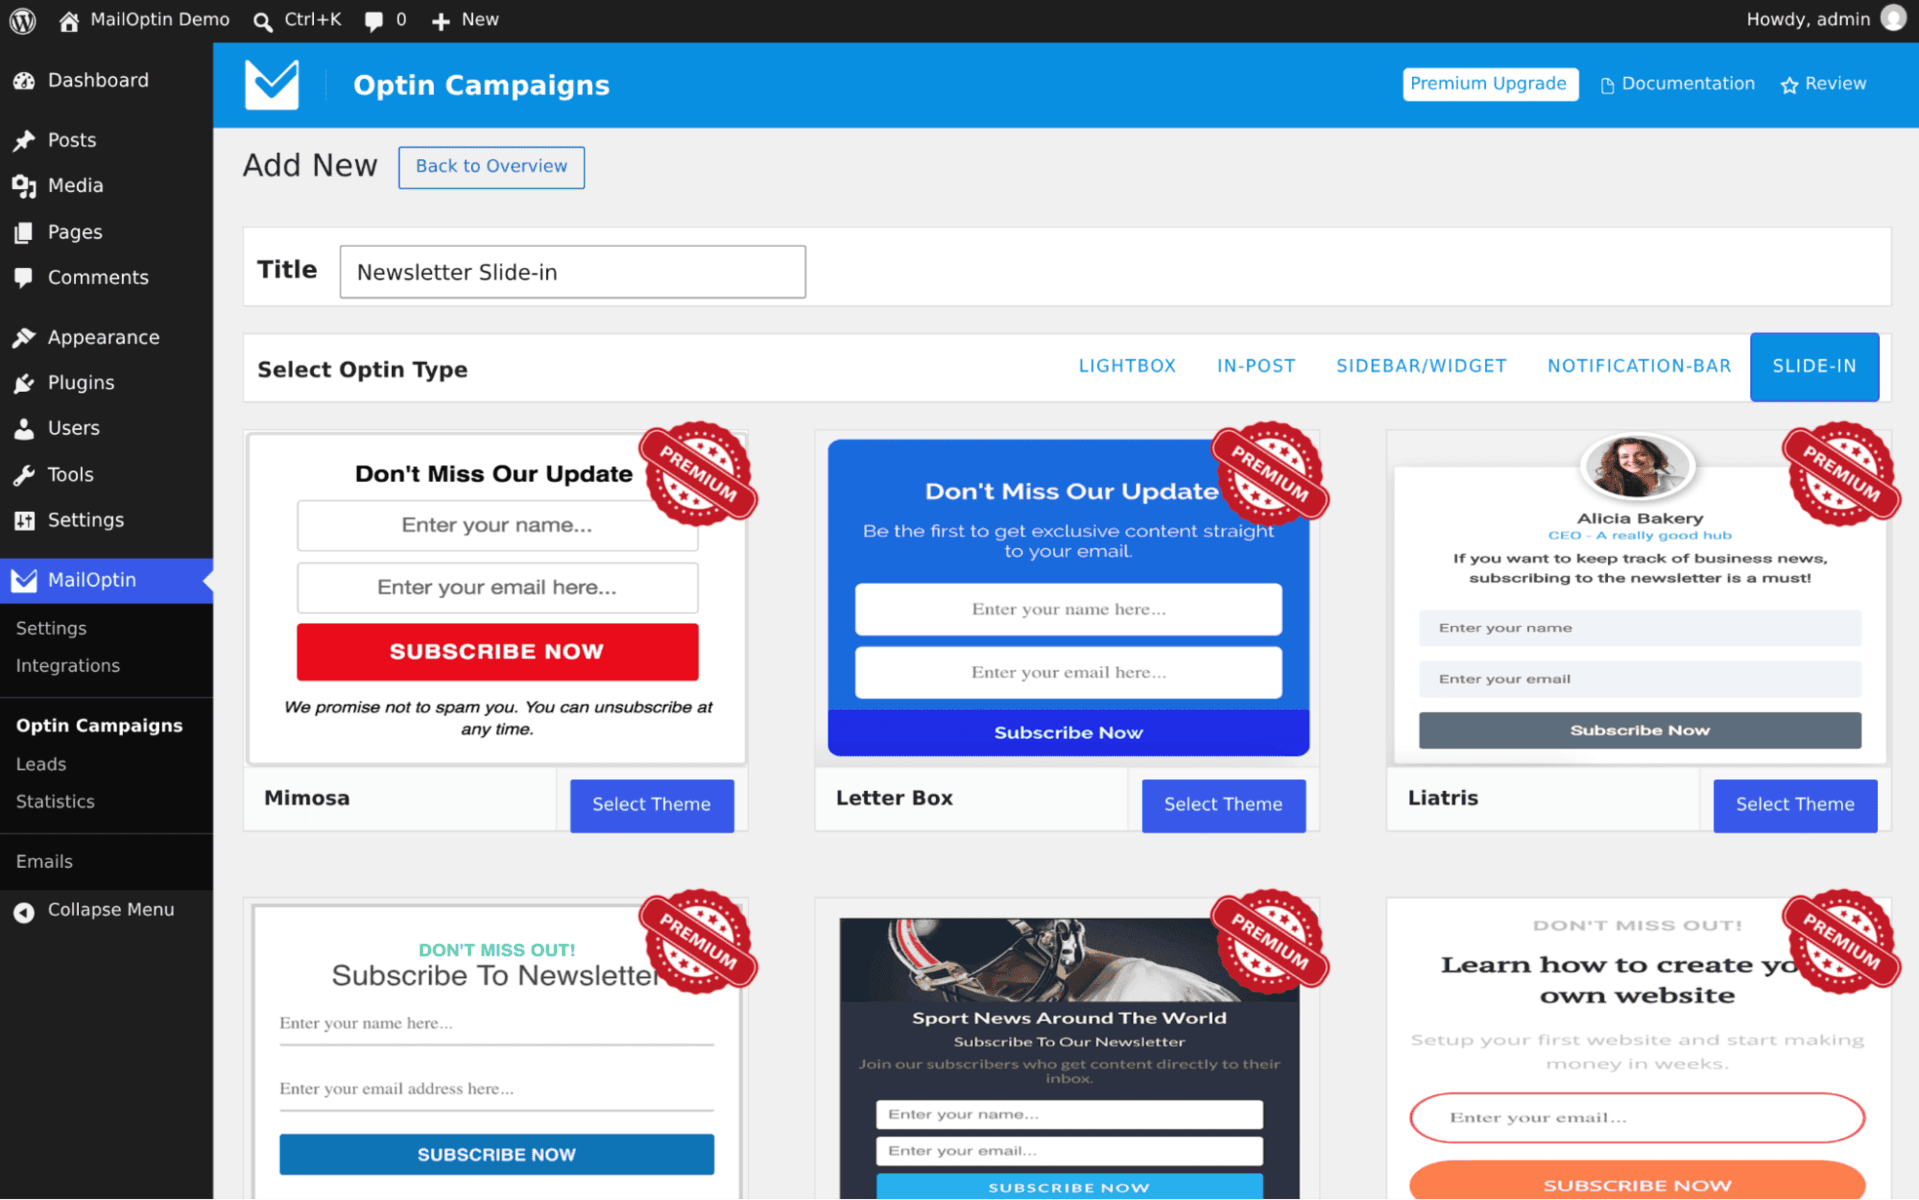
You can then customize your campaign in MailOptin’s form builder. This is where the language from your chats becomes useful. Use your visitors’ wording in the headline so the offer immediately feels relevant.
Using our gardening example, compare these two headlines:
- Generic: Join Our Gardening Newsletter
- Based on chat language: Not Sure What Soil to Use for Your Raised Bed?
The second headline speaks to a specific problem that real visitors have raised. Follow it with a clear description of what subscribers will get.
Step 5: Show Your Offer in the Right Place
Even a great lead magnet can fall flat if it appears in the wrong place. MailOptin’s targeting options let you show each offer to the visitors most likely to care about it.
Start with page-level targeting. Display your offer on the pages connected to the question cluster you identified. In our example, the raised bed offer belongs on raised bed articles and related product pages rather than on every page of the site.
Then, choose when the campaign should appear:
- Scroll triggers can show your offer after someone has engaged with the content.
- Time on site rules can give visitors a moment to settle in first.
- New vs. returning visitor rules let you tailor your offer to each group.
- Exit-intent technology can present your offer as someone is about to leave.
Your chatbot and optin campaign should complement each other. Resolver stays available for visitors who have a question, while MailOptin invites interested visitors to subscribe for more in-depth help.
Step 6: Test, Follow Up, and Improve
Your first campaign gives you a starting point. Testing and regular review will help it improve over time.
Use MailOptin’s A/B testing to compare headlines based on different phrases from your chats. Then, check the built-in analytics to see which version converts better.
You should also send new subscribers a welcome message so they get a strong first impression. Follow up with content related to the topic that brought them in, which keeps your emails as relevant as the offer they signed up for.
Finally, make chat review a regular habit. Your visitors’ questions will change as your products, content, and audience change, and each review may reveal your next campaign idea.
Bonus: Use the Same Questions to Improve Your Content
Chat history can improve more than your optin campaigns. It can also show you what’s missing from your website.
If visitors keep asking a question your site doesn’t answer well, publish a helpful post about it. Resolver can train on new pages automatically, so your chatbot can start using that post without you having to add it by hand. You can then use MailOptin to send the post to your subscribers as a new post notification.
One question can now do three jobs: improve your chatbot’s answers, give your website a useful new page, and provide your email list with relevant content.
FAQs
Can Resolver collect email addresses?
No, Resolver doesn’t collect email addresses. Use MailOptin to collect signups through your optin campaigns, and use Resolver to learn what your visitors want.
Do Resolver and MailOptin integrate directly?
No, Resolver and MailOptin don’t have a direct integration. They work side by side on your WordPress site, and you use what you learn from Resolver to plan your MailOptin campaigns.
How much does it cost to run an AI chatbot on WordPress?
The cost depends on your AI model and how many conversations your chatbot has. Resolver is free to install, and you pay your AI platform for usage, which usually comes to a few cents per conversation. You can also monitor token usage and set limits inside Resolver.
Conclusion
Your visitors are already telling you what they want to know. An AI chatbot gives you a place to hear those questions, and an optin campaign gives you a way to act on them.
Start by installing Resolver and letting it answer questions for a while. Then, review your chats, build a lead magnet around the most common topic, and launch your first targeted campaign with MailOptin.
With this process in place, your email list can grow around real demand, not guesswork.