Do you want to learn how to sell paid memberships with WooCommerce?
WooCommerce is one of the most popular eCommerce plugins for WordPress, and with the proper setup, you can use it to offer memberships alongside selling physical and digital products.
Memberships are a great way to build recurring revenue, grow a loyal community, and provide customers with access to exclusive content, discounts, or services.
In this guide, we’ll explain why selling paid memberships via WooCommerce is an excellent choice and show you the exact steps to set it all up.
By the end, you’ll know how to create membership plans, connect them to WooCommerce, and deliver a seamless experience for your members.
Why Sell Paid Memberships via WooCommerce?
Selling paid memberships via WooCommerce comes with several advantages that make it ideal for growing your business and creating lasting customer relationships.
Here are some reasons to use WooCommerce to sell paid memberships.
Recurring Revenue and Business Growth: Memberships allow you to charge a recurring fee monthly, quarterly, or annually. This predictable income stream makes it easier to plan for growth, invest in your business, and maintain a stable cash flow compared to one-time product sales.
Flexibility and Customization: WooCommerce integrates seamlessly with membership plugins that let you create different plans, set pricing tiers, and control access to content, courses, or products. You can customize every aspect of your membership program to fit your audience’s needs.
Exclusive Content and Perks: Memberships allow you to provide gated content, member-only discounts, free shipping, or early access to products. This not only creates a sense of exclusivity but also increases customer loyalty.
Community Building: A membership site is more than a sales channel; it’s a way to build a loyal community. You can create discussion forums, webinars, and other experiences that give members a sense of belonging, which leads to long-term engagement.
Now that you understand why selling paid memberships via WooCommerce is a great idea, let’s walk through the steps to set everything up and start offering memberships on your site.
Steps to Selling Paid Memberships via WooCommerce
To begin, please make sure your WordPress site is set up, WooCommerce is installed, and you have a clear idea of the membership plans you want to offer.
Once that’s in place, the next step is to install and activate the membership plugin you’ll be using.
For this guide, we’ll use ProfilePress because it’s a powerful membership solution packed with features for selling subscriptions, managing members, and creating a smooth user experience.
With ProfilePress’s WooCommerce integration, you can create and manage memberships, control billing and shipping fields, and replace the default WooCommerce login and account forms with ProfilePress’s custom forms.
Now, I’d like to walk you through the process of installing ProfilePress.
Install and Activate the ProfilePress Plugin
To get started, visit the ProfilePress website and purchase the plugin.
After completing your purchase, download the ZIP file from your account section to your computer.
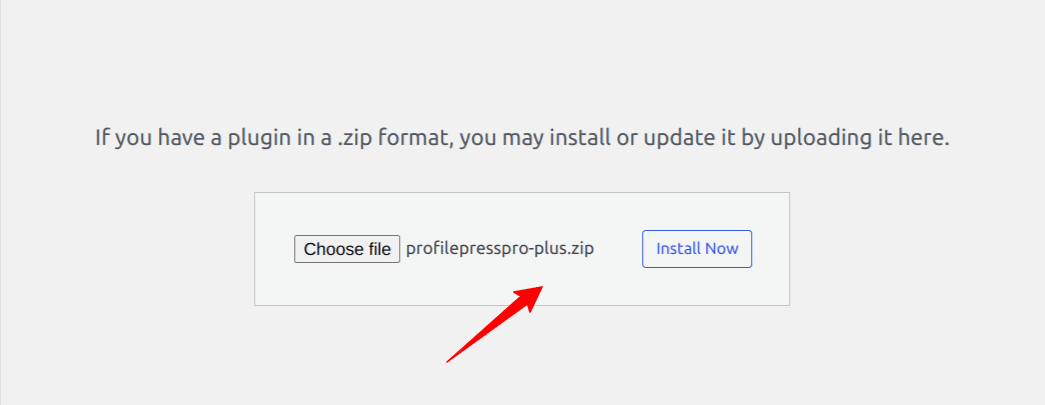
Next, log in to your WordPress admin dashboard and go to Plugins > Add New.
Click Upload Plugin, then either drag and drop the ZIP file into the upload area or use the Choose File button to select it from your computer.
Finally, click Install Now and then Activate to enable the plugin on your site.
The next step is to activate your license key. This will unlock all premium features and ensure you receive regular plugin updates.
After activation, you’ll see a notification at the top of your WordPress dashboard that says: “ProfilePress needs to create several pages to function properly.” Click the Create Pages button to let the plugin automatically generate the necessary pages.
Once that’s done, you can move on to activating the WooCommerce addon.
Activating the WooCommerce Addon
To enable the WooCommerce integration, go to ProfilePress > Addons in your WordPress dashboard, locate the WooCommerce addon, and switch it on.

With the addon active, you can now connect WooCommerce products to membership plans. Here’s how it works:
- Create a product in WooCommerce with the price you want to charge.
- Create a corresponding membership plan in ProfilePress.
- Link the WooCommerce product to that membership plan.
Once this is set up, anyone who purchases the product will be subscribed automatically to the linked membership plan in ProfilePress.
For example, if you want to offer a Premium Membership plan, start by creating a WooCommerce product named Premium Membership. Then, create the matching plan in ProfilePress and map the two together. This way, purchasing the product automatically subscribes users to the membership.
In the next section, we’ll walk you through how to set this up step by step.
Creating WooCommerce Products for Selling WordPress Memberships
To create a WooCommerce product for your Premium Membership, log in to your WordPress dashboard and go to Products > Add New.
Enter a title for the product. In the Product data section, select Simple product, set the price, add a product image, and then change the Catalog visibility to hidden.
Setting a product Catalog visibility to be hidden ensures it won’t appear in your store catalog or search results. It will only be accessible through a direct link or when added to a pricing page.
Once you’ve added the necessary details, click Publish to save the product.

With the product created, the next step is to set up the membership plans your users will subscribe to.
Creating Membership Plans in ProfilePress
To create a membership plan in ProfilePress, go to ProfilePress > Membership Plans > Add New.
Give the plan a name and set the price to match the cost of the corresponding WooCommerce product. Since this product is not a subscription, set the billing frequency to One-time purchase. (We’ll cover recurring memberships later.)
Next, scroll down to the Downloads & Integration section. Click on the WooCommerce tab and select the Premium Membership product you created earlier.
This links the product to the membership plan, ensuring that when customers purchase the product, they are automatically granted access to the membership.

Once everything is configured, click Save Plan to create the membership plan.
Understanding the WooCommerce and ProfilePress Integration
Here’s how the integration works in practice:
Imagine you have a pricing page on your site that links to the Premium Membership product.

When a user clicks the link, adds the product to their cart, and completes the checkout process, they are automatically granted access to the Premium Membership plan in ProfilePress.

Note that if their order is ever canceled or refunded, their membership access will also be revoked, and their subscription will be marked as Expired in ProfilePress.
With this setup in place, you can confidently sell memberships through WooCommerce.
Next, let’s look at how to set up recurring memberships for ongoing payments.
Selling Recurring Memberships with WooCommerce
WooCommerce offers a Subscriptions extension that allows customers to subscribe to products or services with recurring payments, whether weekly, monthly, or annually. When combined with ProfilePress, this makes it easy to sell recurring memberships on your website.
To set this up, install and activate the WooCommerce Subscriptions plugin on your site.
Next, create a subscription product in WooCommerce by going to WooCommerce > Products > Add New.
Enter a name for the membership, set the product type to Simple subscription, and define the subscription details such as price, billing schedule, product image, and length.
Then change the catalog visibility to Hidden so it does not appear in your shop or search results, and then publish the product.

The next step is to create the corresponding membership plan in ProfilePress from ProfilePress > Membership Plans > Add New.
Enter a title and price, and set the billing frequency to Monthly to match the WooCommerce subscription product.

Scroll down to the Downloads & Integration section, click the WooCommerce tab, and select the Silver Membership product you created earlier.

When you are done, click Save Plan.
Now that the setup is complete, users can subscribe to the Silver Membership by visiting the product link, adding it to their cart, and completing the checkout process through WooCommerce.

After their purchase, they will automatically be subscribed to the corresponding membership plan in ProfilePress.
If the WooCommerce subscription is ever canceled or expires, their membership in ProfilePress will also be canceled or marked as expired, ensuring both systems remain perfectly in sync.
Now that we’ve shown you how to sell paid memberships via WooCommerce for both one-time fees and recurring fees, the next section will cover how to create WooCommerce members-only discounts.
Creating WooCommerce Members-Only Discounts
With the ProfilePress WooCommerce addon, you can reward members with exclusive discounts by creating members-only coupon codes.
These discounts are automatically applied at checkout for users with active subscriptions to specific membership plans, removing the need for customers to search for or enter coupon codes manually. This is a great way to add value for members and encourage loyalty.
To set this up, start by creating a discount in WooCommerce. Go to Marketing > Coupons > Add New.
Then enter or generate a coupon code, write a description, and configure the discount details. For example, in the screenshot below, we are offering a 20% discount.

Once you are done, click on Publish.
Now the coupon is ready, you need to assign it to a membership plan in ProfilePress so that the discount is automatically applied to members subscribed to that plan.
To do this, navigate to ProfilePress > Membership Plans and click on the title of the plan you’d like to edit.
Scroll to the Downloads & Integrations section, and select the coupon you created.

When done, click on Save Plan.
Now, whenever a member with an active Premium Membership adds products to their cart, the discount will automatically apply at checkout.

ProfilePress also hides the actual coupon code on the Cart and Checkout pages, replacing it with the text “Membership discount” for a cleaner shopping experience.
Offering Free Shipping to Members
Your members are often your most loyal customers, so giving them special perks like free shipping can encourage them to keep purchasing from your store. One way to provide free shipping in WooCommerce is by creating a coupon code that grants free shipping to members.

In the next section, we’ll show you how to create a members-only WooCommerce store.
Creating Members-Only WooCommerce Stores
One of the advantages of running a membership site is the ability to create a private WooCommerce store where certain products are only visible and available to paying members. This approach not only adds exclusivity but also creates more value for your memberships, as customers are motivated to subscribe to access these special products.
With ProfilePress, setting up a members-only WooCommerce store is simple. The plugin’s powerful content protection features allow you to restrict individual products, categories, or even your entire shop to specific membership plans.
Let’s go ahead and show you how it works.
Restricting Access to WooCommerce Product Pages to Members
To restrict access to WooCommerce product pages so only paid members can access them, go to ProfilePress > Content Protection > Add a Protection Rule

Give the rule a name, then in the Content to Protect section, select All Products from the dropdown menu.
Next, scroll down to the Access Condition section to decide who can view your store and product pages.
From the dropdown options, choose Logged-in users and specify the membership plans or user roles that should have access.

For non-members, you need to decide how they will interact with your protected content. ProfilePress offers two primary options for handling this.
The first option is to redirect them to another page, such as your pricing page. This approach provides users with a clear path to subscribe to have access to your products.

The second option is to select ‘Show access restricted message.’ For example, you could display a custom message asking visitors to log in to view and purchase the product, as shown in the image below.

When this option is enabled, visitors who try to view protected content will see your custom message, and the Add to Cart button will be hidden or replaced with an error message informing them that they cannot purchase the product, as shown in the image below.

Once you’re satisfied with the configuration, click on Save Rule.
This same method can be used to restrict access to other areas of your WordPress site, including pages, posts, and custom post types, allowing you to create an entirely member-exclusive experience.
Setting Up the Member Area in WordPress
ProfilePress comes with a Member Area (My Account) feature that allows users to manage their profiles, update personal information, change their passwords, and more.
Since you’re building a WooCommerce membership site, it’s essential to give users access to additional details like their orders, memberships, and subscriptions.
To enable these extra tabs, go to ProfilePress > Settings > WooCommerce > My Account and select the tabs you’d like to display.

Since WooCommerce handles payments, we don’t need the Orders and other tabs from ProfilePress on the My Account page.
To remove them, navigate to ProfilePress > Settings > My Account > Disable My Account Tabs.

Here’s an example of the My Account page by ProfilePress with menu tabs for viewing their plan subscriptions, WooCommerce orders, and more.

With these settings in place, your members will have a well-organized My Account page that provides everything they need in one place, from managing their subscriptions and memberships to reviewing their WooCommerce orders.
That’s how to sell paid membership via WooCommerce!
Selling paid memberships via WooCommerce is a powerful way to grow your business, generate recurring revenue, and build a loyal customer base.
With the help of ProfilePress, you can create and manage membership plans, control access to exclusive content, and offer perks like member-only discounts or free shipping.
Now that you know how to set everything up, you can confidently launch your membership site and provide an excellent experience for your members.
Start today by creating your first membership plan and turning your WooCommerce store into a platform that keeps customers engaged and coming back for more.