Allow Users Subscribe to Categories To Receive New WordPress Post Emails
You may want to consider sending a new post notification to your WordPress site users or subscribers who are interested in a particular topic so that you don’t bore them with posts they don’t find engaging or willing to read.
WordPress has a feature to categorize post and you can make users subscribe to receive new post newsletters or email update using MailOptin.
To achieve this, create a subscription form that allows visitors and users of your WordPress site to select the topics or post categories they want to be subscribed to via email. Finally, create email automation that will notify them whenever posts belonging to the category they are subscribed to are published.
The steps are as follows:
- Create a signup form that allows users to select categories to subscribe to.
a. Using email lists for segmentation.
b. Using Mailchimp groups for segmentation. - Create new post notification automation for the post categories to send subscribers emails when new posts in the categories they are subscribed to are published.
a. Using email lists for segmentation.
b. Using Mailchimp groups for segmentation.
Getting Started
Ensure that you’ve categorized all your posts. That is, when you create new posts, ensure you assign them to at least, a category. Then, create email lists for each of the categories that users will be allowed to select and subscribe to in your email marketing software.
We support all major email marketing services including MailChimp, Salesforce, Microsoft Dynamics 365, Drip, AWeber, Google Sheets, Kit (ConvertKit), MailerLite, Constant Contact, GetResponse, Sendy, Campaign Monitor, ActiveCampaign, Brevo (Sendinblue), Gist, Klaviyo, Sendlane, Mailster, Vertical Response, Mailjet, HubSpot, Ontraport, Moosend, MailPoet, Zoho CRM, Zoho Campaigns, Keap Max Classic (Infusionsoft), HighLevel, Omnisend, Flodesk, Beehiiv, Benchmark Email, SendFox, iContact, Mailgun, E-goi, SendGrid Email Marketing, Elastic Email, Encharge, weMail, FluentCRM, CleverReach, NewsMAN, Facebook custom audience.
Having done this, next is to create the WordPress signup form that will allow users to pick the list they want to join. Don’t forget that each mailing list represents your post categories.
Our post categories are Leadership, Technology and Travel.
Create a Signup Form That Allows Users to Select Categories to Subscribe To
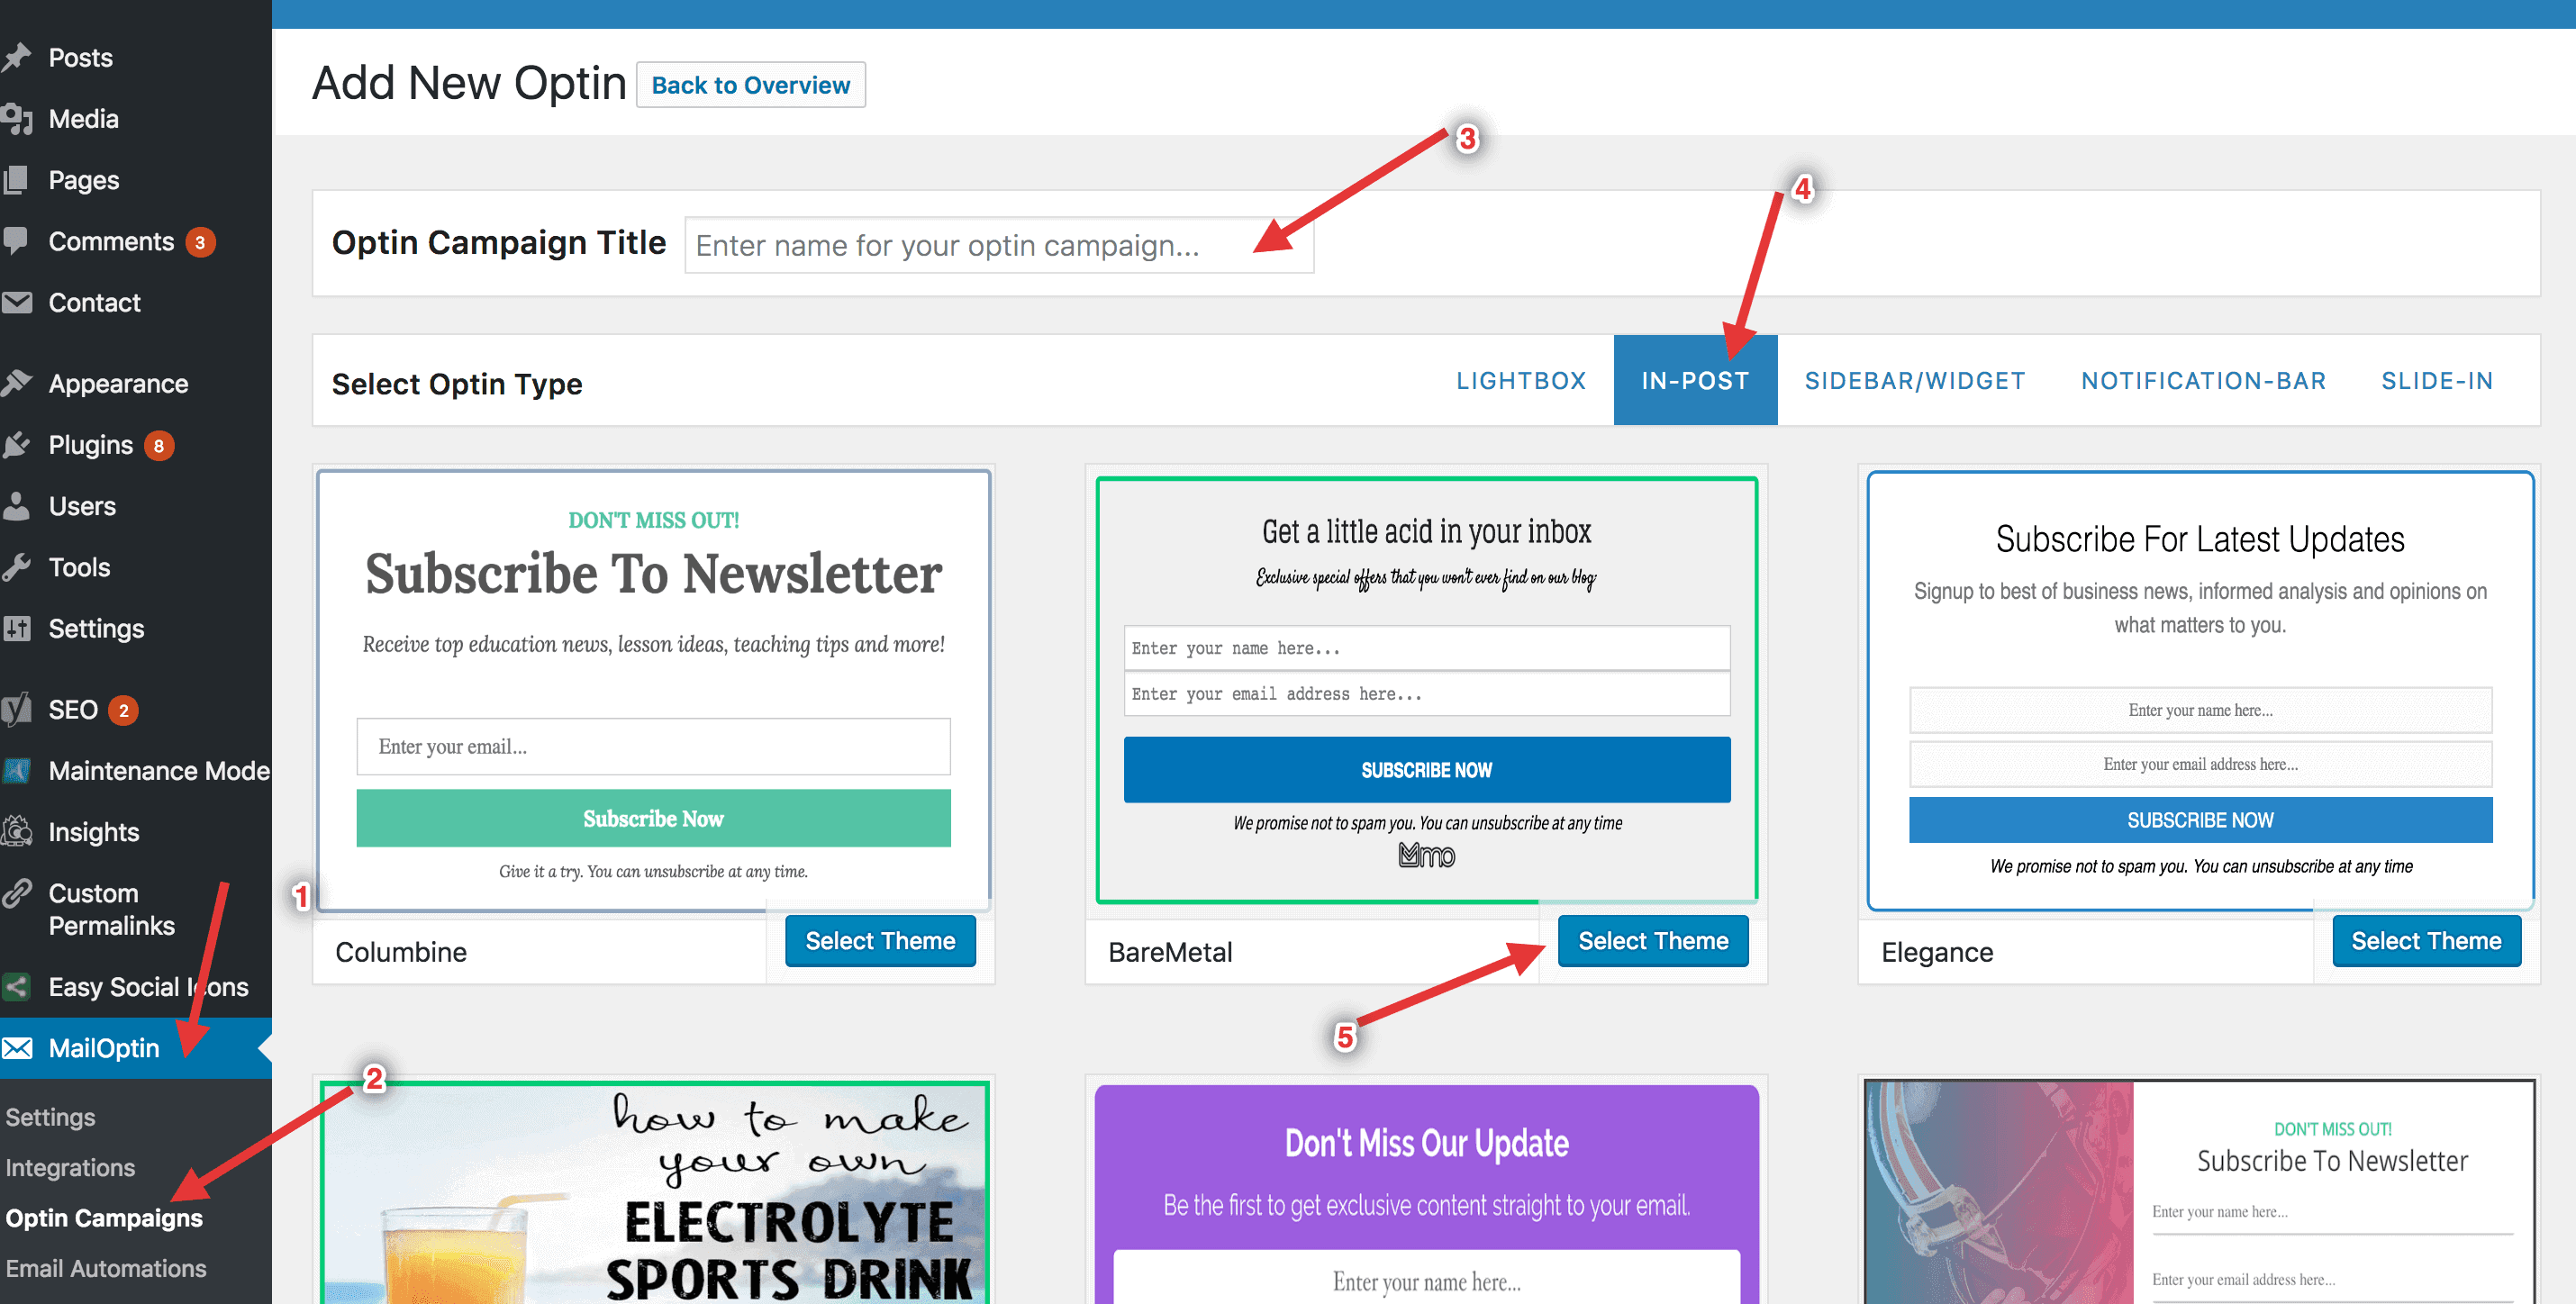
Go to MailOptin plugin on the Dashboard of your WordPress site.
Click on add new
Enter the name of your campaign. You can give it the name of the category you’re targeting.
On the “Select Optin Type” menu, select your preferred optin type. We’ll be using “In-post” because we want the form to be displayed after the post content.
Select a preferred theme from the available options.
Edit the theme using the first five tabs – Design, Headline, Description, Note, and Fields.
Using Email Lists for Segmentation
You’ll need to add the list selection custom field so site visitors can pick which mailing list they want to be a part of.
To do this, open the Fields panel and the “List Selection” field to the form.
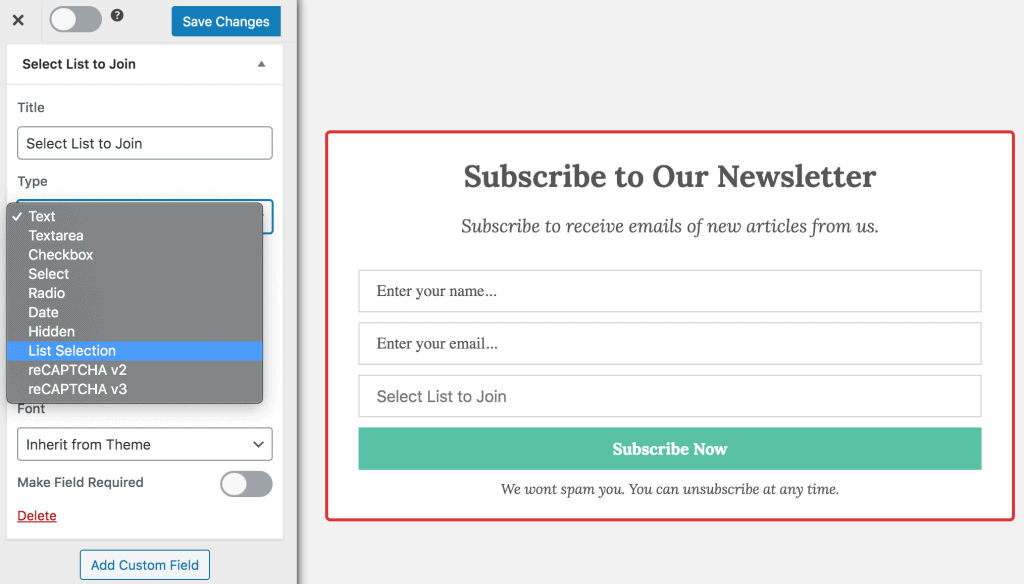
You should see a list of options you need to set up.
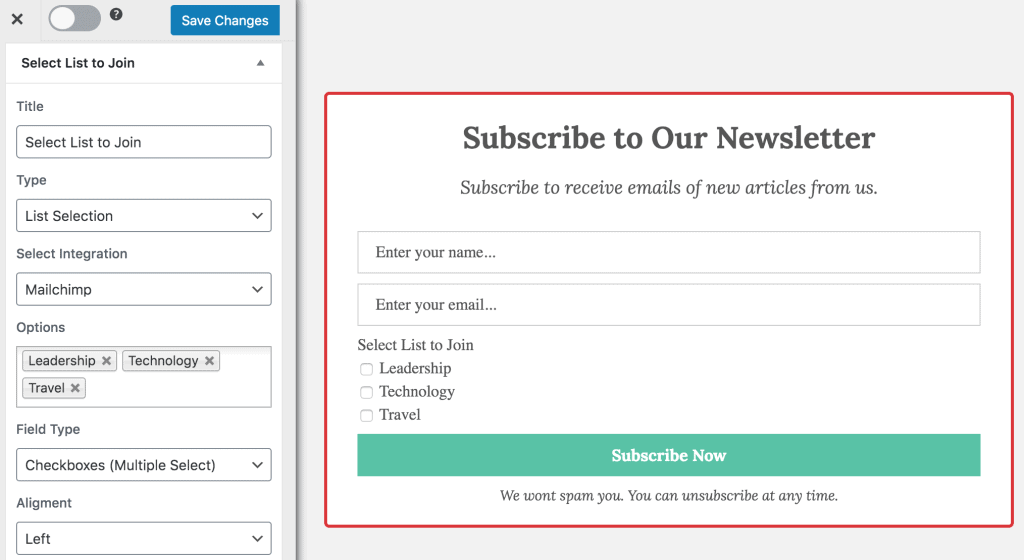
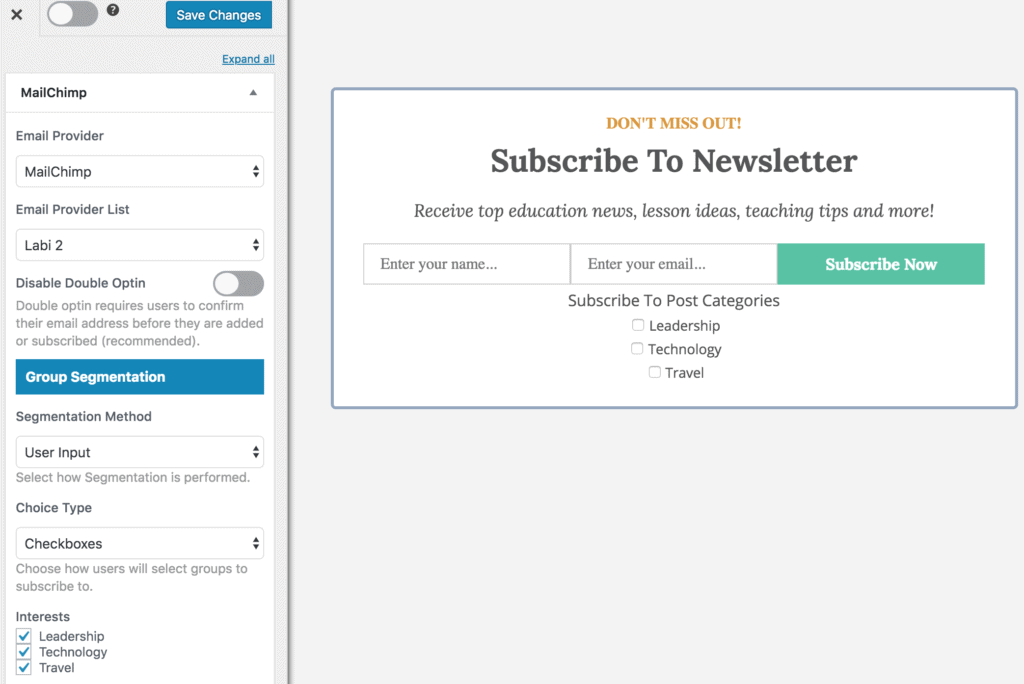
Firstly, select your integration (Mailchimp in our case). In Options, select the lists you want to make available for selection, then select the Field Type which can be a select dropdown, radio buttons or checkboxes (this allows users to select multiple lists unlike select and radio buttons that allows just one pick).
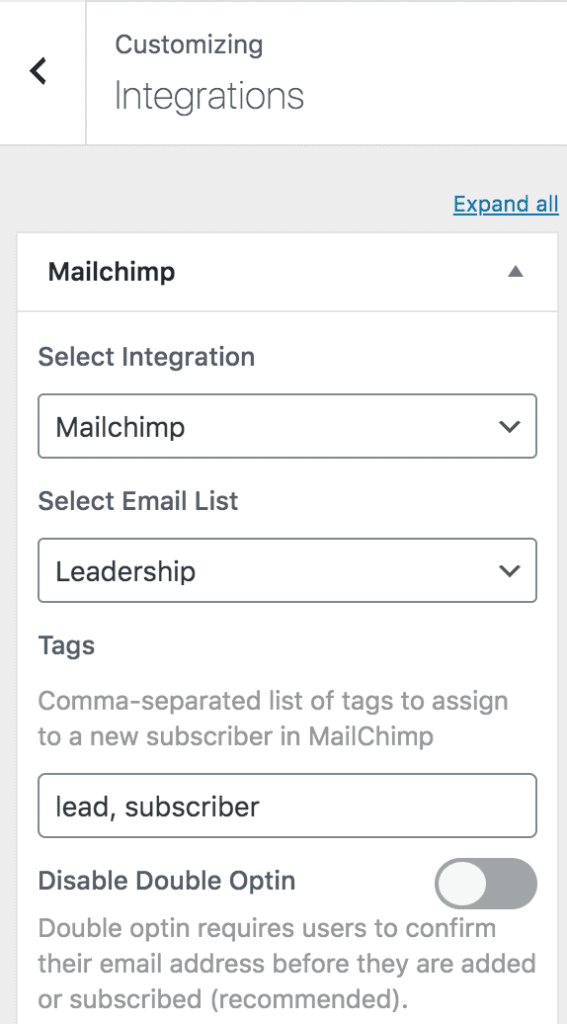
The last thing we need to do is connect the form to your integration.
Open the Integrations panel and select your integration. Note that this must be the same integration you configured in the “List selection” custom field above.
Select the default email list that leads will be added to if they do not select any list. So basically, the way this thing work is, the list selected by subscribers will override the default you selected.
Save your changes and that’s it.
Using Mailchimp Group for Segmentation
If you use Mailchimp, you can use their group feature instead of creating multiple lists for each of your post categories.
How to Create Mailchimp Groups
Select your preferred list or audience. Navigate to Manage Contacts and click Groups > Create Groups
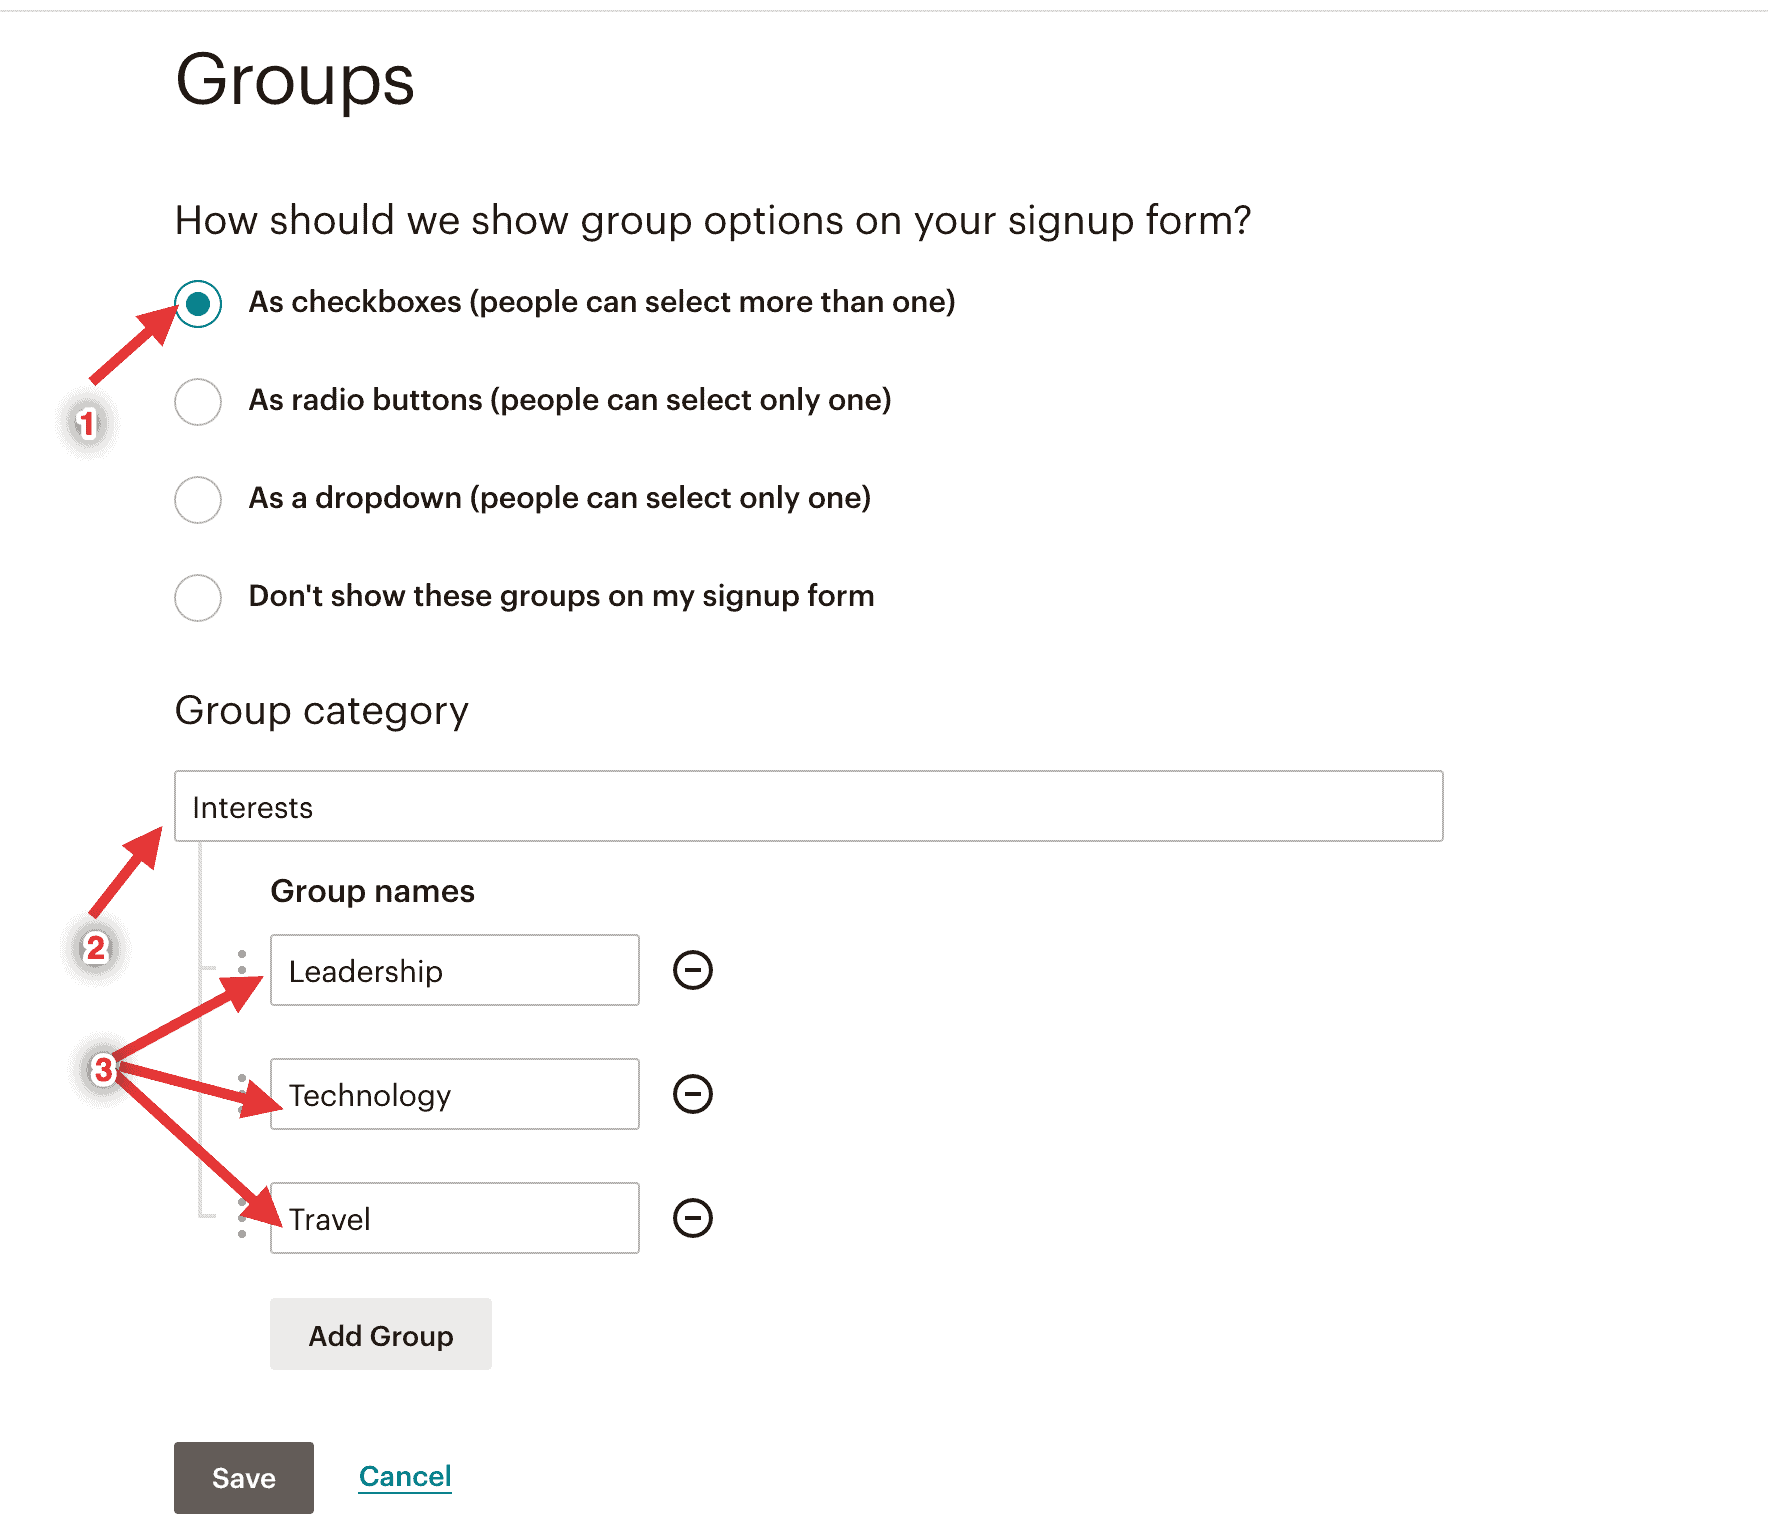
Select “As checkboxes” under “How should we show group options on your sign-up form”
Name the Group Category or type the default placeholder “interest”
Under Group names, type in the names of your post categories and add as many as you want.
Click Save.
Displaying Mailchimp Group for Users to Select
To do this, select manual as your segmentation method and select the groups to make available for subscribers to select.
Create New Post Notification Automation for Each Category
The last step is to create a new post notification automation for each of the post categories.
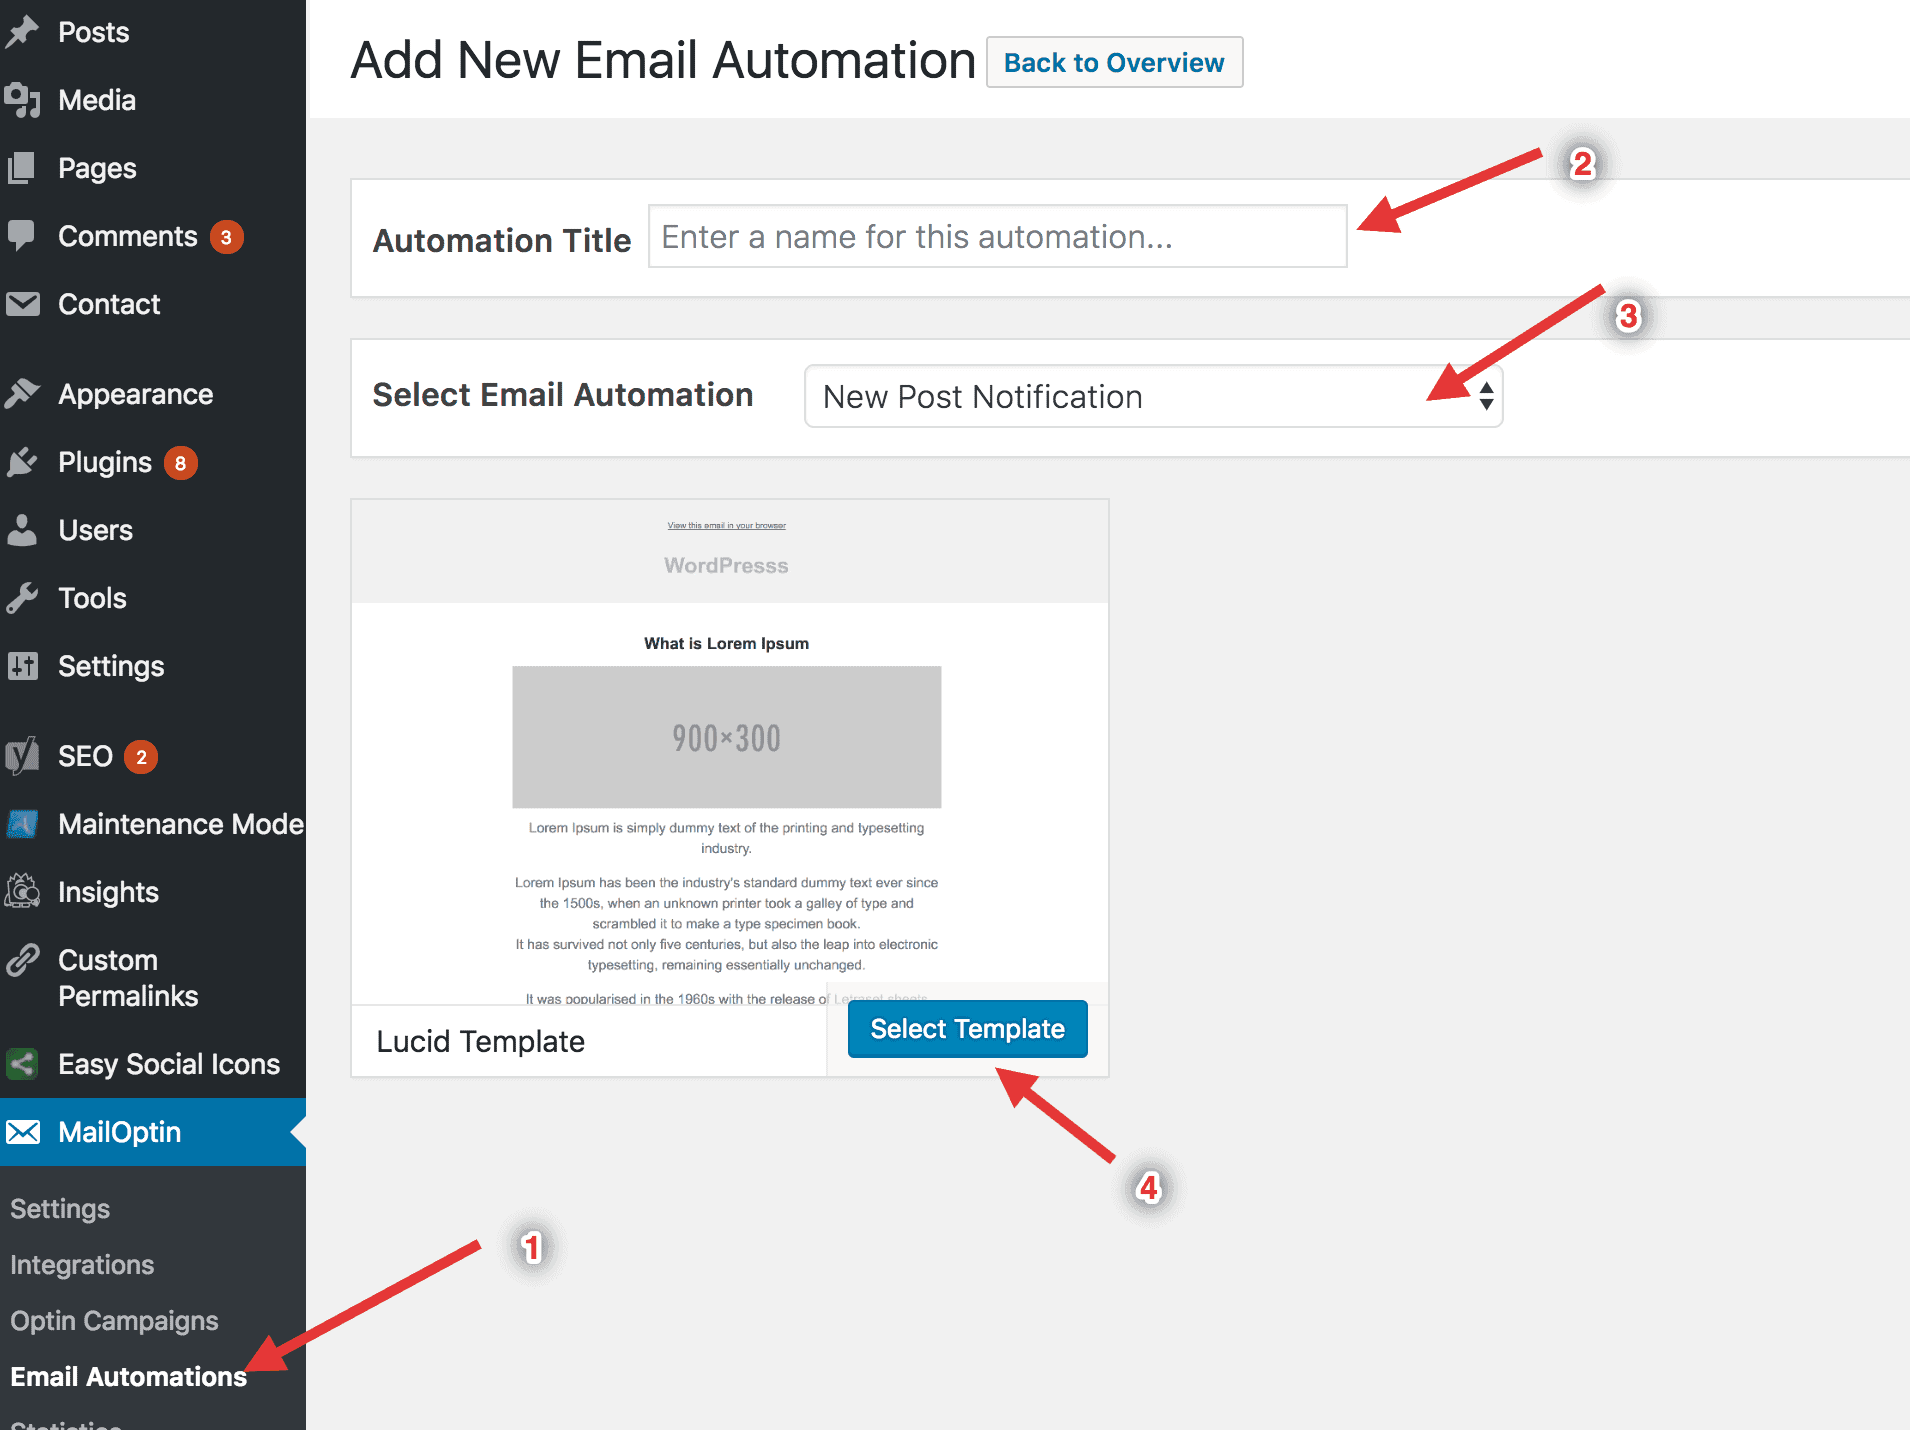
Go to MailOptin > Email Automations on your WordPress Dashboard
Click on “Add New”
Enter the Automation Title i.e. Leadership for posts under the leadership category
Under “Select Email Automation”, select “New Post Notification”
Select a template from the available options
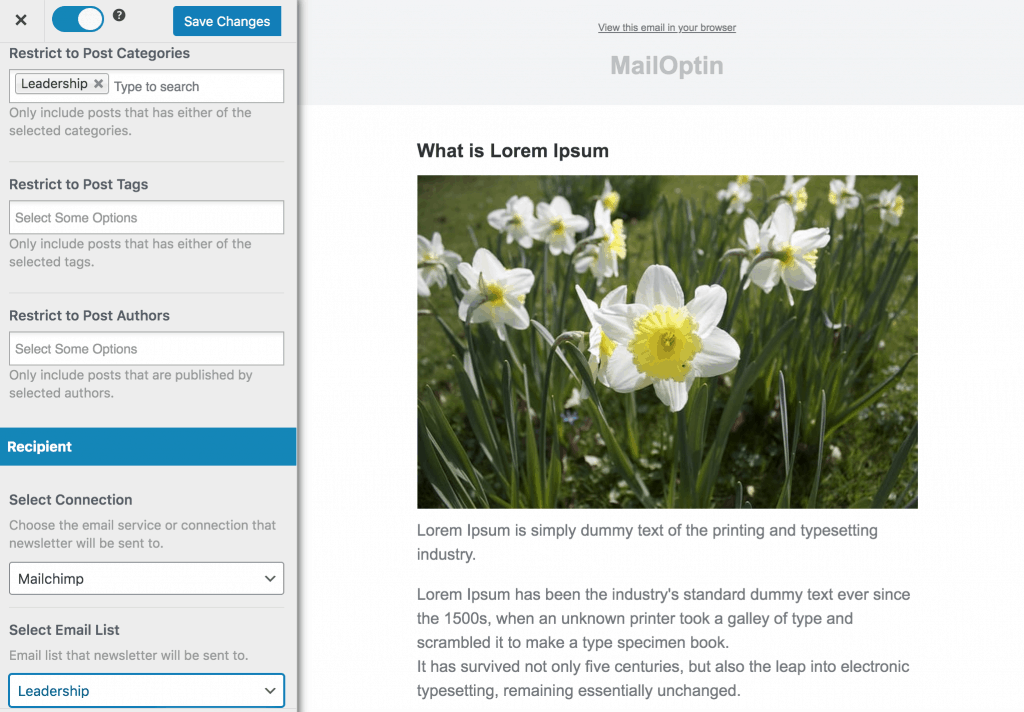
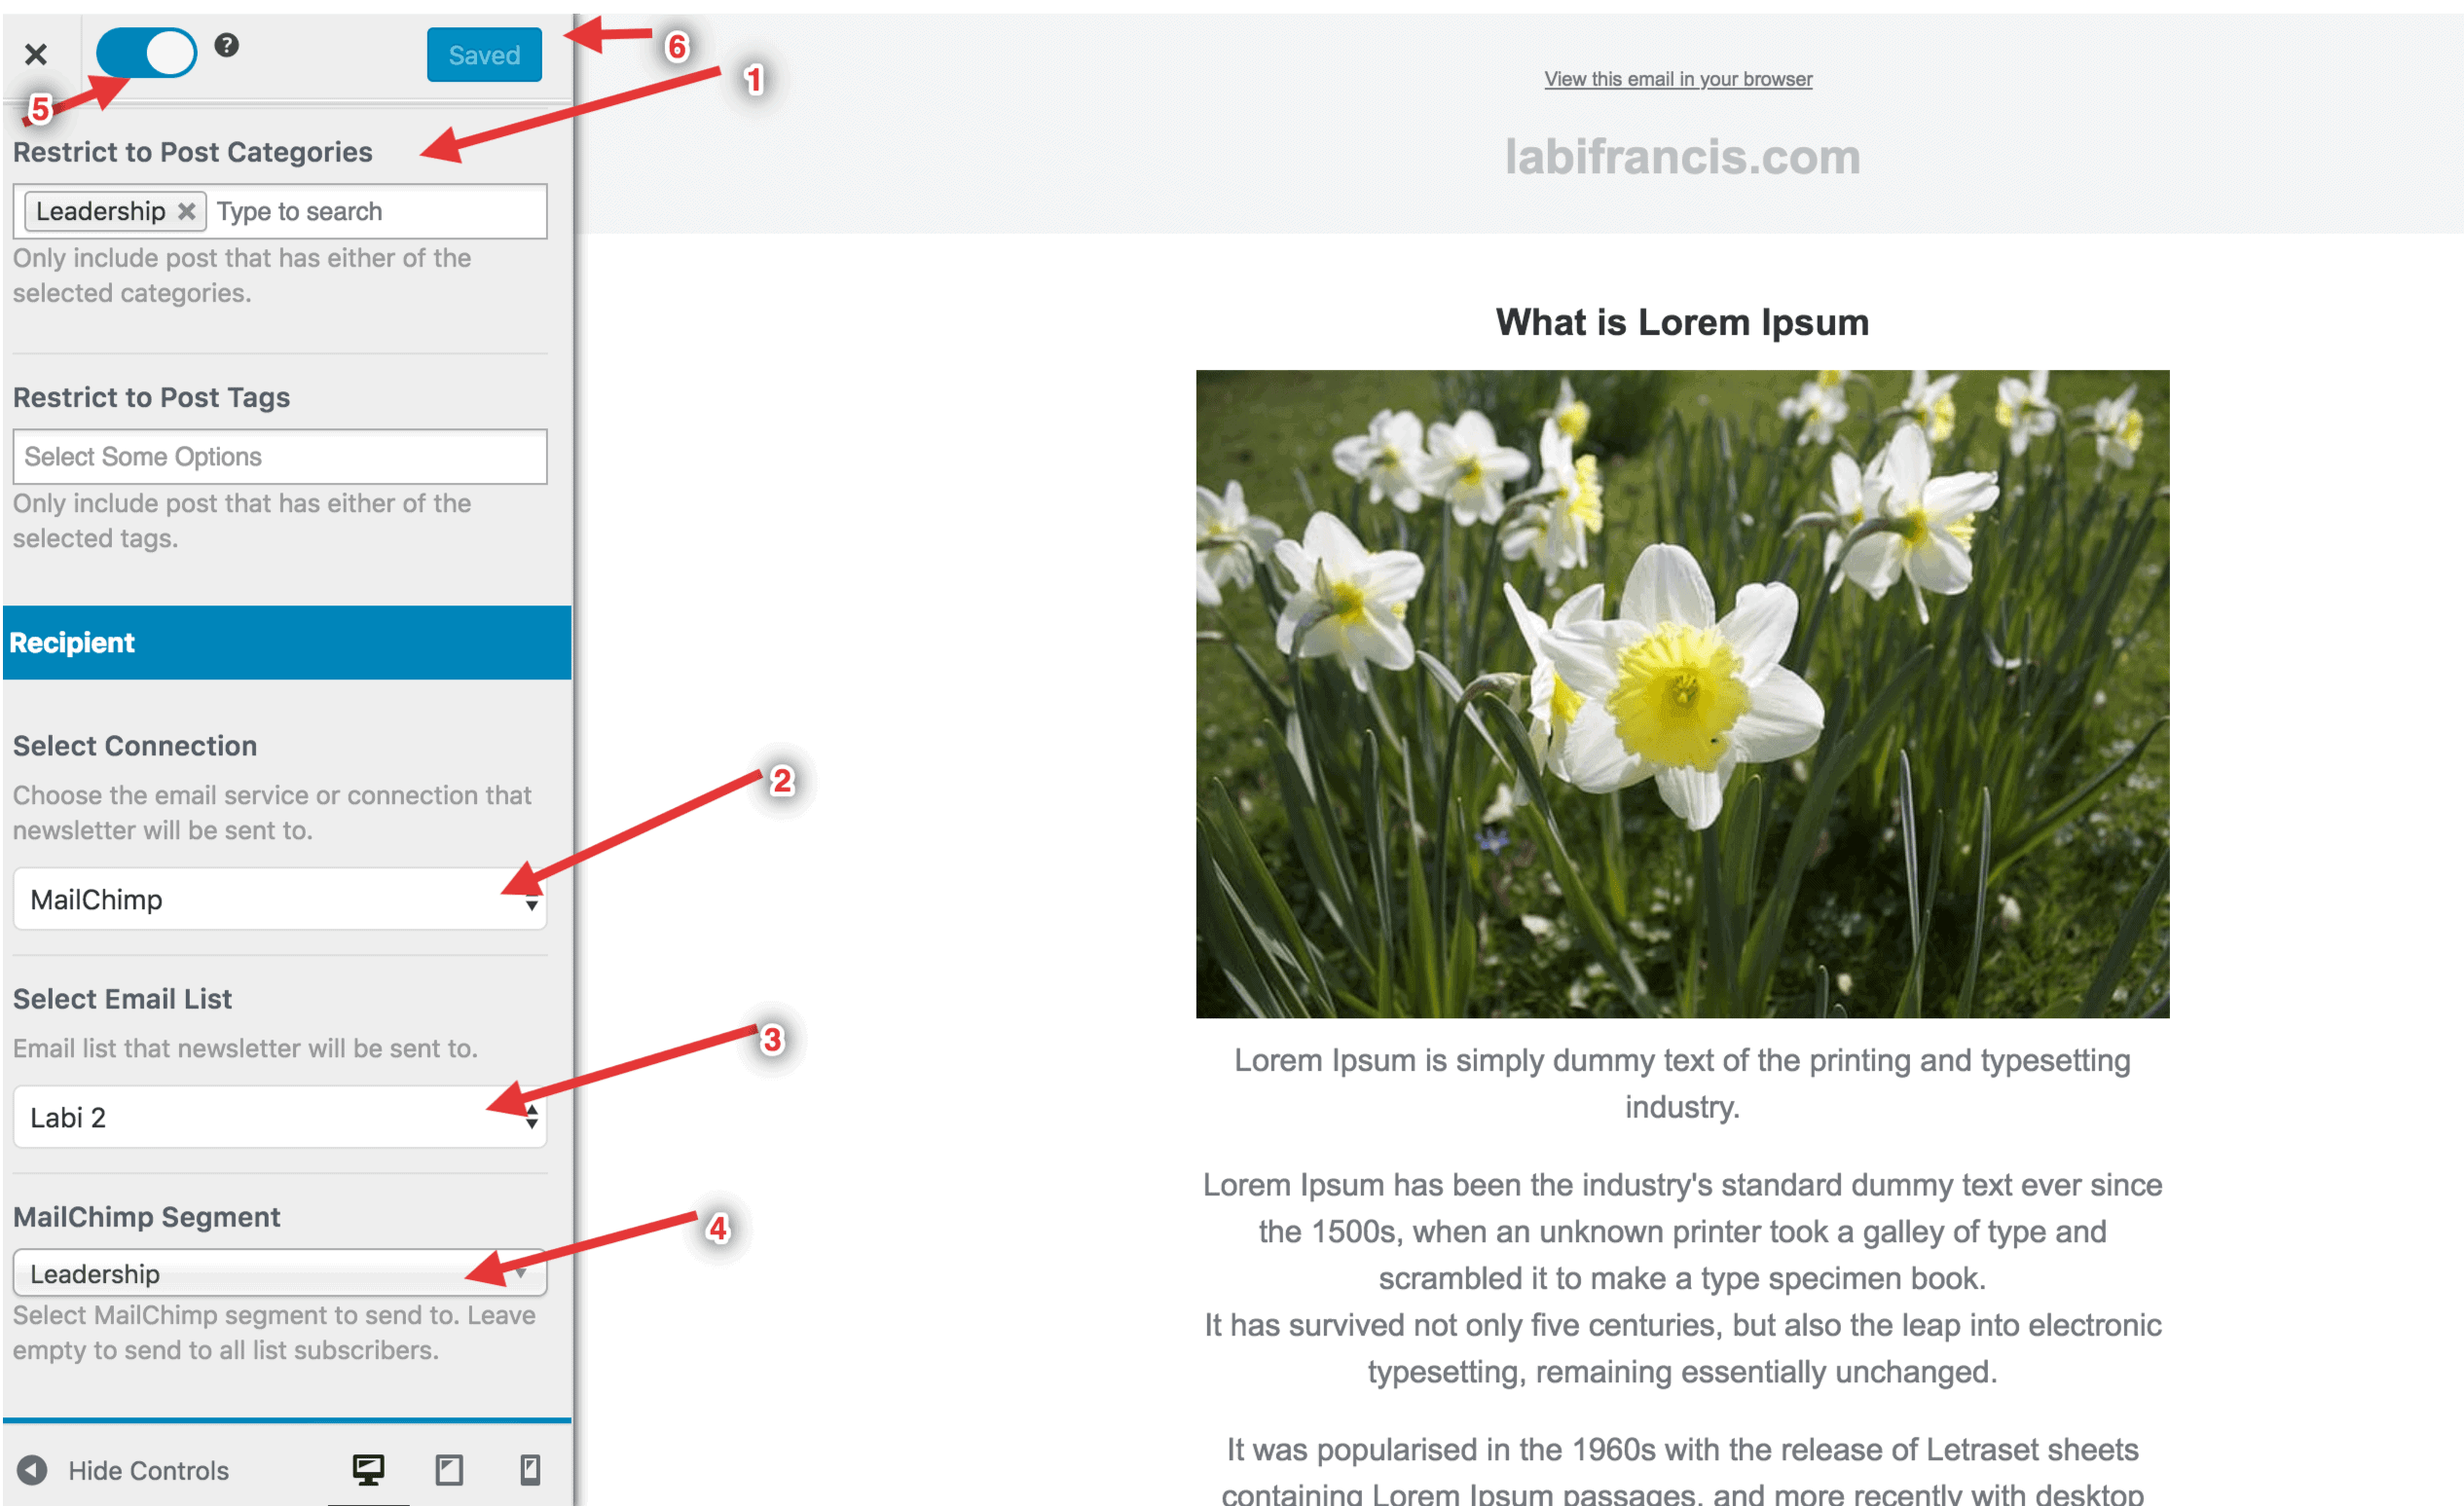
Go to “Settings”, under “Restrict to Post Categories” select the category.
Using Email List for Segmentation
Scroll down to the Recipient section and select your email marketing service in Select Connection followed by the corresponding email list of the category we are restricting this automation to.
and choose MailChimp. MailChimp will load another field for the Email Provider List. Select the List you created on MailChimp. Another field will load to select a Segment. If you haven’t created any segment on your MailChimp account, this field will not load. Please follow the steps at the beginning of this section to create a segment.
Using Mailchimp Group for Segmentation
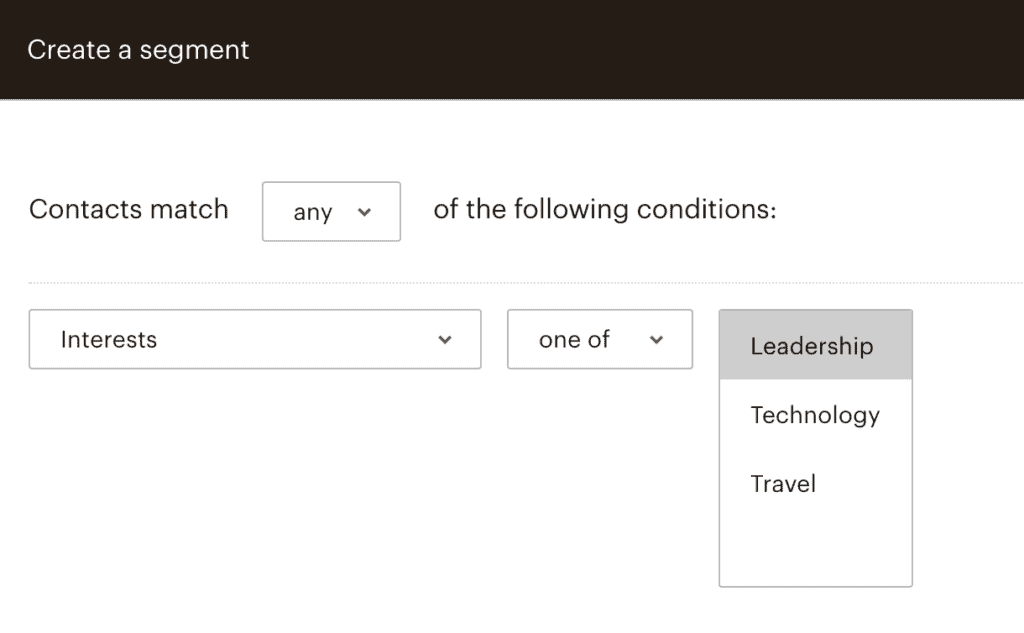
First, you need to create a segment for each of the groups representing each category. In our case, we will create three segments for Leadership, Technology and Travel.
To do this, go to Audience > Segments > Create Segment. Select the group category in the first dropdown. Leave the condition as “one of”. Finally, select the particular group representing the post category you are creating.
You’ll find more information on Mailchimp Segments here and here
Scroll down to Recipient > Select Connection and choose MailChimp.
MailChimp will load another field for the Email Provider List. Select the List that contains the groups you created for each of your post categories.
Another field will load to select a Segment. If you haven’t created any segment on your MailChimp account, this field will not load. Please follow the steps at the beginning of this section to create a segment.
Note
Don’t forget you have to do this for every post categories on your site.
Click save and activate the Email Automation by clicking the toggle button next to “Save”
Conclusion
After you’ve successfully completed all the steps, subscribers to a post category will always receive emails when new posts belonging to the category are published
Let us know if you have any question in the comment section.