How To Create a WordPress Paywall For Your Content
Creating a content paywall is the easiest way to monetize your WordPress blog.
Ads are annoying and degrade the user experience. And getting accepted in a good ad network requires that your blog gets hundreds of thousands of visitors. Creating a product or a course can take months or even years; after all that effort, it can still fail.
A content paywall is a simple but effective way to monetize your blog. If your audience likes your content, they will have no problem paying $5 a month (or more) to read your best content. If you can get 1000 people to subscribe to your paid content, that’s a full-time monthly income right there!
In this article, I will first tell you the pros and cons of creating a WordPress paywall. Then, I will show you the types of content paywalls you can create, and then I will show you how to create two different types of content paywalls in WordPress easily.
Pros and Cons of Paywalls
Before you create a paywall on your blog, you need to consider some advantages and disadvantages. You may find that paywalls are the perfect way to monetize your blog, or you may find that they may not be appropriate for your industry.
Pros
One of The Easiest Ways To Monetize Your Blog
There are dozens of ways to make money with your blog. Creating a content paywall is one of the easiest. You can create a reliable passive income stream from your blog if done right.
Unlike other methods of monetization that take months of work to create, test, and launch a product, creating a content paywall takes virtually no time. It also doesn’t require hiring a web developer to set it up for your website. Instead, you can do it yourself with a WordPress plugin in under an hour.
Your Fans Fund Your Content
Having a subscription-based paywall means you no longer need to rely on Ad revenue or affiliate partnerships. Instead, your fans fund the content you create. Isn’t that the dream of every blogger? Creating content for your fans full-time.
The amount of money you make depends on the number of paid subscribers you have. Unlike other monetization methods, a content paywall can become a significant source of income or even replace your full-time job when you reach 1,000 subscribers or more.
Cons
Paid Subscribers Expect High-Quality Content
Whatever content you put behind a paywall needs to be your best work. You will get bad reviews if your fans don’t get enough value out of paying you. A business that sells content is only successful if it gets repeat buyers.
This is especially true if you create a monthly subscription. Your subscribers will expect to see new subscriber-only content added every month. You will need to consistently deliver new high-quality content to keep your subscribers interested.
SEO
When you implement a paywall, only paid subscribers can see your content. And because Google isn’t one of them, they won’t be able to see and index your content.
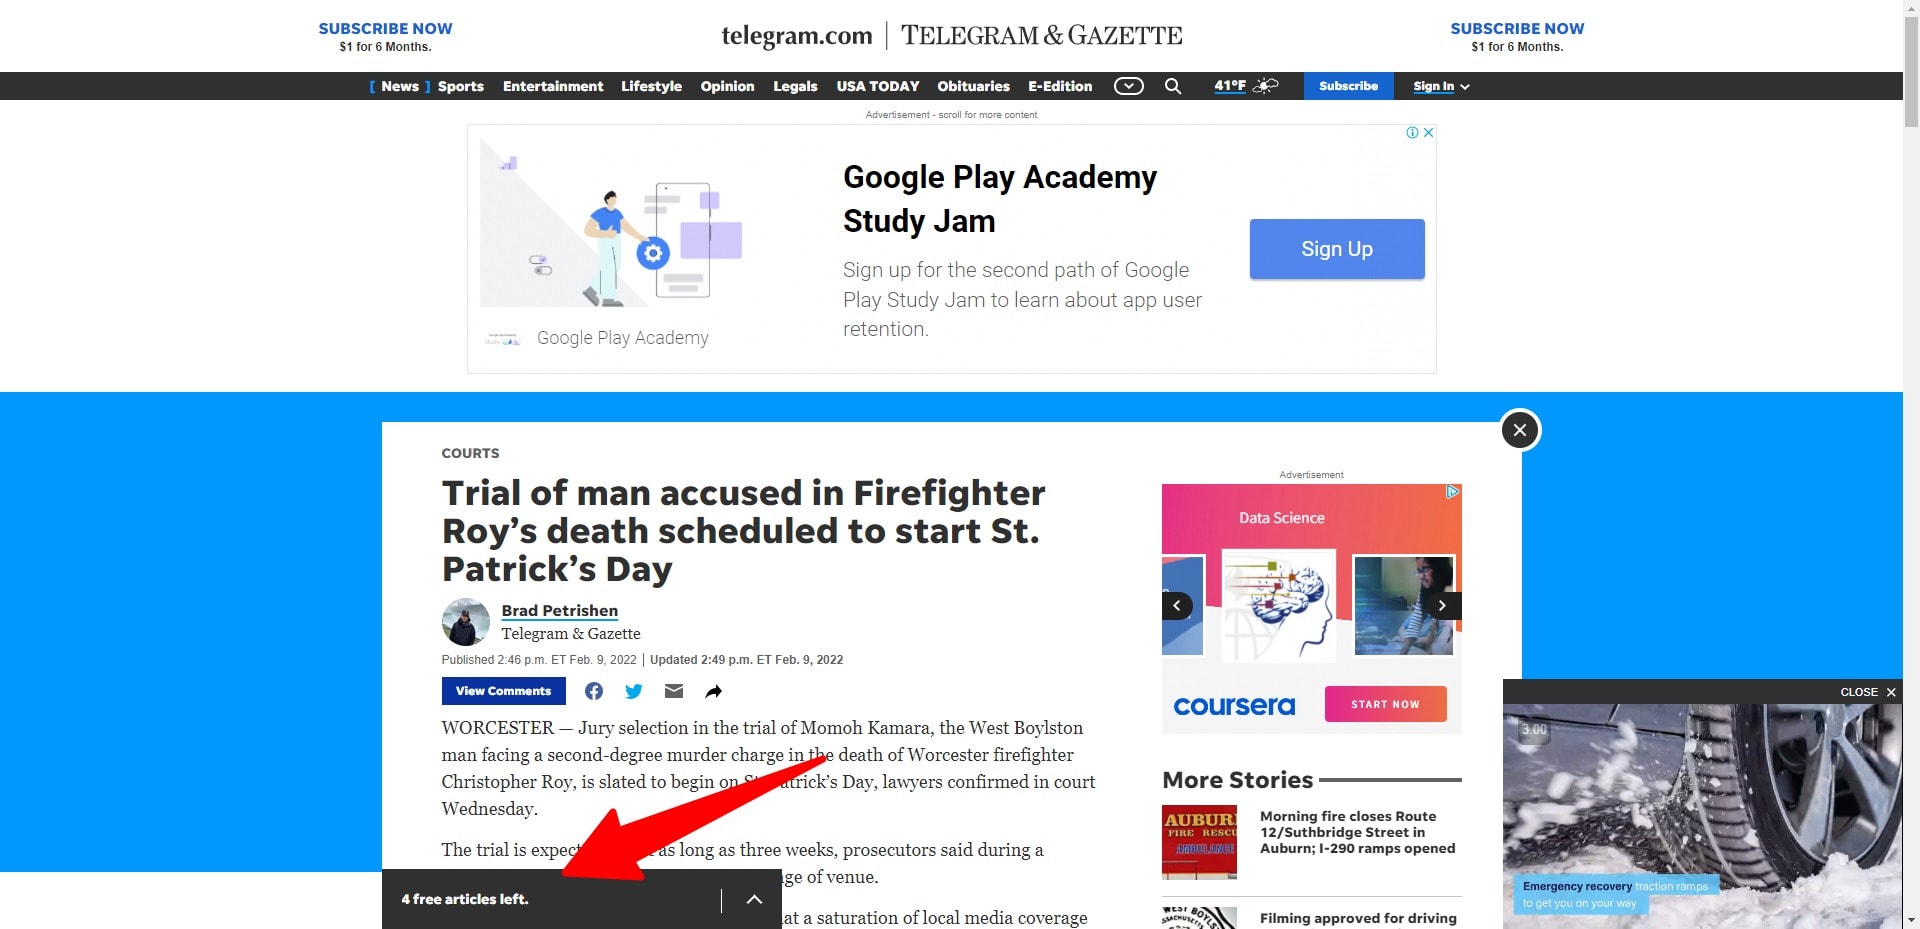
This problem can be avoided if you create a metered paywall that lets people view a couple of articles for free. This is what news sites like Telegram do to let Google read and index all their content.
Types of Paywalls
There are three types of content paywalls that you can create for your blog. Each comes with its pros and cons.
Metered Paywall
This is what big publications like Telegram do. They let you read 3-4 articles for free. If you want to read more, you can get a paid subscription for unlimited access. This type of paywall works excellent with almost all kinds of content sites. How much you can charge depends on how much content you have on your site and how much your audience values it.
Subscriptions
Selling subscriptions to your content is an easy way to generate passive income from your blog. Blogs that do this usually offer a couple of their best blog posts for free and lock the rest of their best content behind a paywall.
To succeed with subscriptions, you need your subscribers to keep paying you every month. This means you will need to publish new high-quality content every month. Most blogs increase the value of their subscription by creating a community around their blog that is only accessible to paid members.
Farnam Street is a productivity and self-improvement blog that does subscriptions successfully:
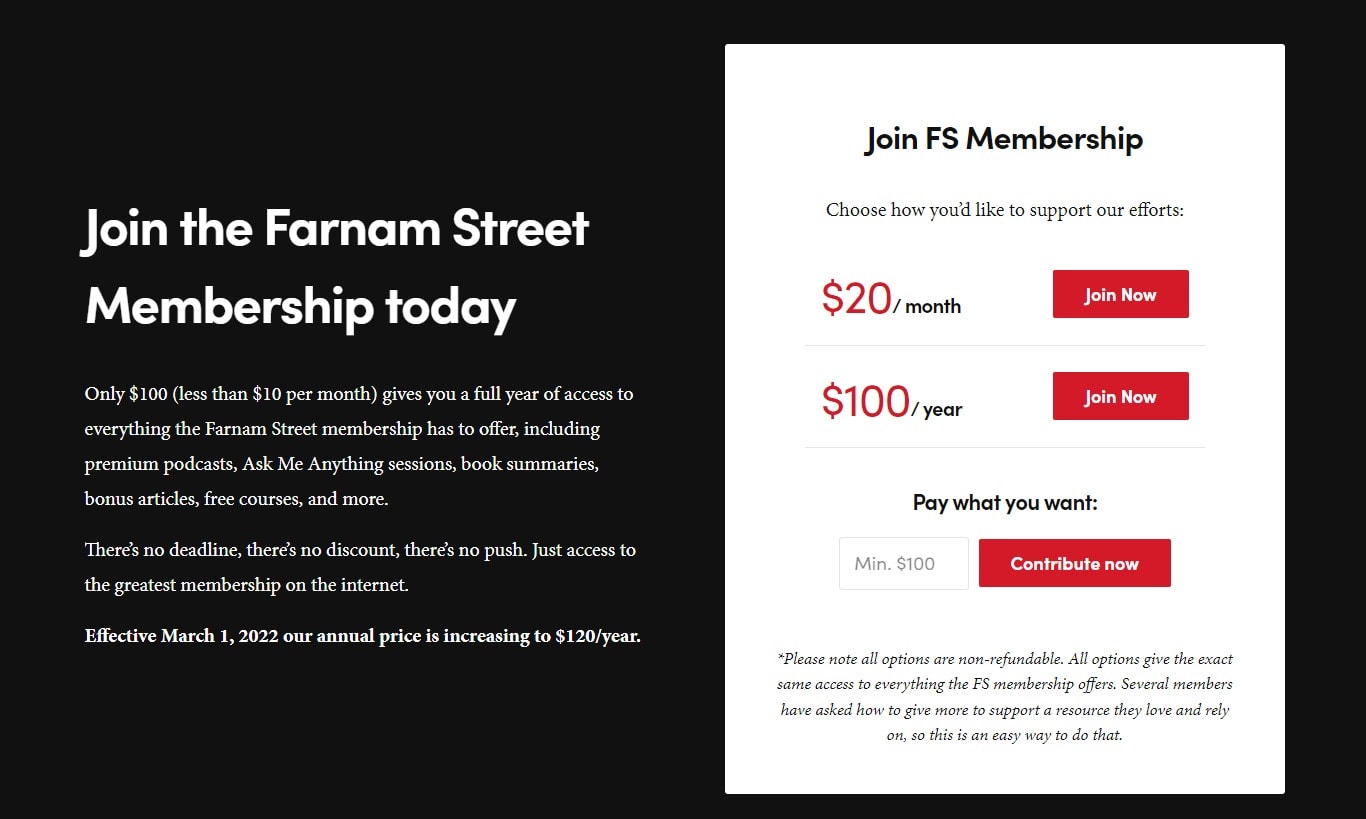
For $20 per month, you can get access to exclusive subscriber-only content and the Farnam Street community, where you can connect with other like-minded people.
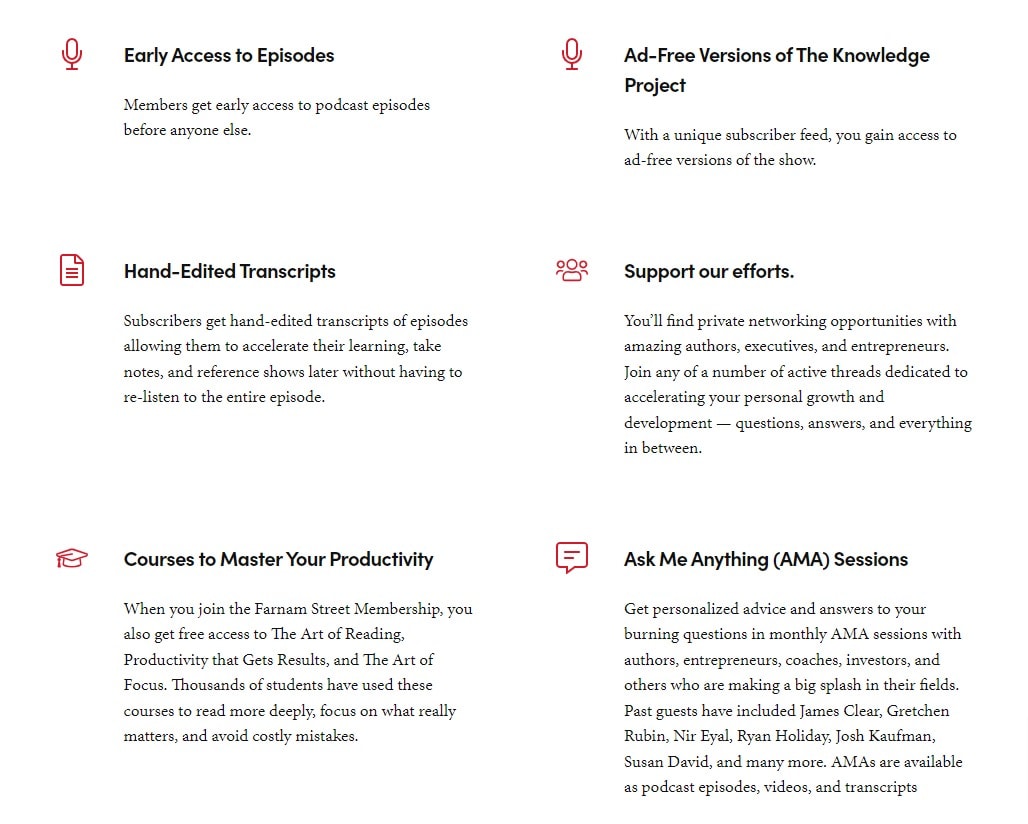
The membership might look expensive at first glance, but to the people who are fans of this blog, it’s a steal. The membership gives them access to not only subscriber-only content but also courses on improving your productivity and monthly AMA sessions with the blog’s author:
If you choose to create a monthly or annual membership, you will need enough subscriber-only content on your blog to make it worth the price.
Email Opt-in Paywall
Rather than asking for money, you ask your audience to subscribe to your email list. This is one of the oldest and most effective content marketing strategies. Once someone gets on your email list, you get to pitch them your products again and again for free.
The easiest way is with a WordPress plugin such as MailOptin. It lets you set up an email opt-in paywall in less than a few minutes. In the next section, I will show you how easy it is:
How to set up WordPress Paywall with MailOptin
Mailoptin is a powerful paywall WordPress plugin that helps you grow your email list. It’s an all-in-one tool for email marketing. One of its best features is that it lets you lock your content behind an email opt-in paywall. This way, your readers will only be able to access the locked content if they subscribe to your email list.
Mailoptin makes locking your content really easy. Once you install it on your WordPress blog, all you have to do is create a new opt-in campaign and configure it to lock specific blog posts on your blog.
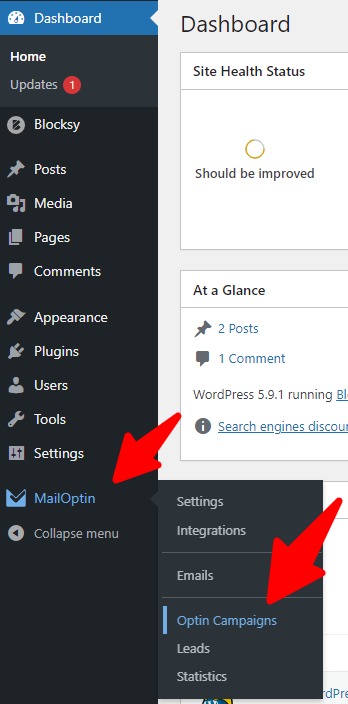
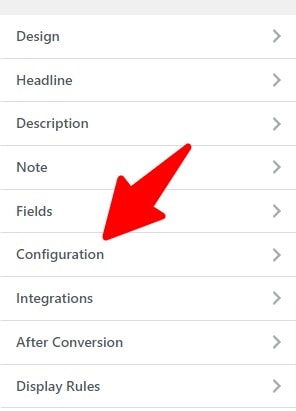
Let me show you how easy it is. First, navigate to MailOptin -> Optin Campaigns in your WordPress dashboard sidebar:
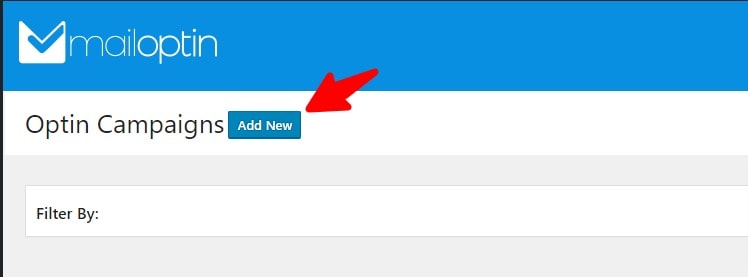
Now, click the Add New button at the top:
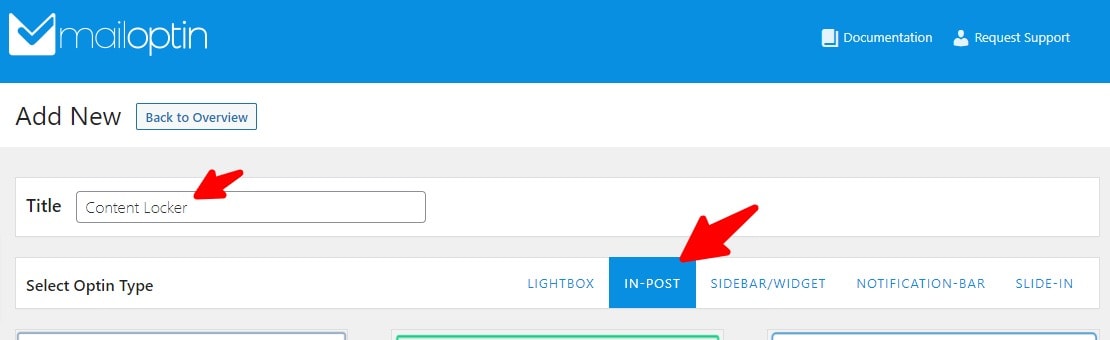
Now, enter a title for your new campaign and select In-Post as the opt-in type:
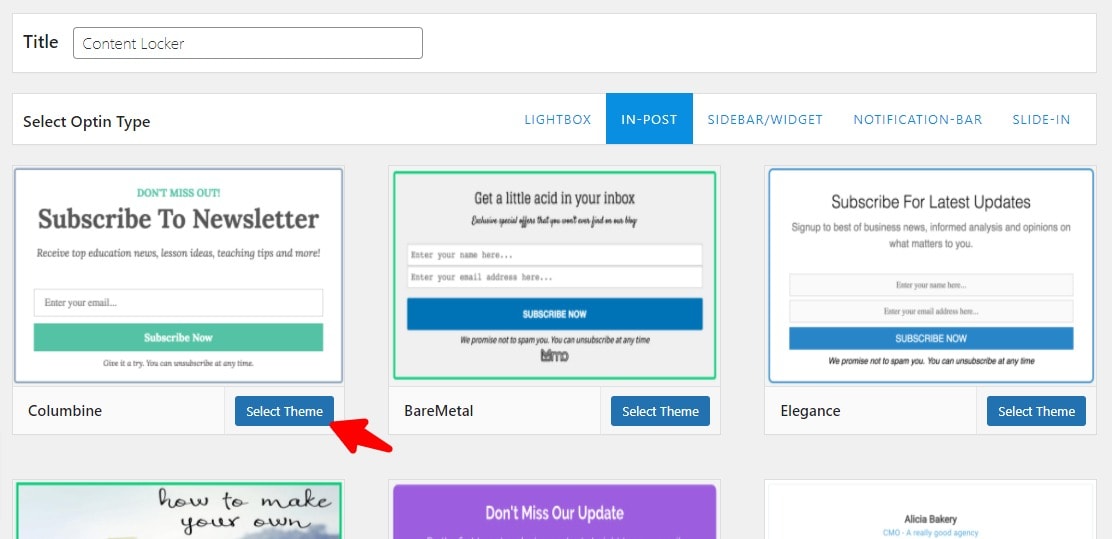
You will now see some professionally-designed opt-in templates. Click the select theme button on the one that you like the most. I like the first one, so I’ll select that:
Once you select a theme for your first opt-in campaign, you will see this screen:

This is where you can customize all aspects of your opt-in campaign to suit your website’s branding.
Let’s first set it up for content locking, and then you can take your time to customize its looks of it. To do so, click the configuration menu in the sidebar:
Now you will see the available options for content locking:
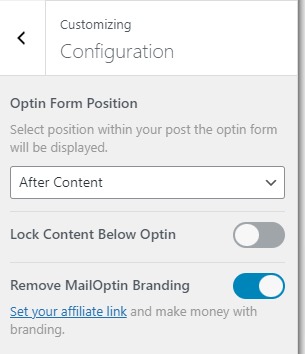
First, you will want to check the Lock Content Below Optin checkbox:
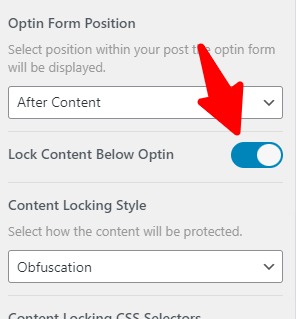
Now, you will be asked to select a content-locking style. If you choose obfuscation, the content will be loaded, but it will be blurred and hidden behind the opt-in form.
But if you select Removal, the content will only be loaded on the page once the user subscribes to your email list. Obfuscation is acceptable for most blogs.
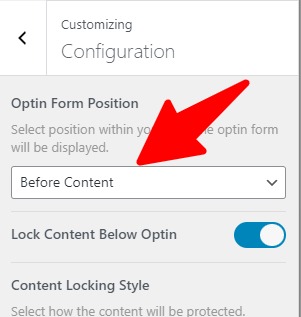
Finally, change Optin Form Position from After Content to Before Content because this opt-in form will only lock content that is below it:
Now click the back button next to the Configuration heading to return to the main menu.
You will now need to choose where the leads/subscriber information collected from this form goes. You can do so from the Integrations menu:
Here you can choose to send your leads to an already connected service such as Mailchimp or Kit (ConvertKit). If you don’t have any integrations connected with MailOptin, you can connect your favorite email marketing tools to MailOptin from the MailOptin Integrations page.
For now, you can just select MailOptin Leads Only:
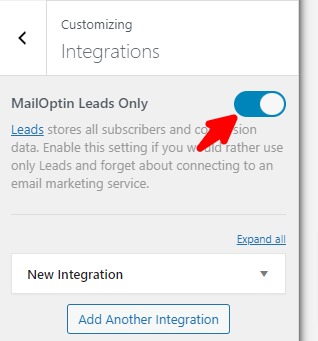
This will store all the leads collected by this form in the database.
The only thing remaining now is configuring this opt-in form to show up on the pages and posts you would like it to appear on. To select the pages, you want to lock on your website, go to the Display Rules menu:
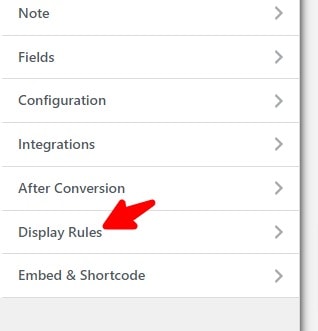
Now, select Page Targeting.
You can now select the pages and posts that you want to lock behind an email opt-in paywall:
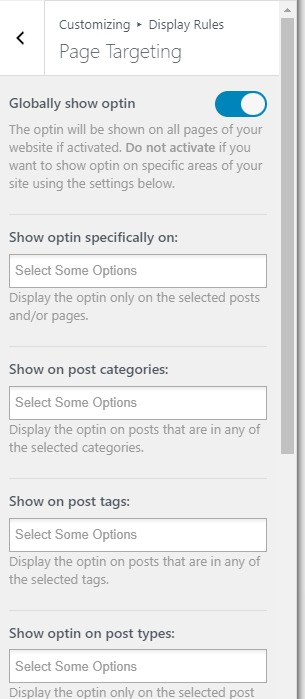
First, you will need to disable the Globally show opt-in checkbox, or all the pages and posts on your website will get locked.
Now, you can search for posts and pages that you want to lock behind this opt-in form:
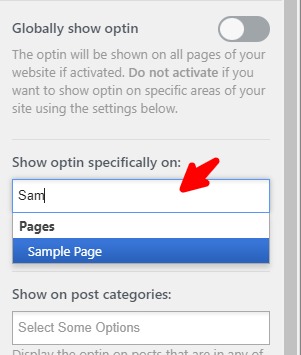
You can lock as many posts and pages as you want behind this opt-in paywall by searching and selecting them from this search box.
Now, take a minute or two to customize the opt-in form to your liking. Feel free to play around with the options. There are a lot of cool things MailOptin can do for your blog.
Once you are ready to publish this form, click the big checkbox you see on top to activate it, and then click the Save Changes button to save it:

To test if it’s working, visit the page that you choose to lock, and you will see your opt-in form locking the content:
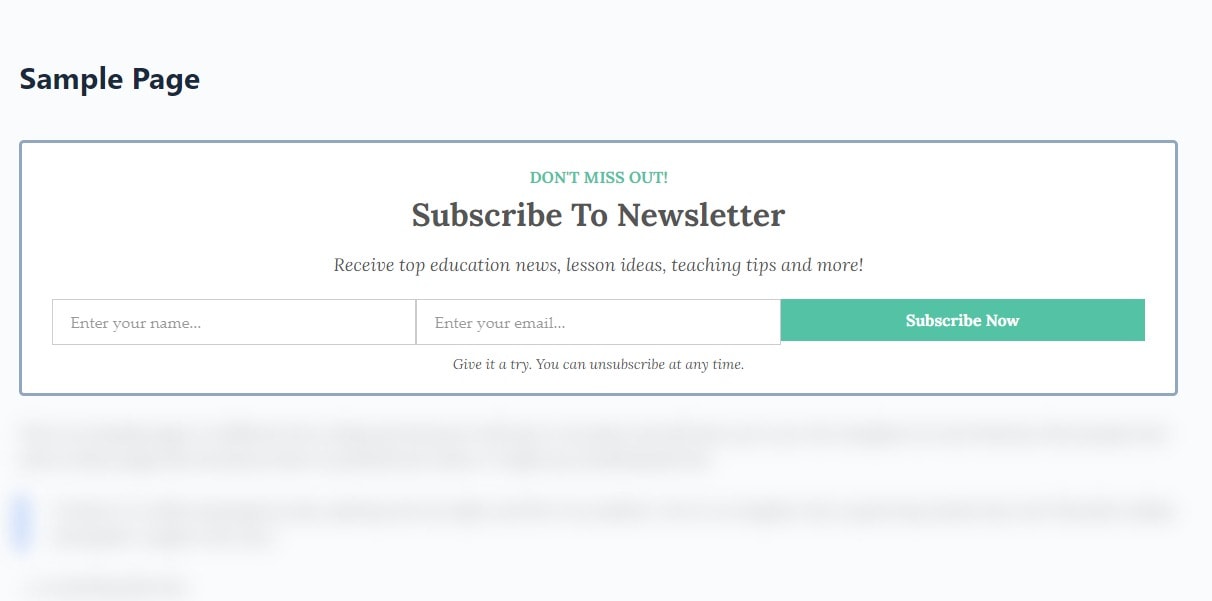
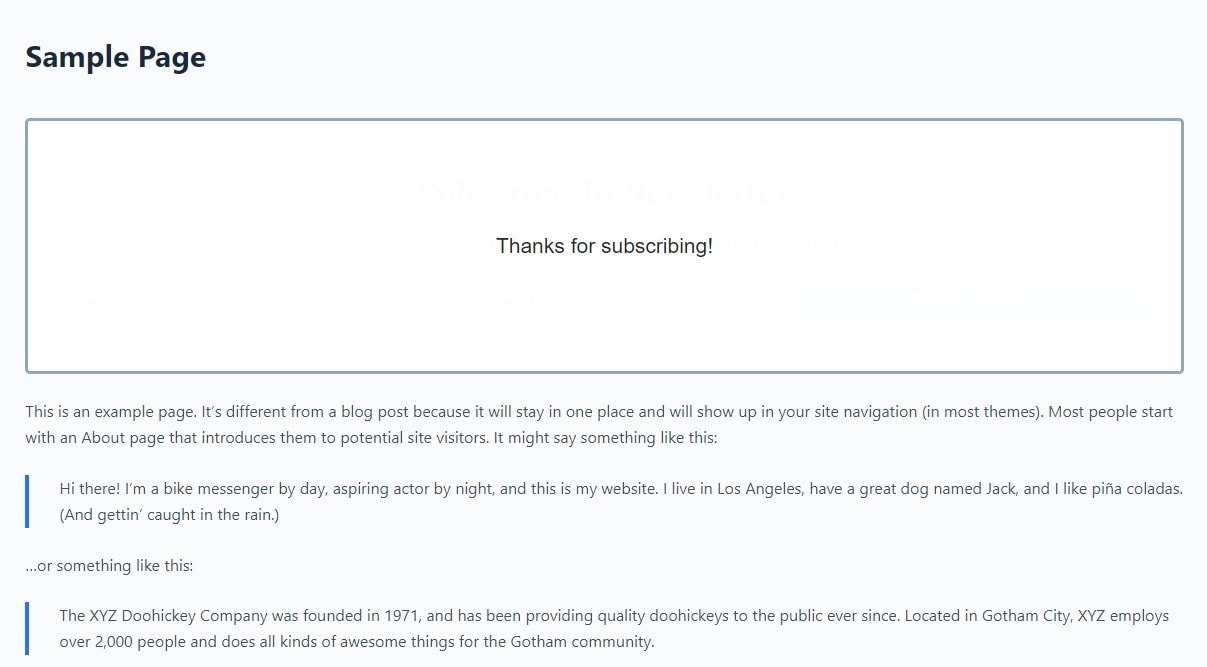
Try entering your name and email in the form. When you click the subscribe button, you will see that the content gets unlocked:
How to create a payment-based paywall with ProfilePress
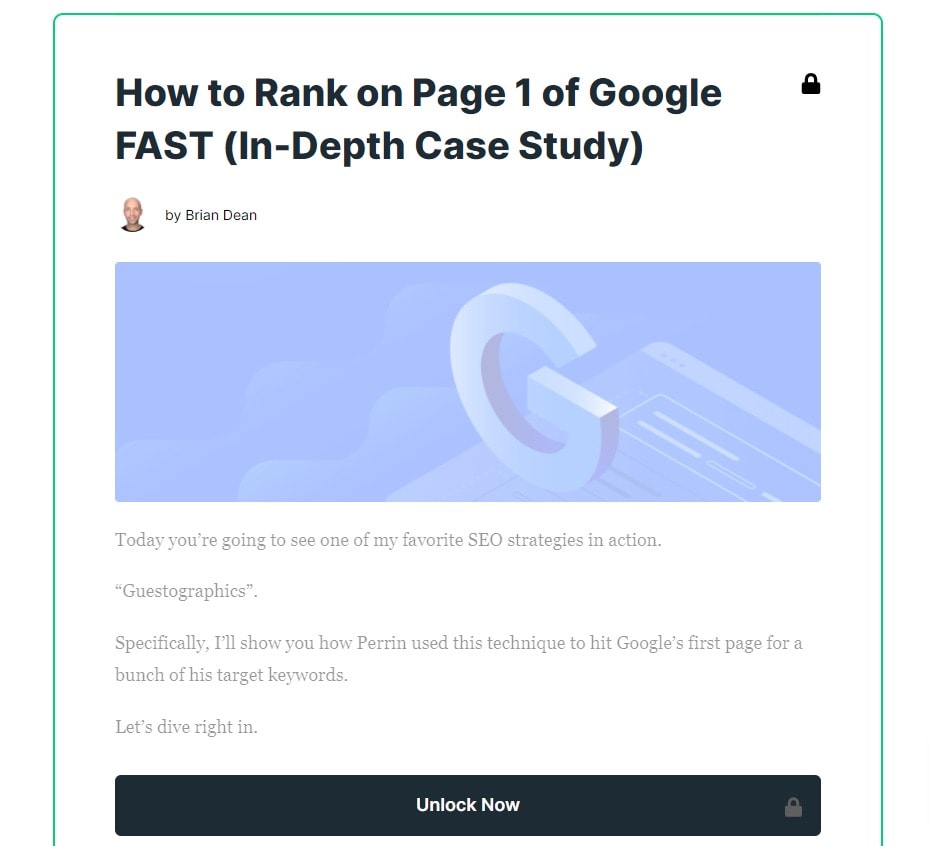
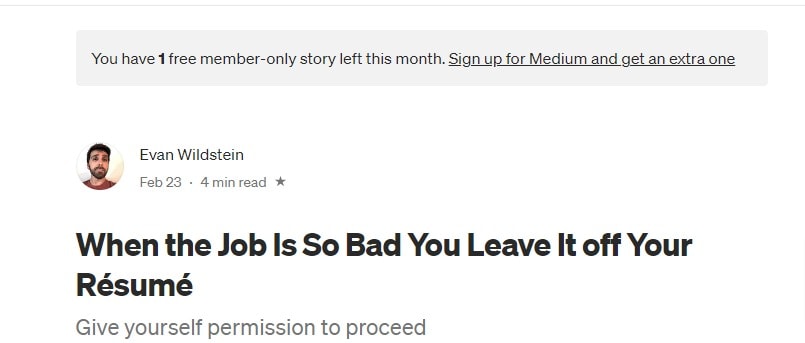
ProfilePress lets you add a paywall to WordPress content where your readers get to read the first couple of articles for free. It’s like a free trial for your content. This is what major publications do. You might have seen this in action if you have ever read something on Medium.com:
Note: To take payments with ProfilePress, you need a Stripe, PayPal, or Mollie payments account. But don’t worry! It only takes a couple of minutes to sign up, and your account gets activated the next day.
ProfilePress is the best WordPress paywall plugin, and you can install it by purchasing the plan with the Metered Paywall addon.
By now, I assume you have the ProfilePress plugin and the Metered Paywall addon active on your WordPress site,
ProfilePress requires a number of pages for it to work correctly. To see the list of pages needed, visit ProfilePress >> Settings >> Pages.
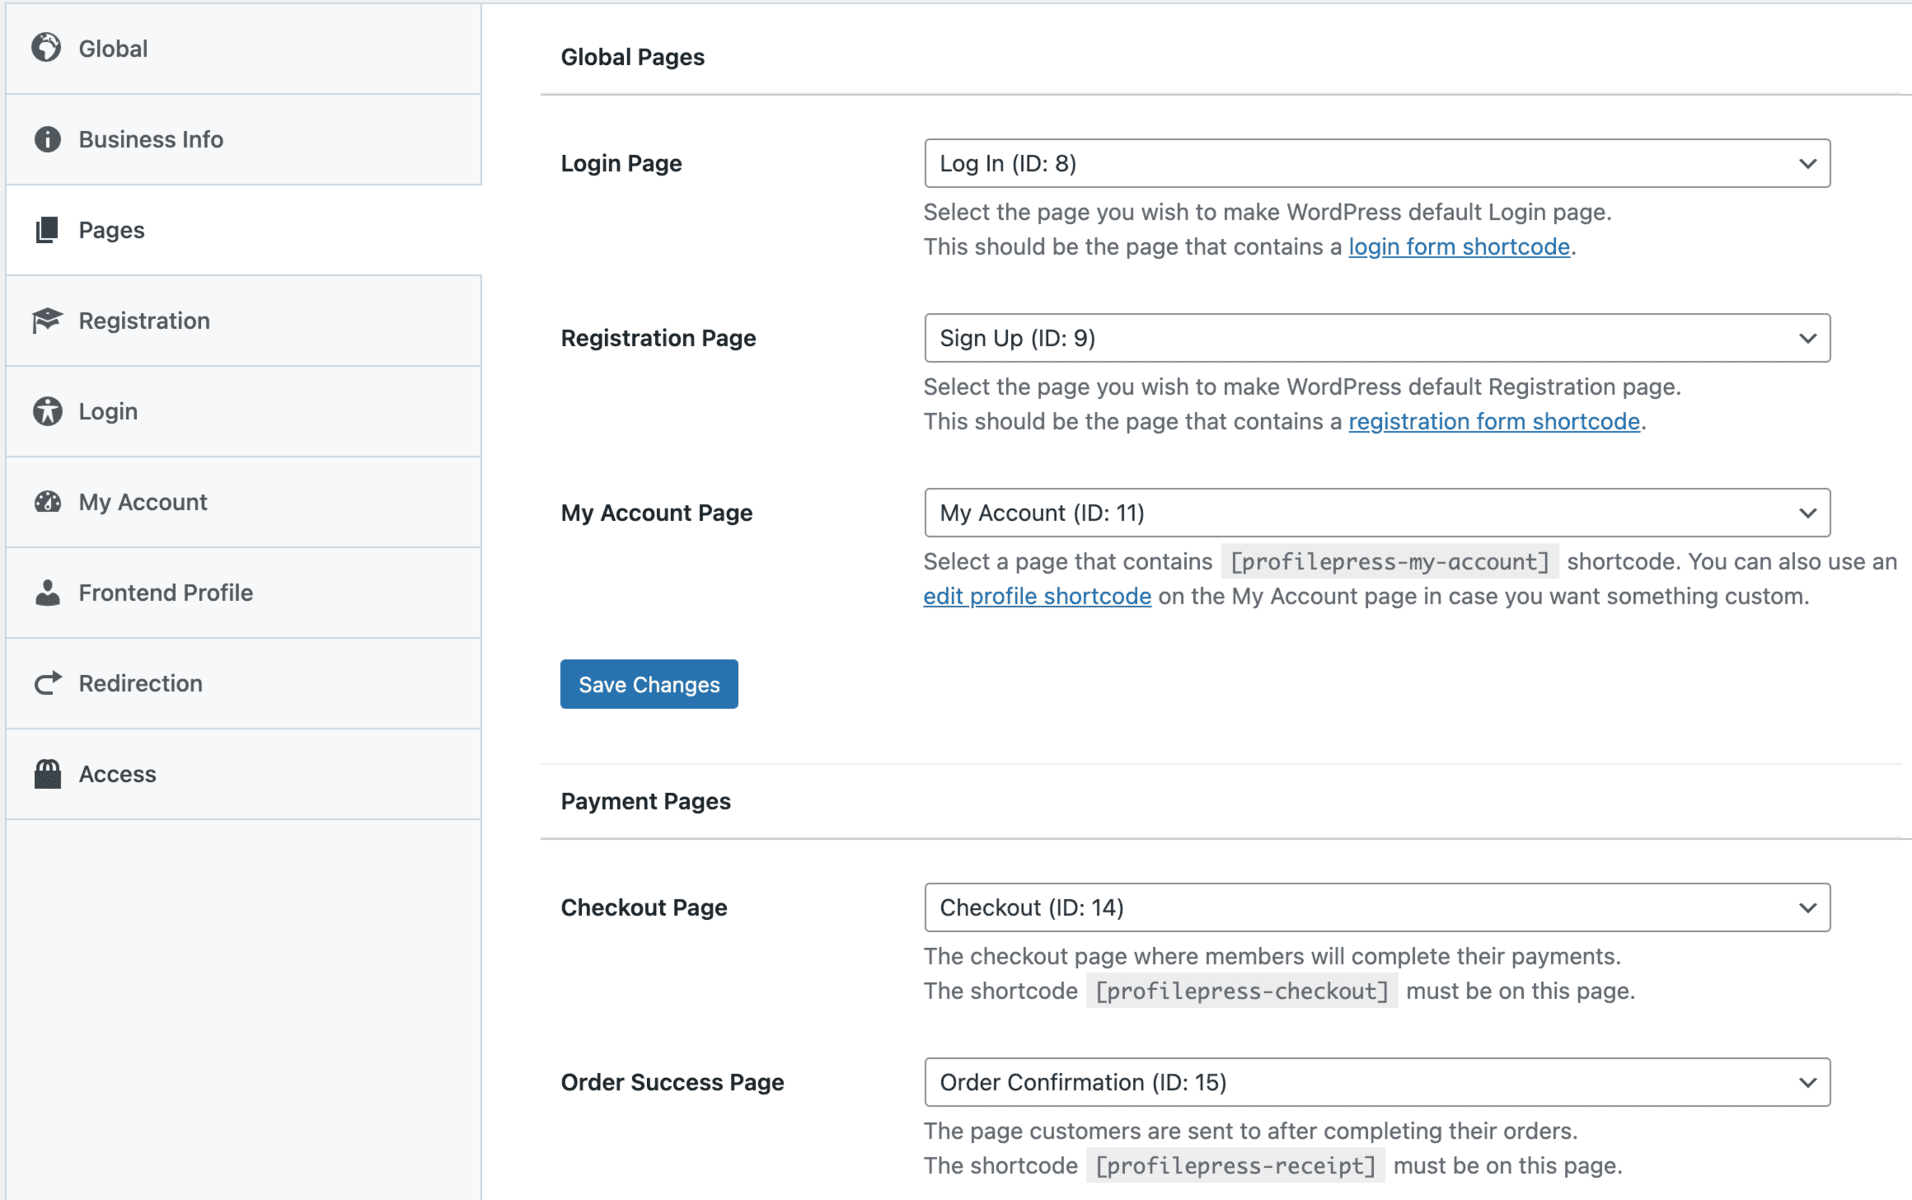
You will see dropdown menus that all say “Select”.
By default, ProfilePress will display a button to create the pages in one click. If, however, you dismissed the button, you will need to create a new page and place the required shortcode on that page and then select it from the dropdown.
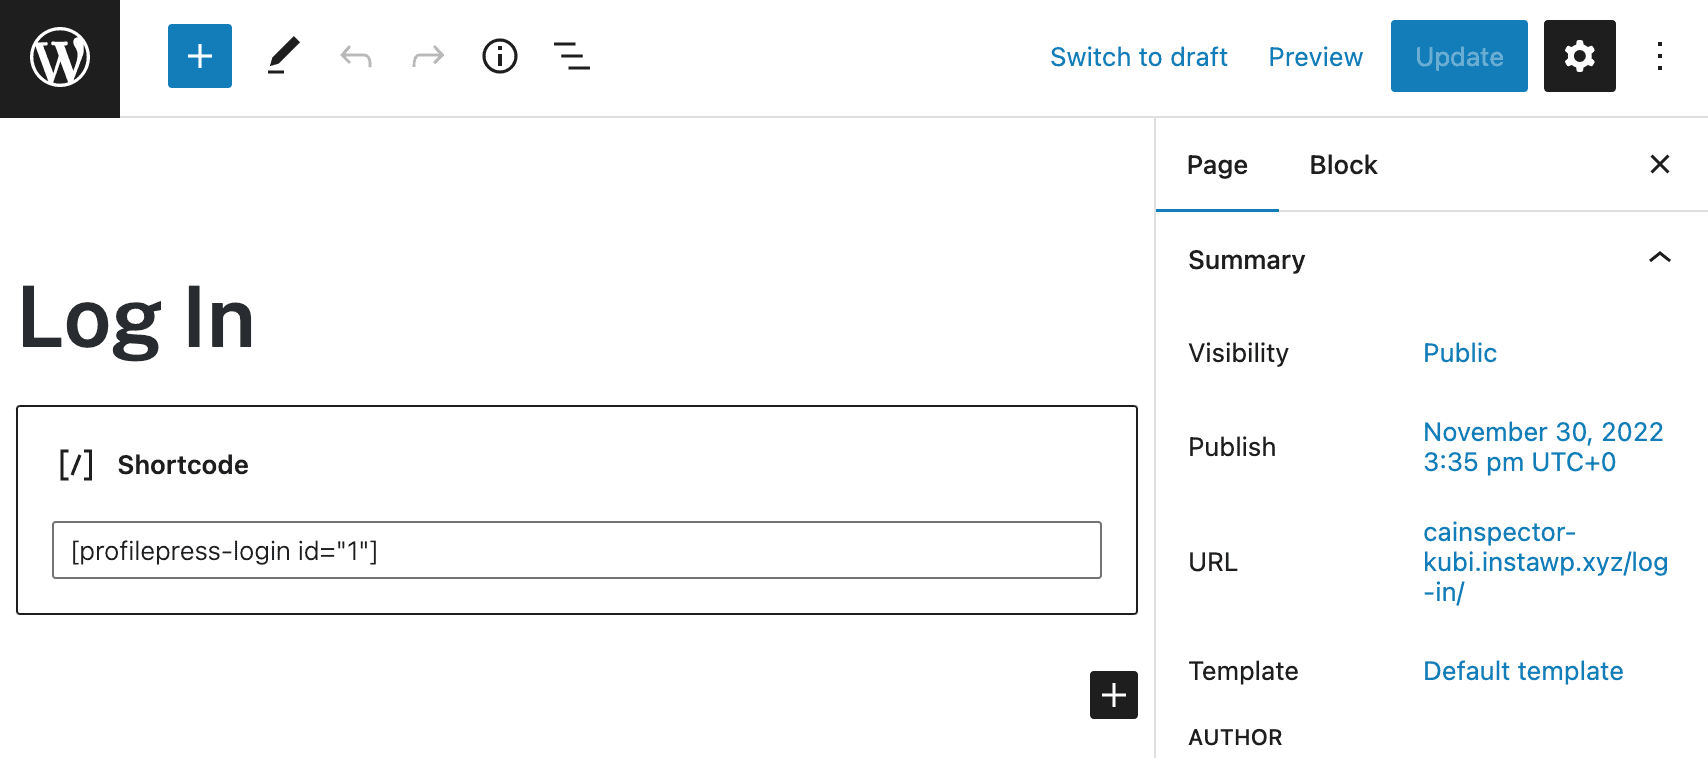
Let’s do it for the login page first. Create a new custom WordPress login form in ProfilePress, then create a Page called “Login” and put the login form shortcode in the content:
Now select this newly created page from the drop-down for Login Page. Next, do the same for the other required pages.
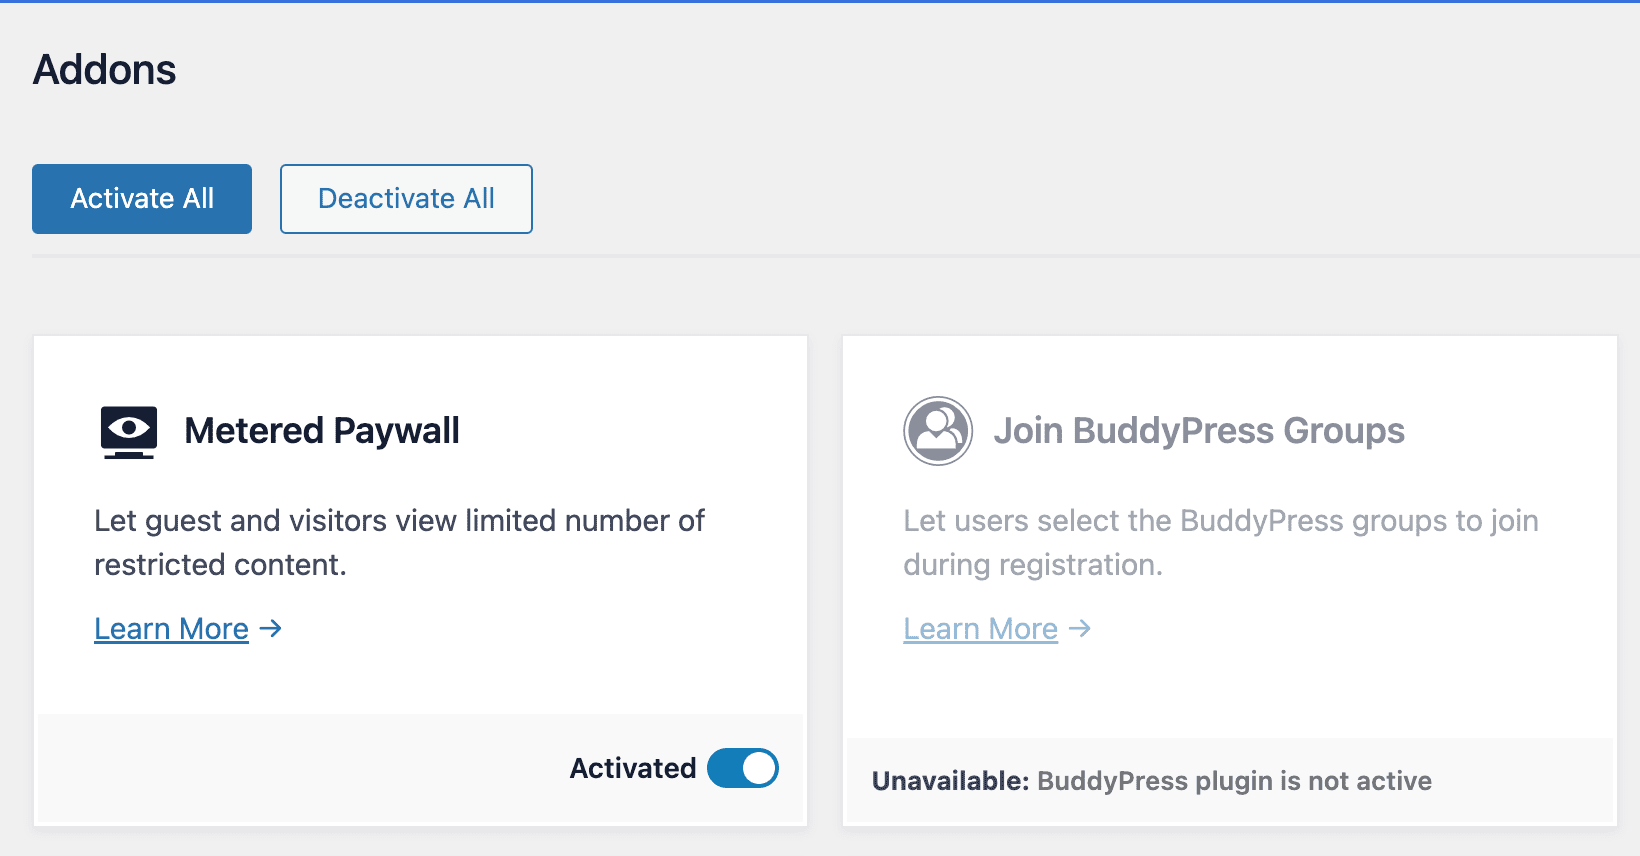
Activating the Metered Paywall Addon
To get started, please make sure you have ProfilePress installed and activated on your site. Then, activate the Metered Paywall addon at ProfilePress>>Addons.
Setting up Metered Paywall for WordPress
The Metered Paywall addon lets you define or configure the content to make it accessible to guests and non-paying members on your WordPress site. Consequently, you need to ensure the contents are already protected or restricted with the ProfilePress content protection feature. Otherwise, everyone will still access the content after hitting their limit.
Example / Usecase
Say all published posts on your WordPress site are available only to Standard membership plan subscribers, but you want to offer three free post views daily to guests and users not subscribed to the Standard membership plan. The below guide is how you would set things up.
Setting up the Content Protection
Using the example/use-case above, we will protect all posts from all users except members subscribed to the Standard plan. This means only Standard plan subscribers can access all published posts.
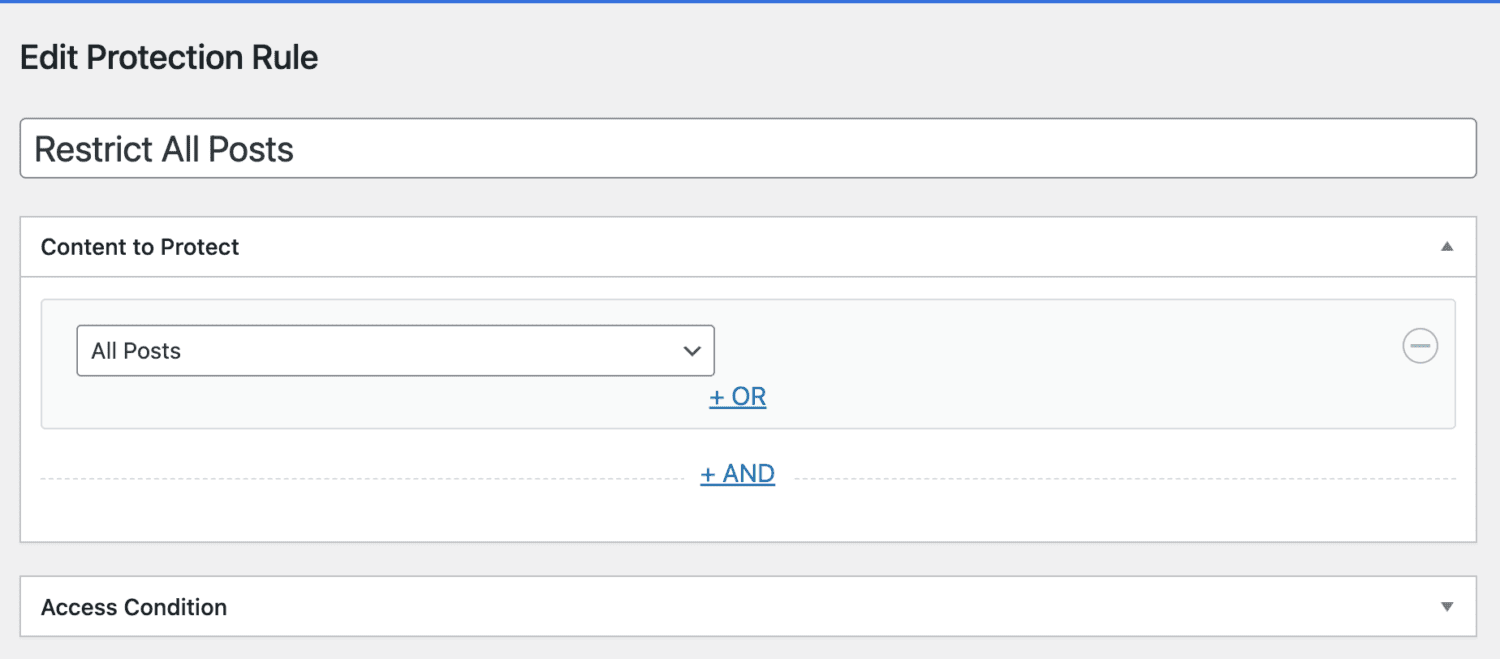
To restrict all posts to members with an active Standard plan subscription, go to ProfilePress >> Content Protection.
Click the “Add a Protection Rule” button to add a new rule.
Select “All Posts” as the “Content to Protect” condition.
In the “Access Condition” section, you define who can access all your posts. In our case, Logged-in users with an active subscription to the Standard plan. In the screenshot below, I checked “Administrator” because I also want all site admins to have access to all posts.
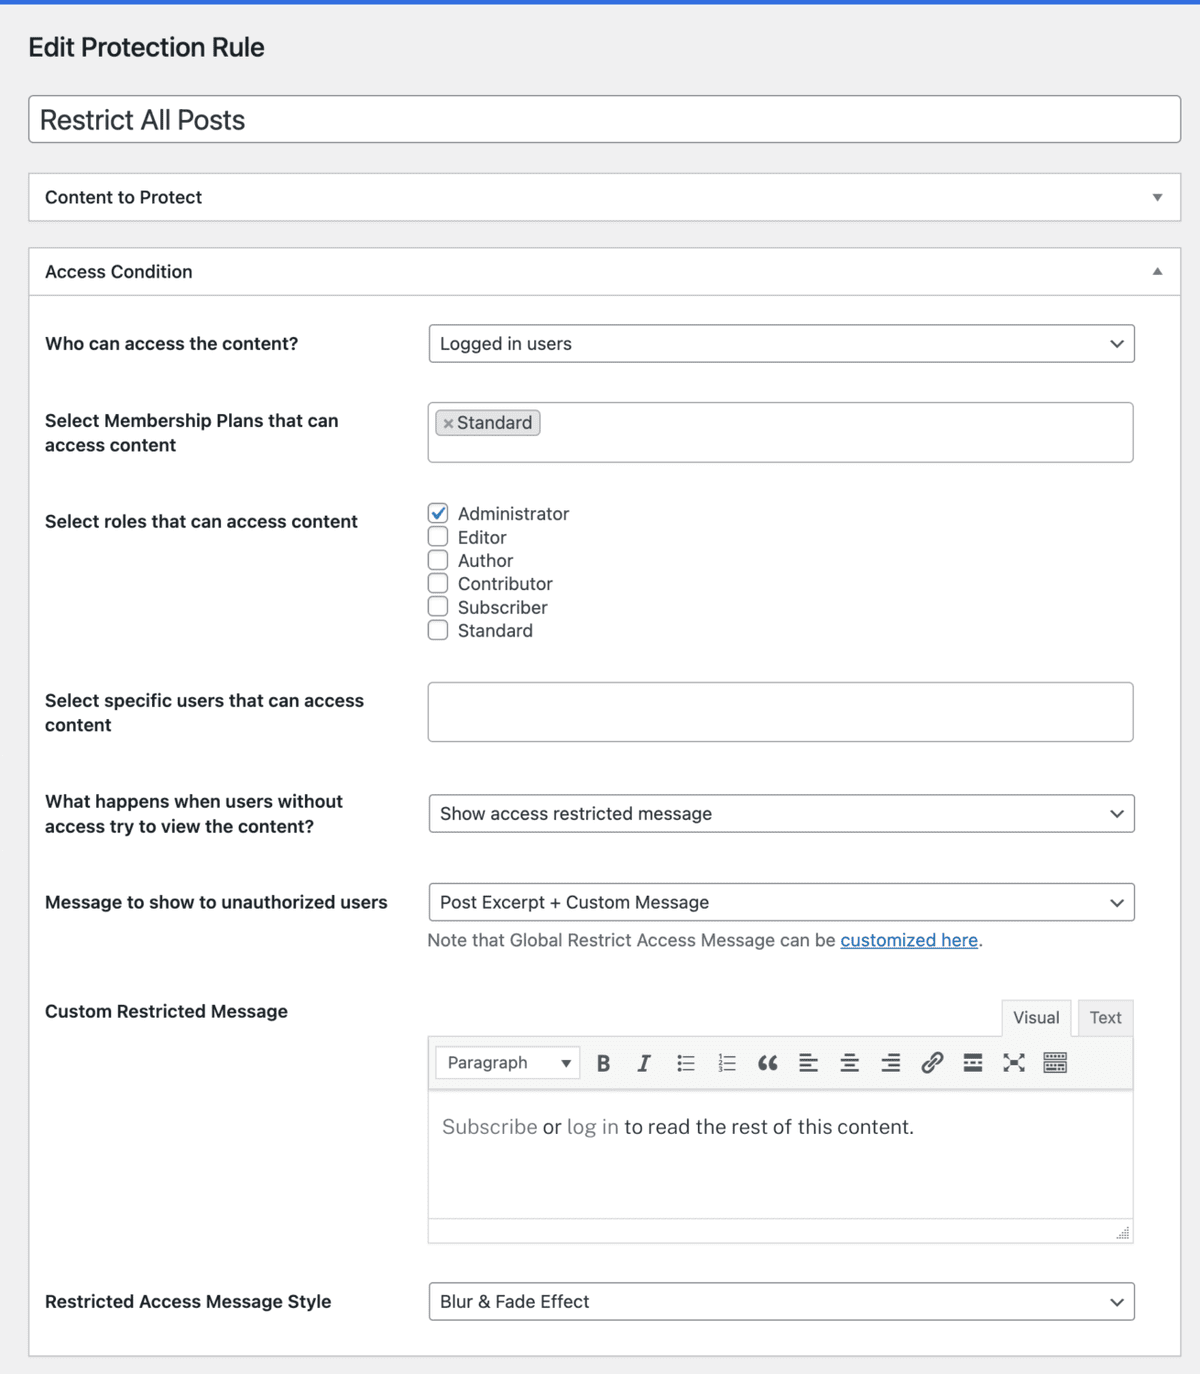
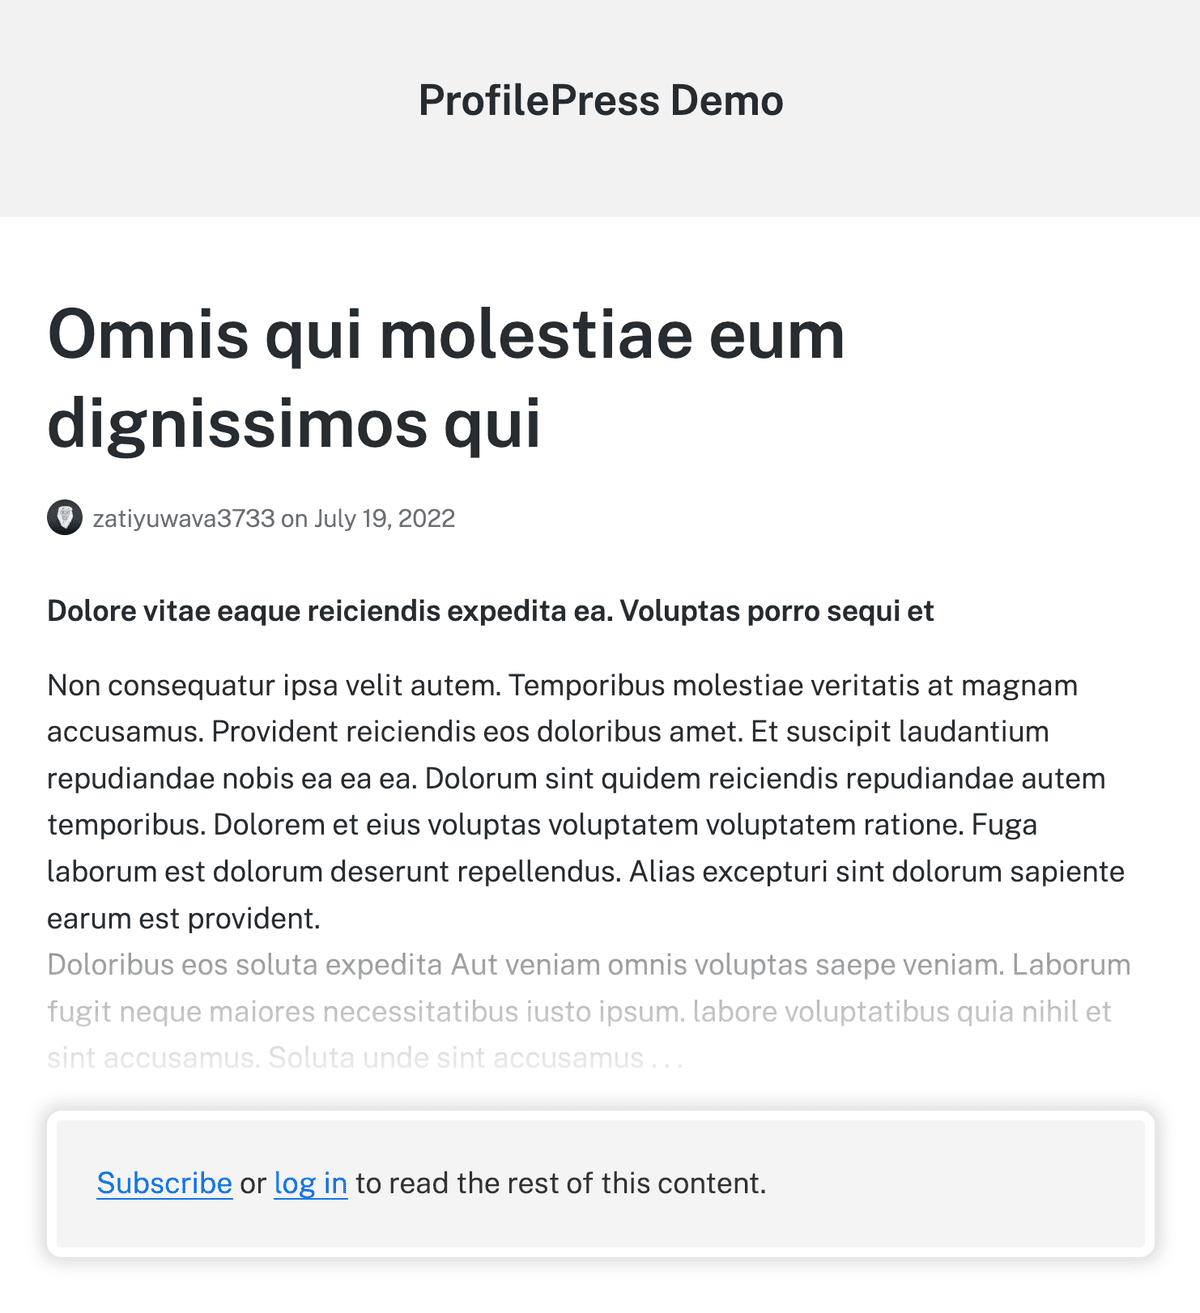
When a post is restricted or protected from a user, we want to show an excerpt of the post and our message urging them to subscribe.
I selected the “Blur & Fade Effect” as the Access Message style to give the end of the post excerpt a blurring/fading effect.
Finally, save your changes.
Next is to use the Metered Paywall addon to define the posts and the number of free views guests and non-members of the Standard plan are limited to.
Setting up the Metered Paywall
Go to ProfilePress >> Content Protection and click the Metered Paywall menu tab.
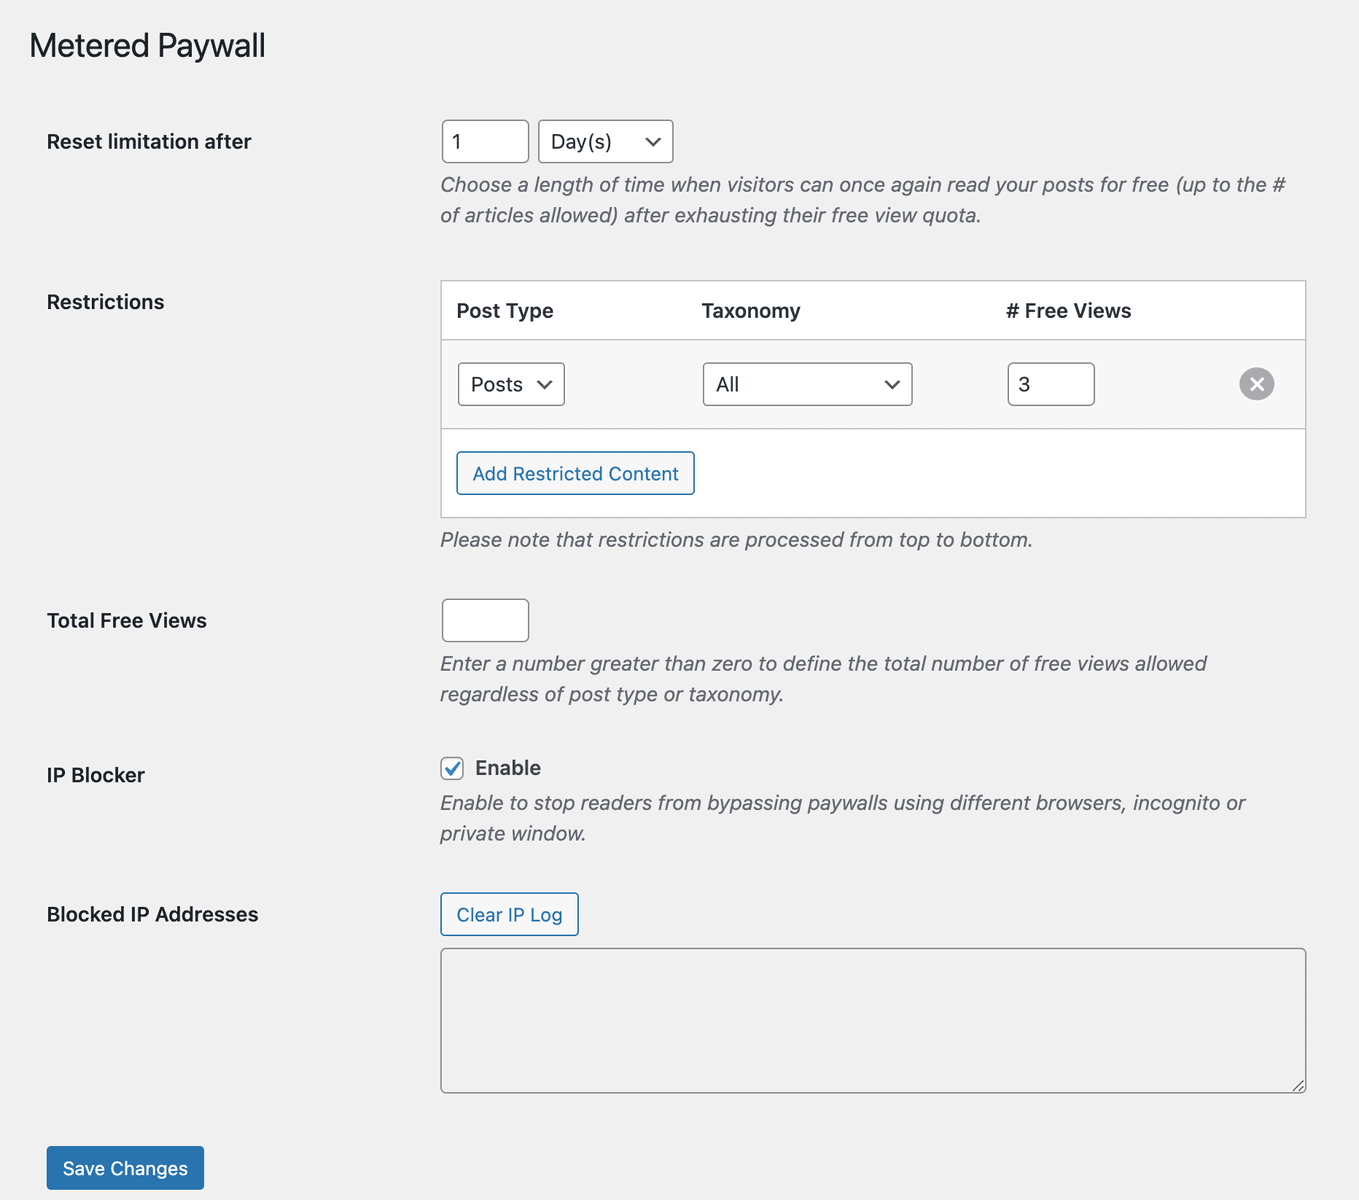
The Reset limitation after setting lets you define how long before a restricted user can once again view protected content for free after hitting their limit.
Use the Restrictions section to define the post types and, optionally, the taxonomy to make available for free viewing and the number of free views to grant to users.
If you’ve added multiple roles of restrictions and want to use a single value for the total number of allowed free views regardless of content type or taxonomy, use the Total Free Views setting.
Remember to save your changes.
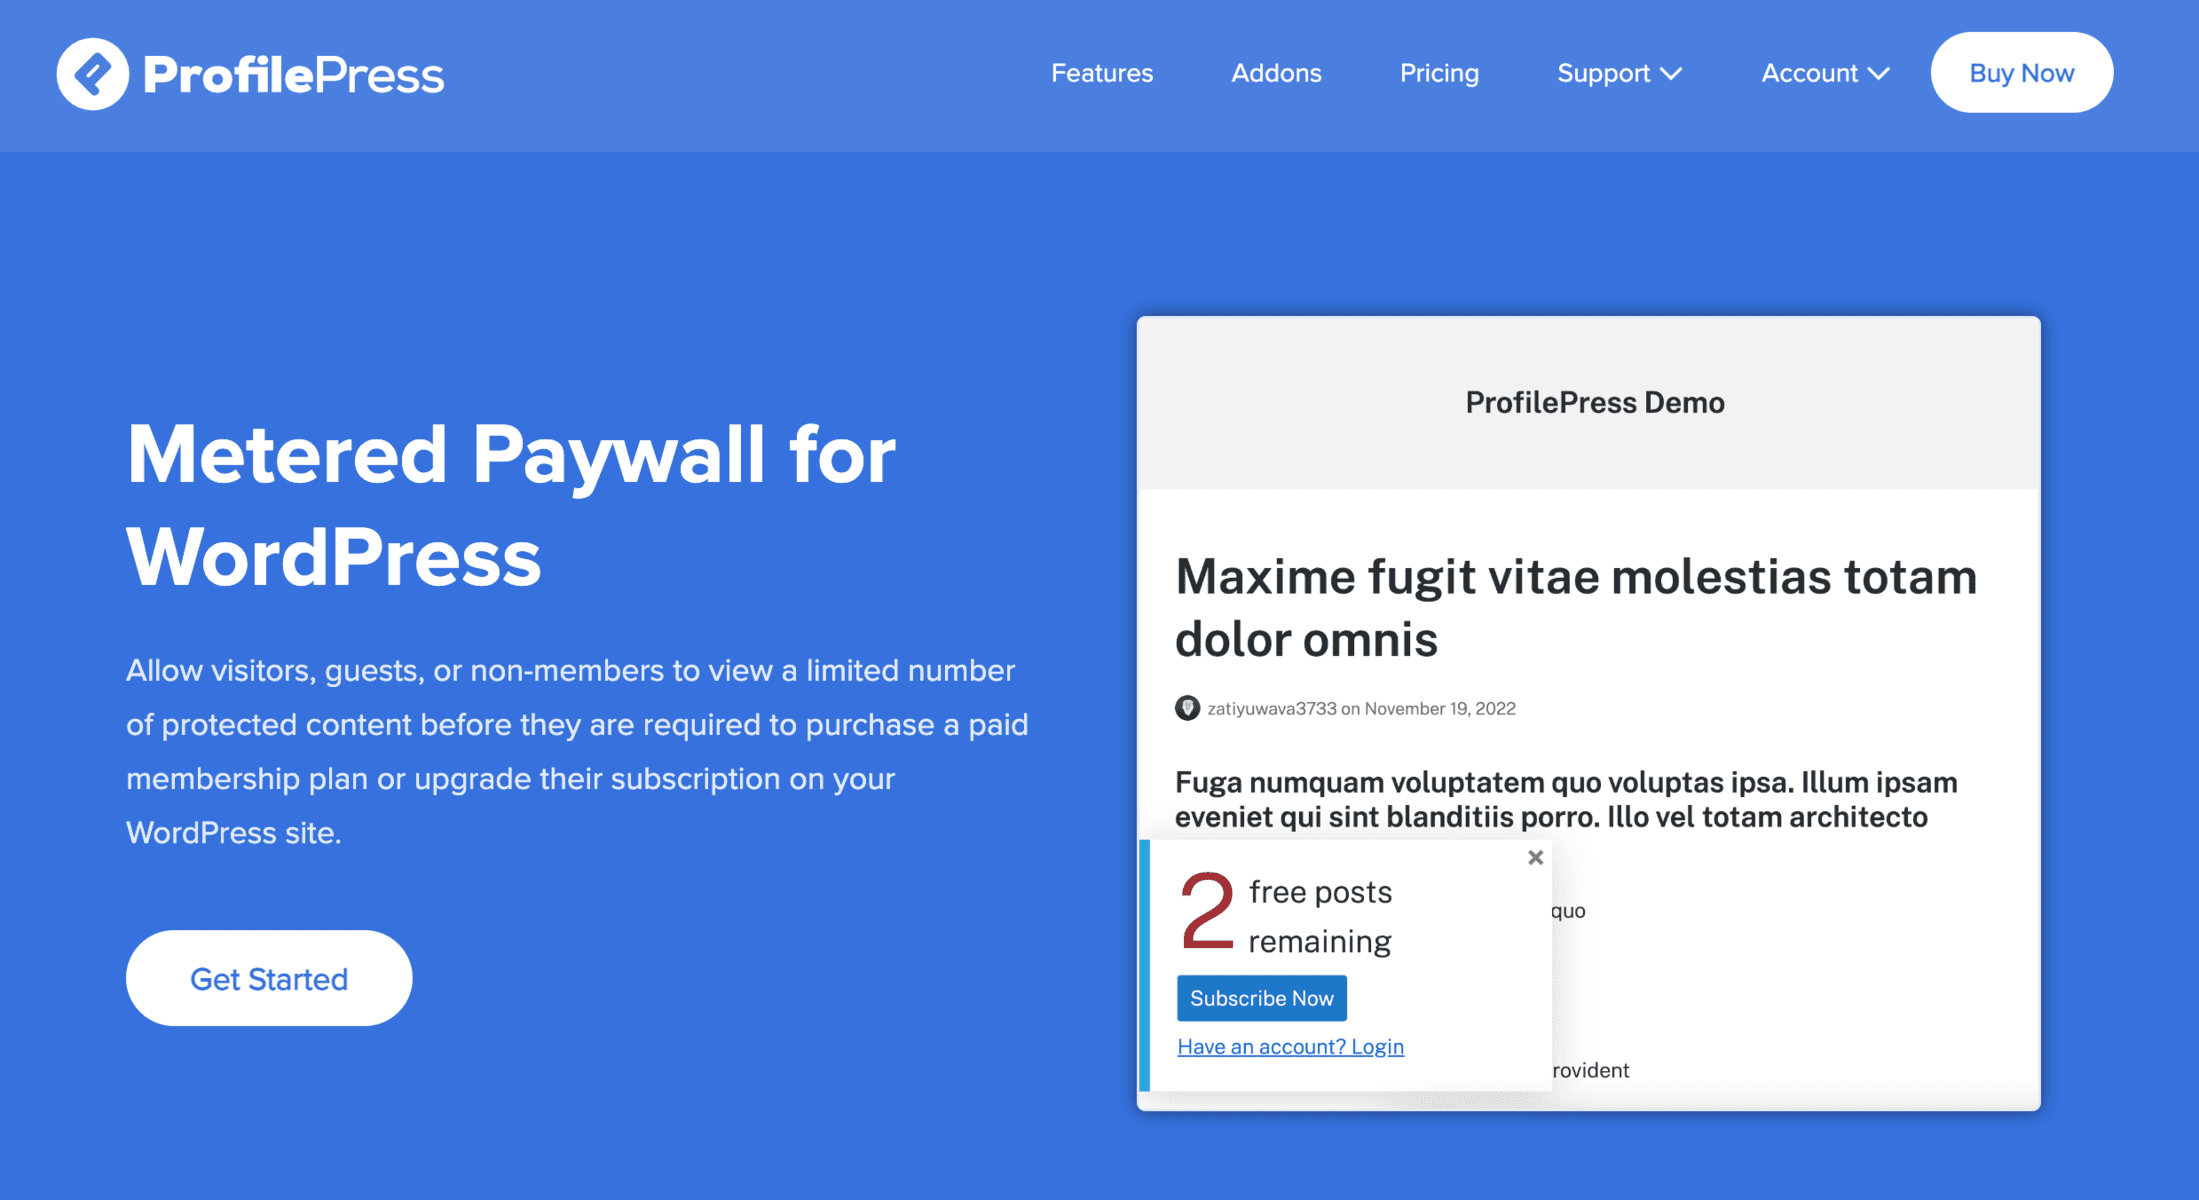
When users hit the free view limit, they would see the message urging them to subscribe to a membership plan to gain unlimited access.
You can read ProfilePress’s Metered Paywall documentation for more information.
Conclusion
If you still need to decide what type of paywall to create, I recommend creating an email paywall. It takes only a couple of minutes and will help you grow your email list. The bigger your email list, the more money you will make in the long run. So, start today!