How To Set Up WordPress Recurring Payments [Stripe & PayPal]
Are you interested in accepting recurring payments on your WordPress website?
Recurring billing allows you to charge your customers at specific intervals, such as weekly, monthly, quarterly, annually, or custom schedules.
While the concept of recurring payments is enticing, the implementation can be complex, particularly for those who are not coding experts. That’s where the ProfilePress Plugin comes into play, simplifying the process and making it accessible to WordPress users of all technical levels.
In this guide, we will walk you through setting up WordPress recurring payments using the ProfilePress Plugin and seamlessly integrating two of the most popular payment gateways: Stripe and PayPal.
This article will guide you on unlocking recurring revenue potential, whether you’re an experienced WordPress professional or just beginning your digital venture.
By the end of this article, you will have the knowledge and tools necessary to establish a recurring payment system.
Understanding Recurring Payments
Before we delve into the technical details, we must grasp the concept of recurring payments. Recurring payments, also known as subscription payments or automatic payments, are a billing model in which customers are charged at regular intervals for a product or service. These intervals can vary widely, from daily and weekly to monthly, quarterly, annually, or even at custom schedules.
The fundamental idea behind recurring payments is to offer customers ongoing access to a product or service while providing a predictable and steady income stream for the business or service provider.
Why Should You Accept Recurring Payments on Your WordPress Website?
There are many benefits to adding recurring billing to your WordPress website, which includes:
Predictable Revenue: One of the most compelling reasons businesses opt for recurring payments is its predictability. Knowing that a certain amount of revenue will be generated regularly allows for better financial planning and budgeting.
Customer Retention: Recurring payments are often associated with subscription-based models, which encourage customer loyalty. Subscribers are likelier to continue paying if they receive value from the service or product.
Reduced Administrative Overhead: Automation is a crucial feature of recurring payments. Once set up, the system handles payments without manual intervention, reducing administrative work and the risk of errors.
In a nutshell, accepting recurring payments makes your website more user-friendly and helps keep your finances in order.
Overview of ProfilePress
ProfilePress is an eCommerce and WordPress membership plugin that empowers you to build robust eCommerce websites. It stands out as one of the best WordPress payment plugins, offering a simple and user-friendly method for setting up recurring payments on your WordPress website.

With ProfilePress, you can quickly sell subscriptions and digital products and receive payments via Stripe, PayPal, RazorPay, Mollie, Paystack, and more.
It offers a range of valuable features, including email notifications, social login, user management, coupon discounts, optimized checkout, and more.
Now that you understand why we chose ProfilePress let’s dive into installing and activating this powerful WordPress plugin.
Install and Activate ProfilePress
The first step in this process is to purchase a ProfilePress license.
After you’ve completed the purchase, a confirmation email will be sent to you. This email will contain a link to download the plugin’s zip file and your license key. Alternatively, you can download the plugin from your account page on the ProfilePress website.
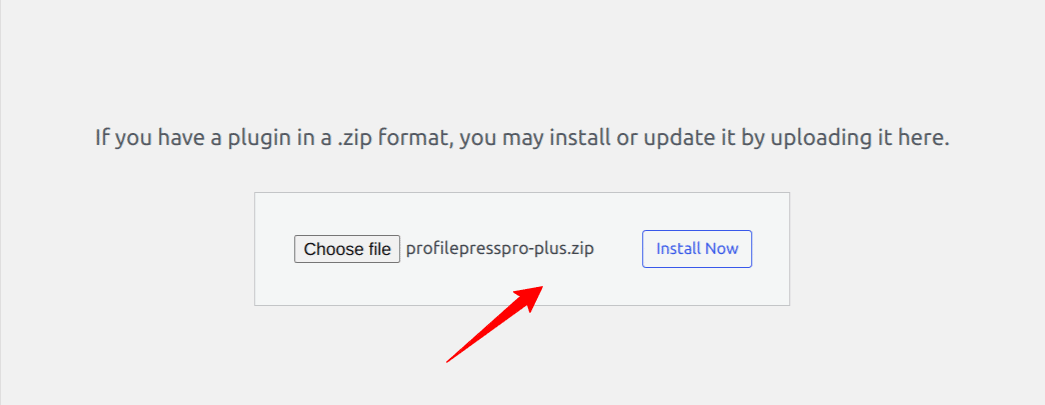
Once you have the plugin, log in to your WordPress admin dashboard. Go to the Plugins page, click “Add New,” and then select “Upload Plugin.” Choose the previously downloaded plugin zip file and click “Install Now.”
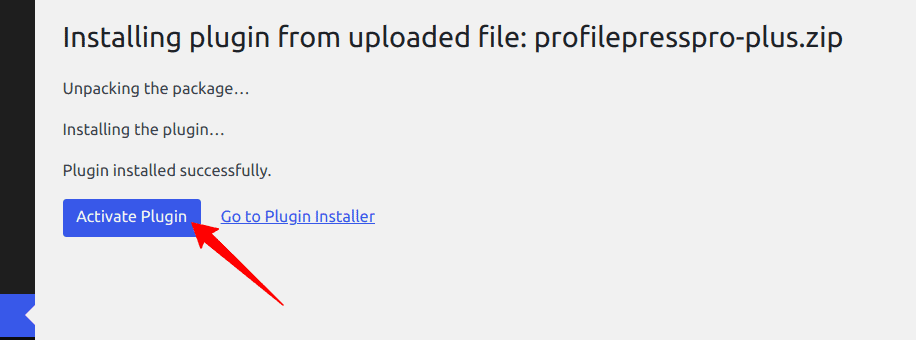
After installation is complete, click the Activate Plugin button.
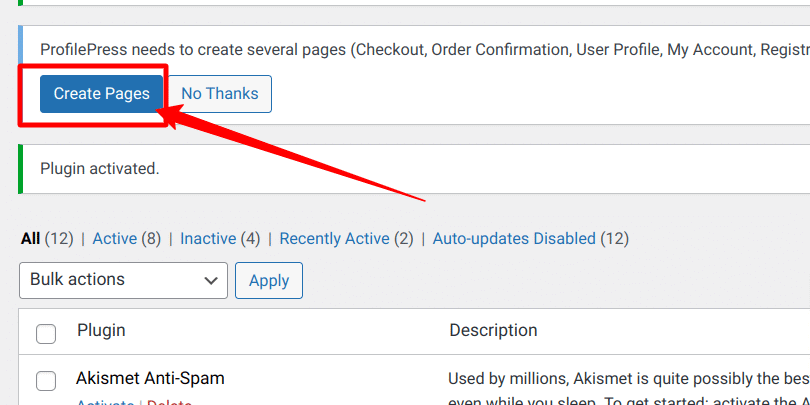
At the top of the page, you will notice a notification that reads, ‘ProfilePress needs to create several pages.’ To complete the plugin setup, click the ‘Create Pages’ button.
The next step is to integrate the Stripe and PayPal payment gateways.
Establish a Payment Gateway Connection
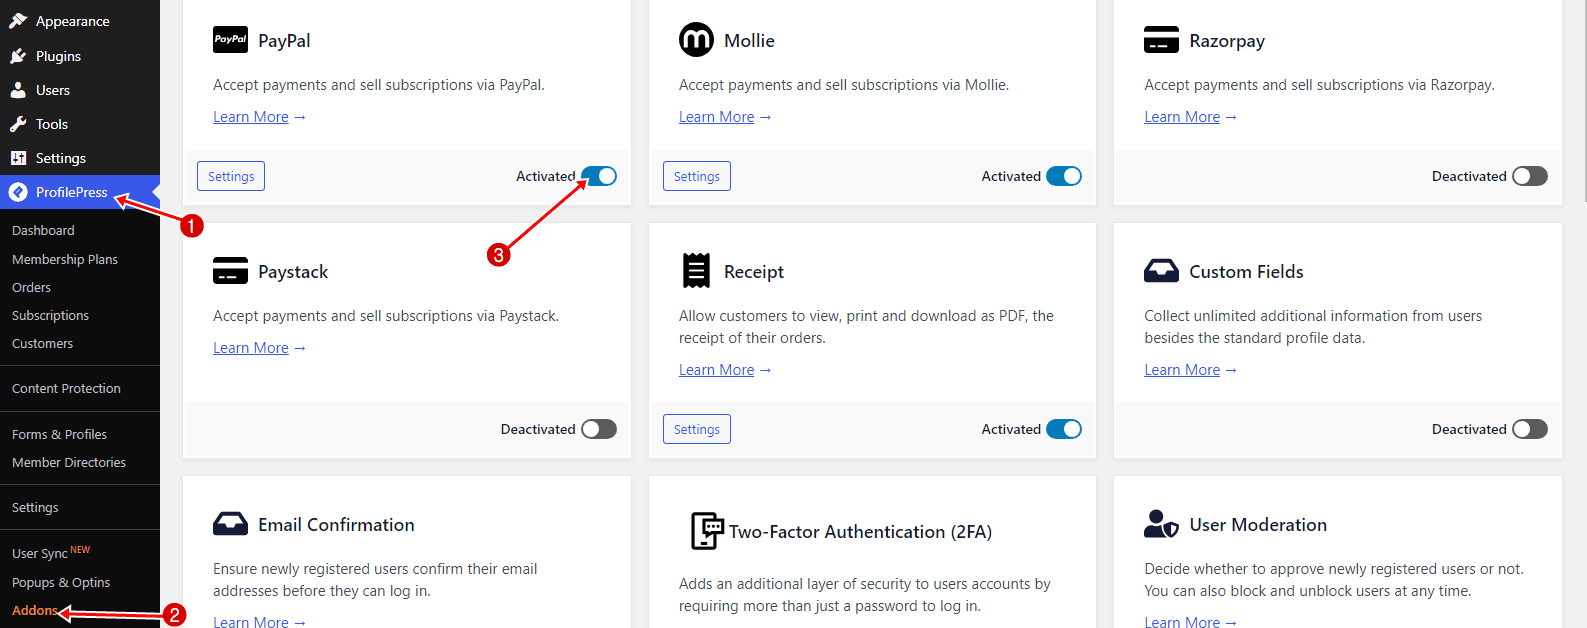
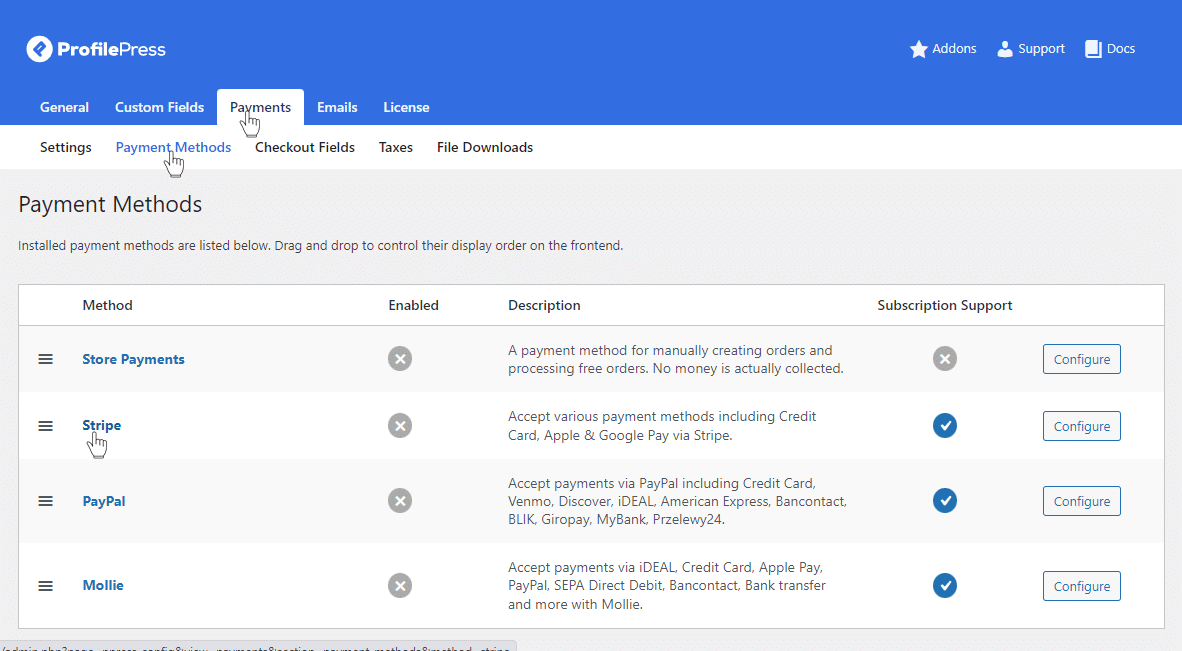
ProfilePress easily integrates with popular payment services like Stripe, PayPal, Razorpay, Paystack, and Mollie. In this section, we will guide you through connecting your website to Stripe and PayPal payment gateways.
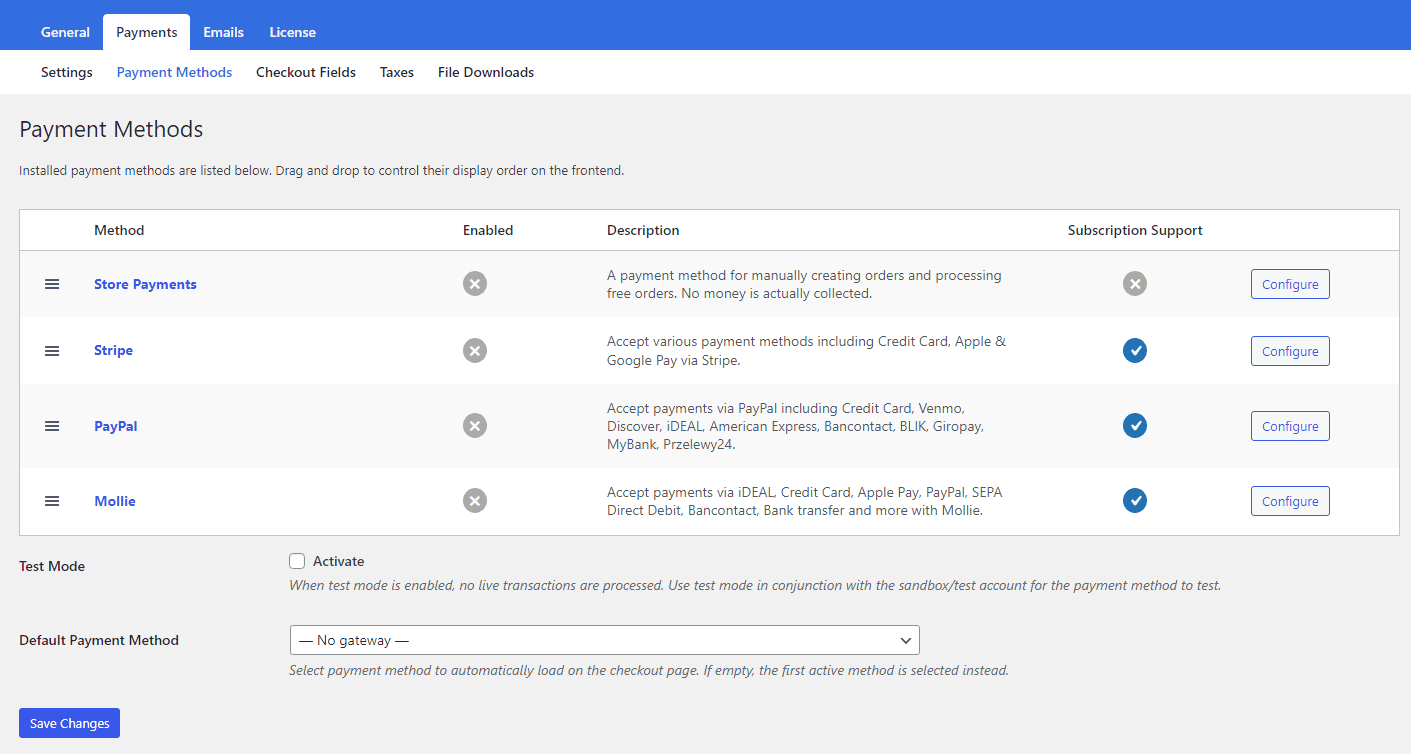
Connecting PayPal Payment Gateway
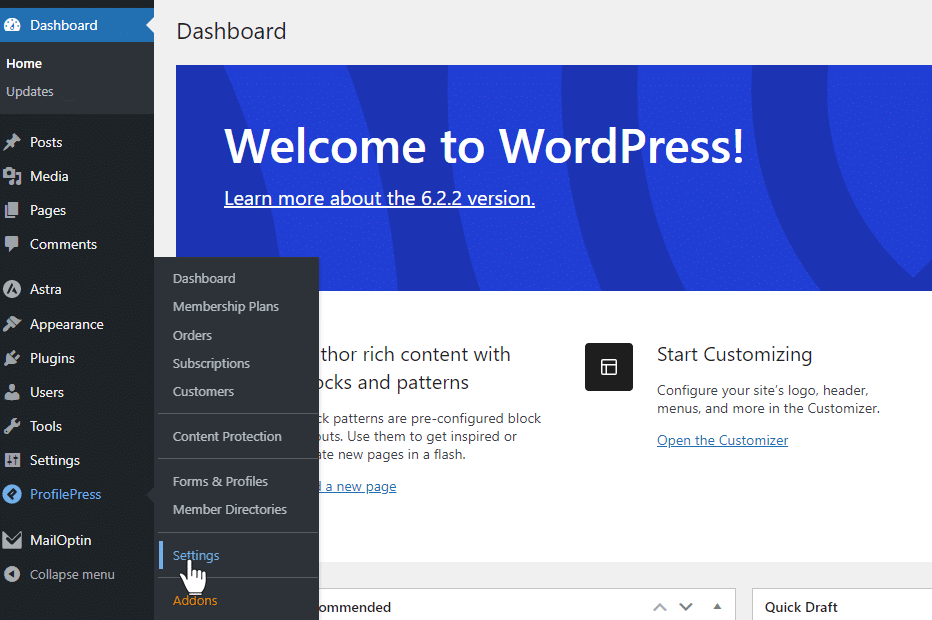
To connect to PayPal, navigate to the Addons section of ProfilePress settings and activate PayPal.
Next, navigate to ProfilePress > Settings > Payments > Payment Methods and click the ‘Configure’ button for PayPal.
If you’d like to test the setup before going live, activate ‘test mode’ before proceeding with the PayPal configuration.
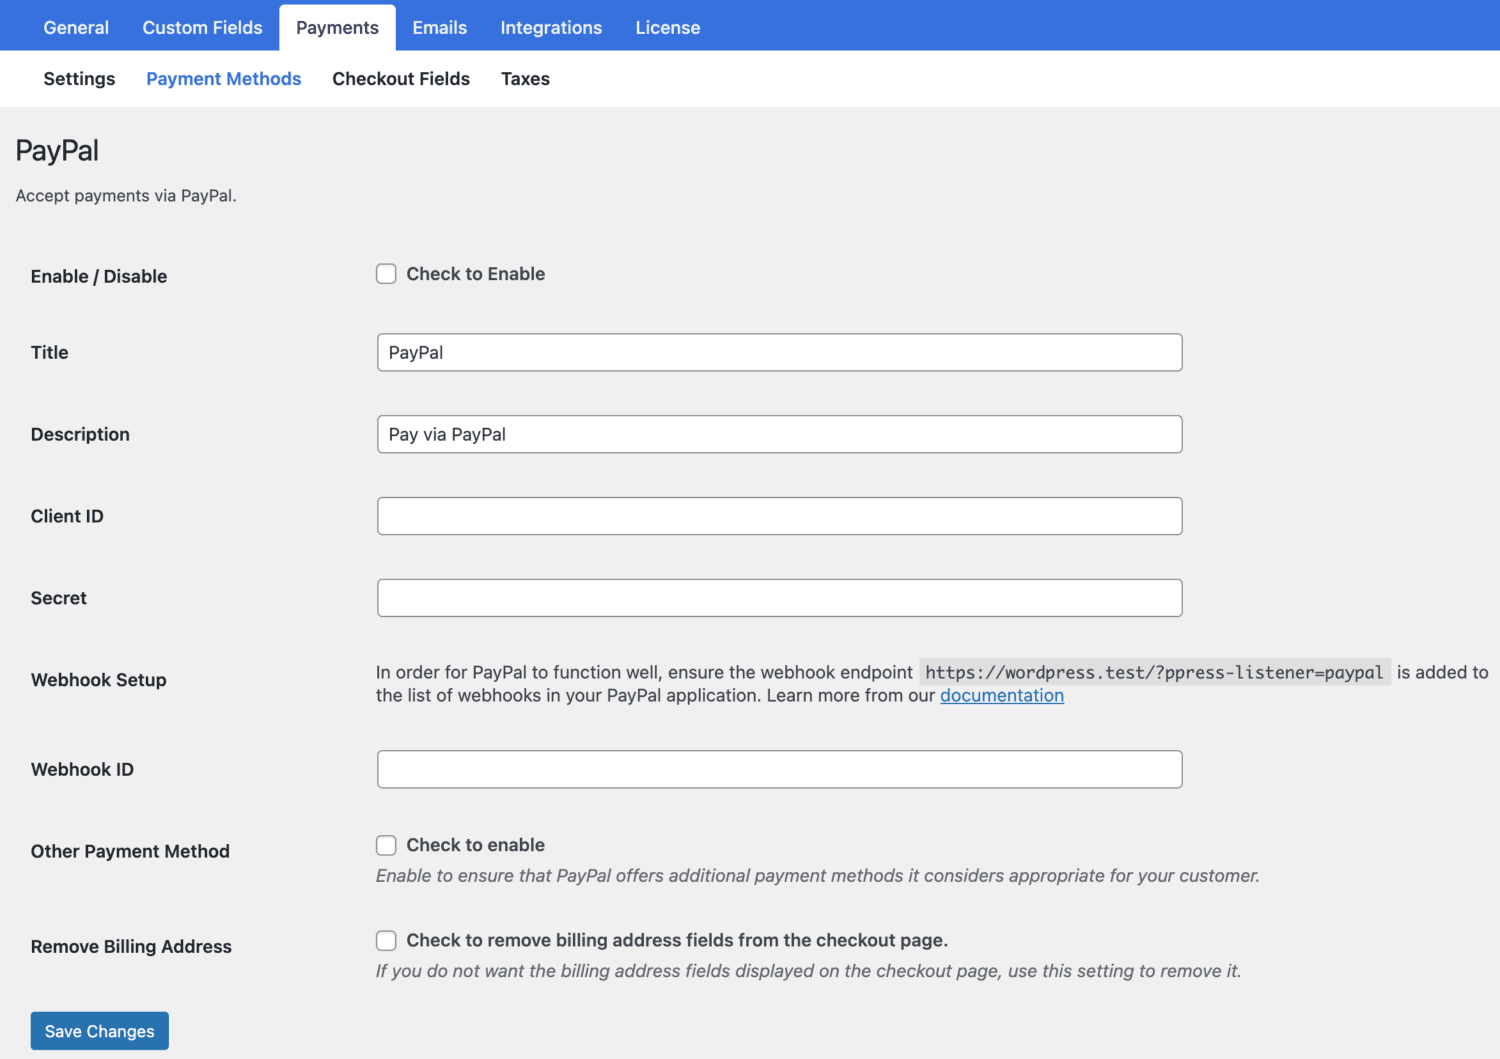
The next step involves creating a PayPal application and providing the application details in the settings.
Setting up a PayPal Application
If you enabled the test mode in the previous step, you must create a Sandbox application. However, to set up PayPal to charge real payments, you must create a Live application. Since this is a tutorial guide, we will use the Sandbox application.
Log in with your PayPal account at https://developer.paypal.com.
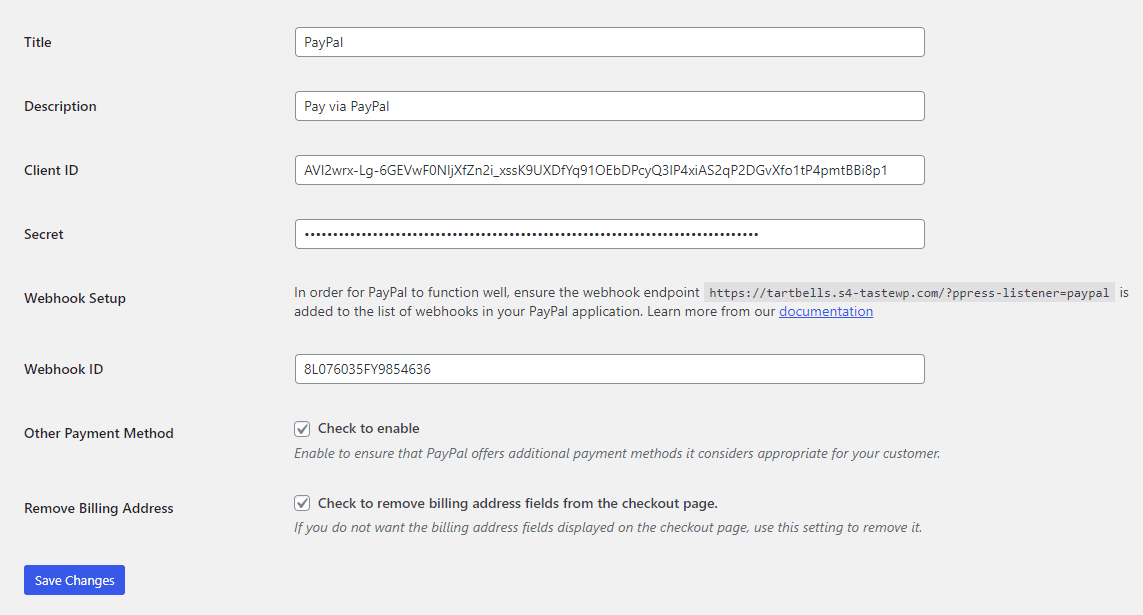
Go to Dashboard >> My Apps & Credentials and click the ‘Create App’ button. Next, input the App Name, then click ‘Create App,’ and you will be presented with a new window displaying your App name, Client ID, and Secret Key.
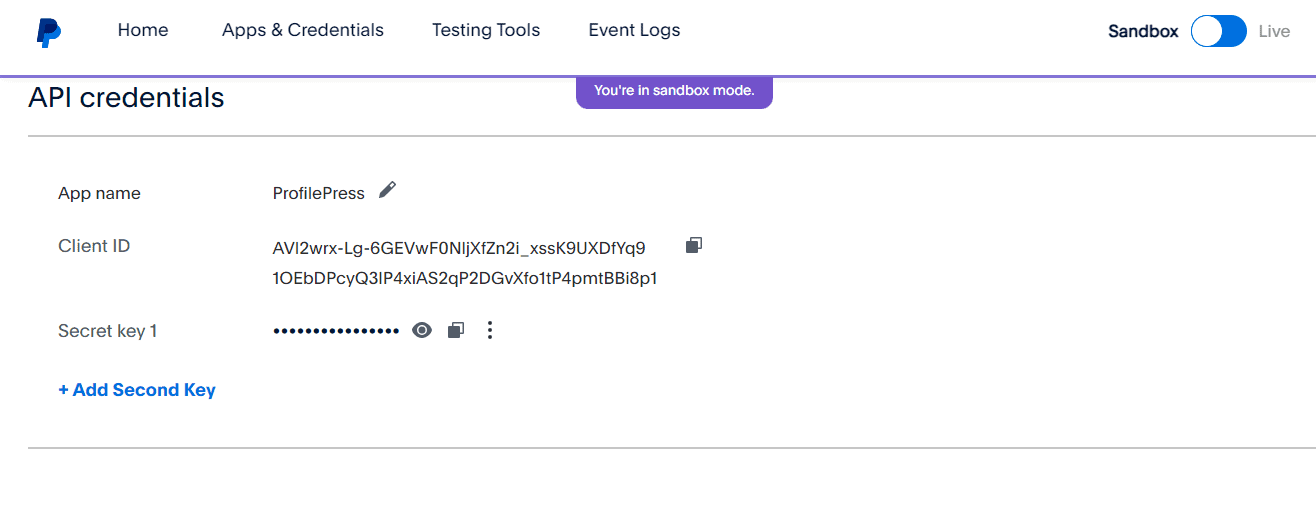
Copy and save your Client ID and Secret Key to the ProfilePress PayPal settings.

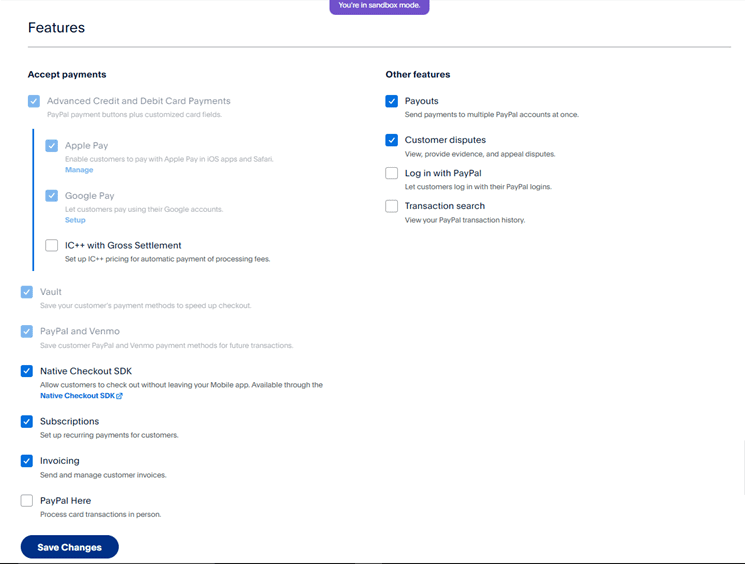
Return to your Paypal Dashboard and enable the ‘Accept payments,’ ‘Invoicing,’ and ‘Customer Disputes’ features.
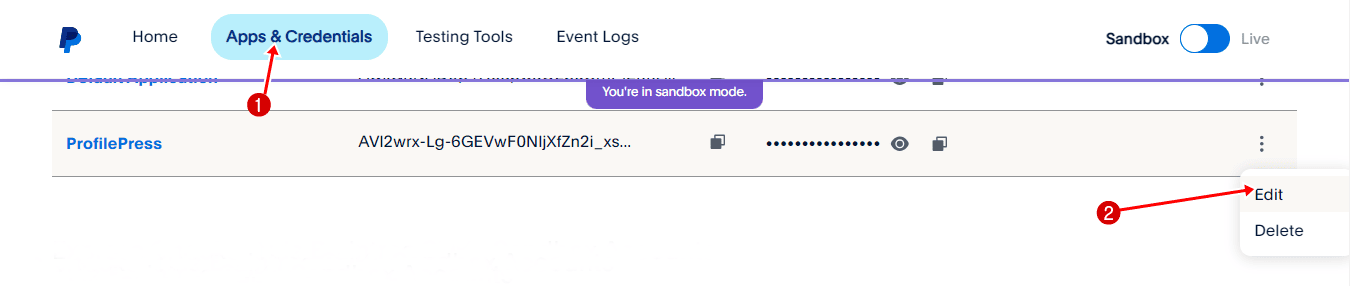
To do this, click on ‘Go to Dashboard,’ then navigate to ‘My Apps & Credentials,’ and click ‘Edit’ on the three-dot icon you see next to the app you created.
Scroll down on the opened page to view the available features and enable the ‘Accept payments,’ ‘Invoicing,’ and ‘Customer Disputes’ features.
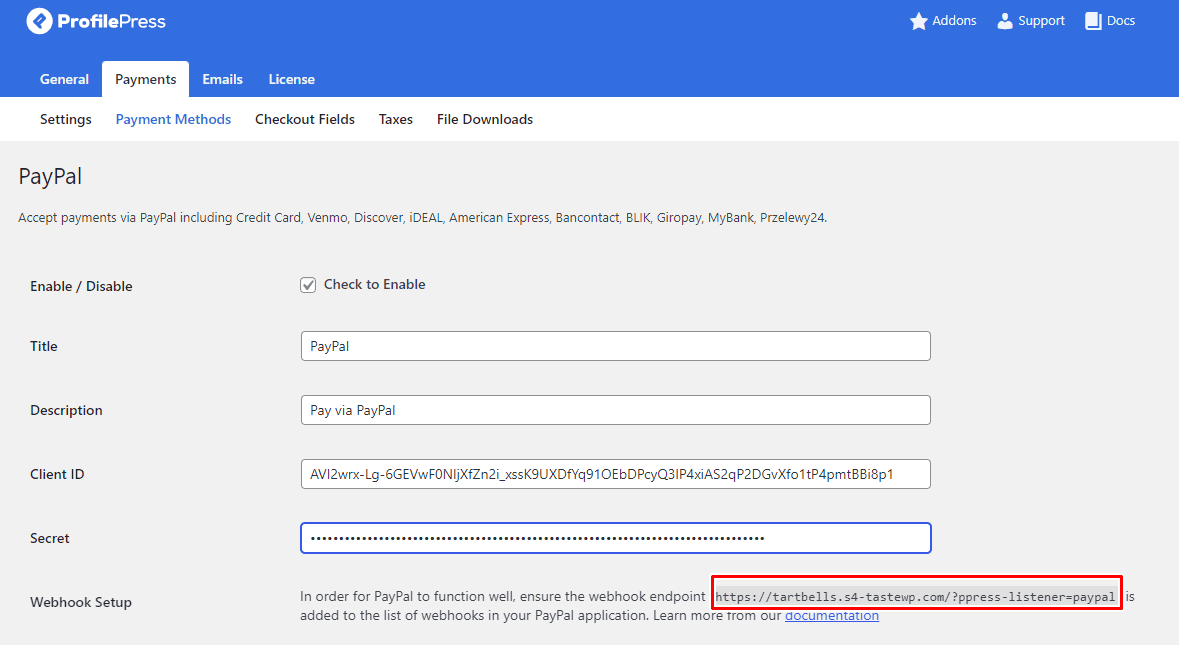
The next step is to set up Webhooks, which are how ProfilePress communicates with PayPal. To do this, add the appropriate webhook endpoints to your PayPal application.
Start by copying the Webhook URL from the Webhook Setup section of the ProfilePress PayPal settings page.
After copying the Webhook URL, navigate to the Paypal Dashboard section, then proceed to ‘My Apps & Credentials.’ Click ‘Edit’ on the three-dot icon next to your created app. On the newly opened page, scroll down until you see the ‘Add Webhook’ button, and click on it.
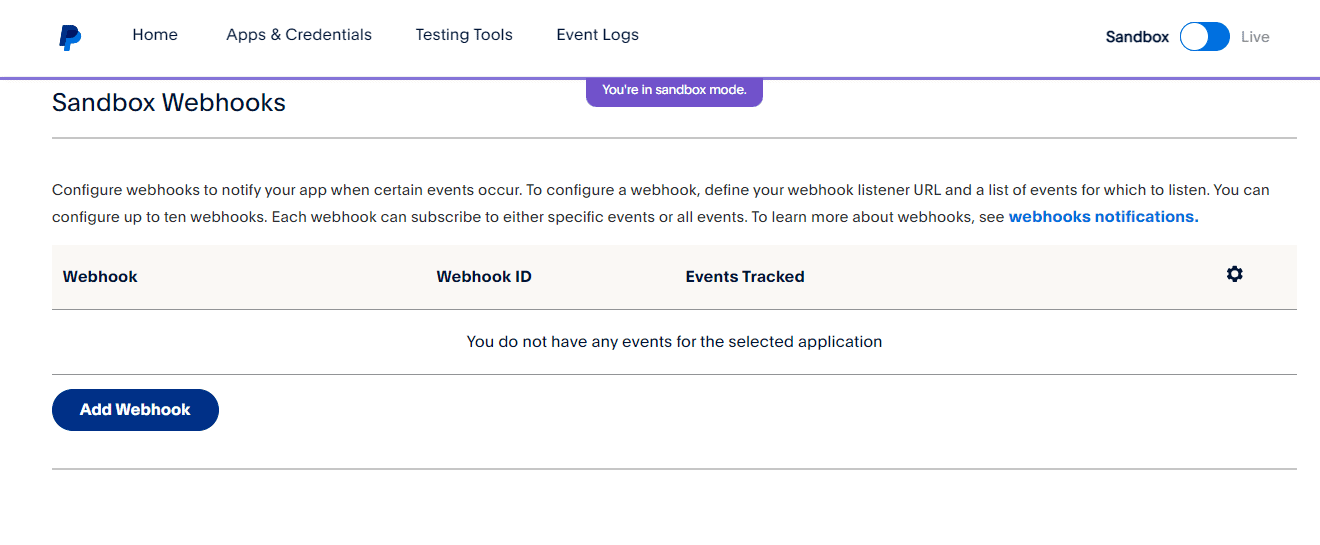
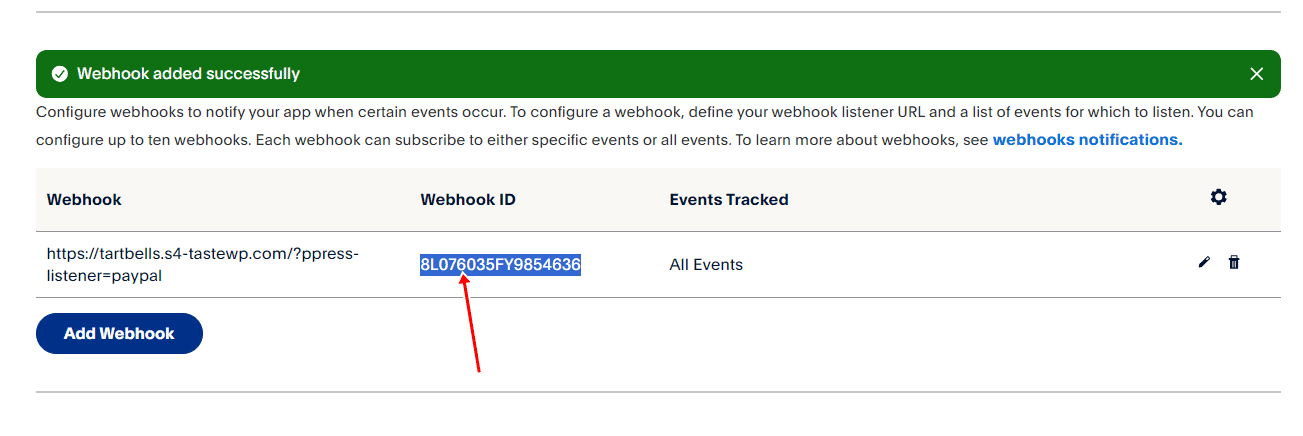
In the new window that opens, paste your website webhook URL. Check the box labeled ‘All Events’ below the Webhook URL field, then click ‘Save.’

After saving the webhook URL, copy the Webhook ID and save it to the ProfilePress PayPal settings.
After pasting your Webhook ID on your ProfilePress PayPal Setting page, you will have two options: ‘Other Payment Method’ and ‘Remove Billing Address.
Other Payment Method: Checking this box ensures that PayPal offers additional payment methods appropriate for your customers.
If you have enabled the setting, the availability of payment buttons depends on two factors:
- The list of permitted sources included in our PayPal Add-On.
- PayPal’s determination of which sources are suitable for your specific customers. For instance, Venmo may only be available to buyers in the US.
If a payment method meets both criteria, it will be offered on the form for that particular customer.
Just so you know, new funding sources may be added in later versions of the add-on, and they will be automatically enabled upon updating if you have this setting turned on.
Remove Billing Address: Checking this box means you do not want the billing address fields displayed on the checkout page.
When done, click on ‘save changes.’ And that’s it! Your website can now accept payments via PayPal.
Connecting Stripe Payment Gateway
The Stripe payment method allows you to use your Stripe.com account with ProfilePress to process one-time and recurring payments using the various methods Stripe provides directly on your WordPress website.
In addition to collecting payments via debit and credit cards, our Stripe integration also supports payments via Link, ACH Direct Debit, Apple Pay, Google Pay, Alipay, Bancontact, bank transfers, BLIK, EPS, FPX, Giropay, iDEAL, Sofort, P24, Affirm, Afterpay, Clearpay, Klarna, Cash App Pay, GrabPay, WeChat Pay, and SEPA debit, as well as Bacs Direct Debit.
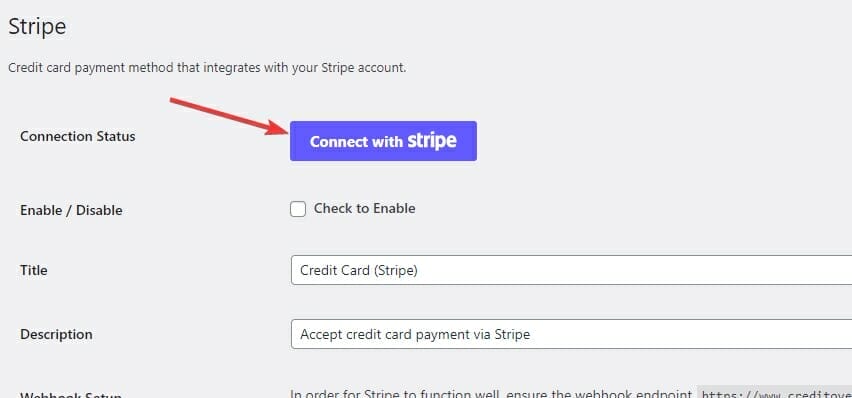
To connect with Stripe, navigate to the ProfilePress settings in your WordPress admin sidebar.
Next, click the Payments tab > Payment Methods sub-tab and choose Stripe
Next, click the “Connect with Stripe” button to connect ProfilePress to your Stripe account.
You’ll be taken to Stripe.com, where you’ll be prompted to create a new Stripe account or log in to your existing one.

Once you complete the form, you’ll be taken back to your website.
Ensure to mark the Enable checkbox and provide a statement descriptor. The statement descriptor is the text displayed on your customers’ card statements for charges. It is recommended to use your business name for this purpose. If you have a short domain name, you can enter it in this field.
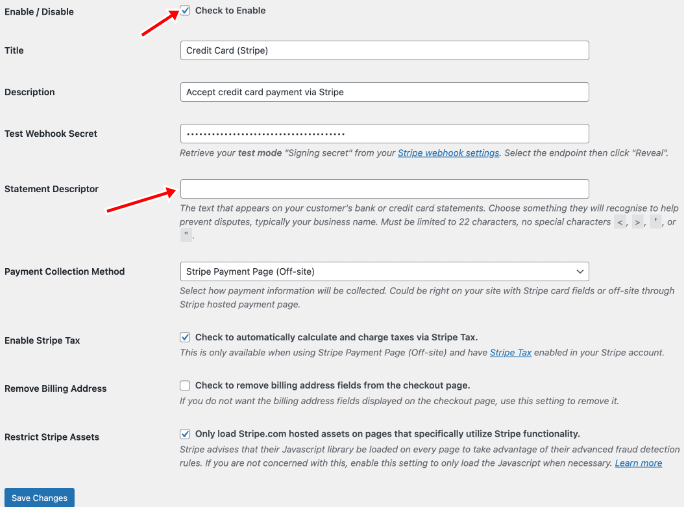
For the Stripe webhook, ProfilePress attempts to create the webhook endpoints automatically.
You can enable Stripe Tax, remove the billing address, and restrict Stripe assets. When you’re done setting it up to your preferences, save the changes.
And that’s it! Your website can now accept payments via Stripe.
Next, we’ll guide you through creating a subscription plan, allowing your customers to set up recurring payments via PayPal or Stripe.
Creating a Subscription Plan
After completing the integration of the Stripe and PayPal payment gateways, we will proceed to create a subscription-based membership plan. To achieve this, follow the steps outlined below:
Navigate to ProfilePress and access the “Membership Plans” section.
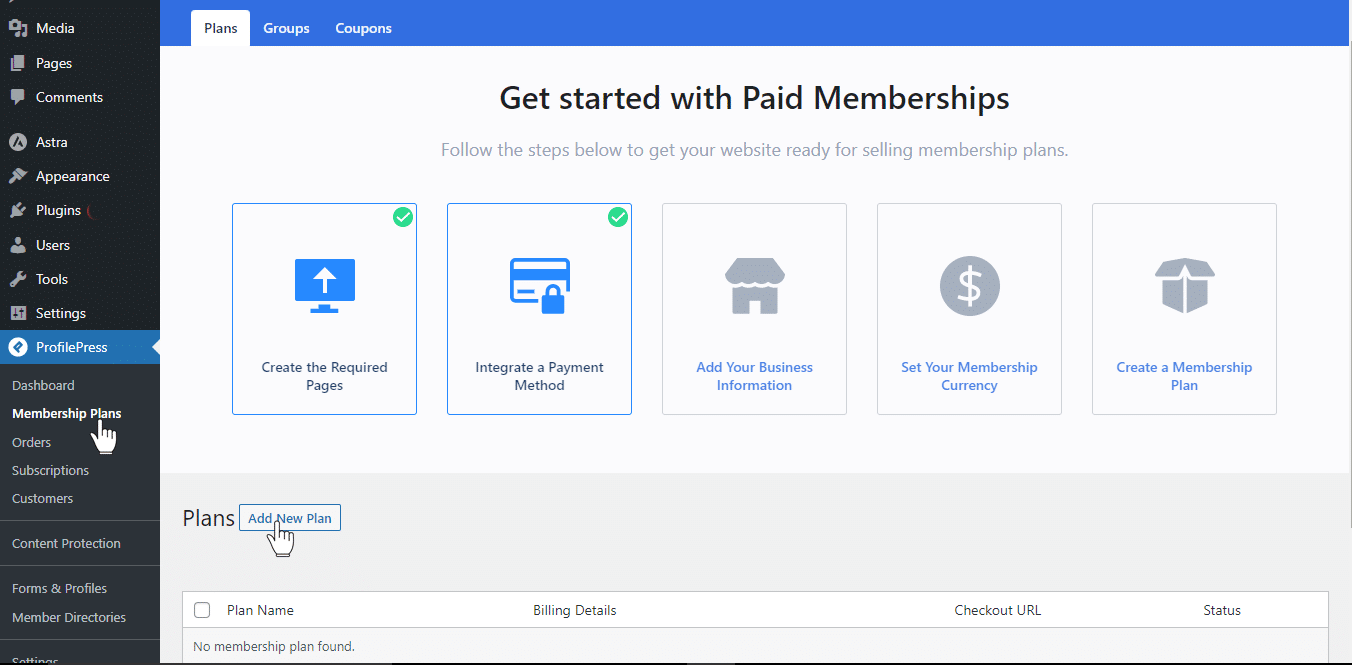
Click the Add New Plan button. It will take you to the Add Plan page.

Under Plan Details, input the Plan name, Description, Purchase Note, User Role, and Price.

After specifying the plan’s name, purchase note, user role, and price, scroll down to the subscription setting section.
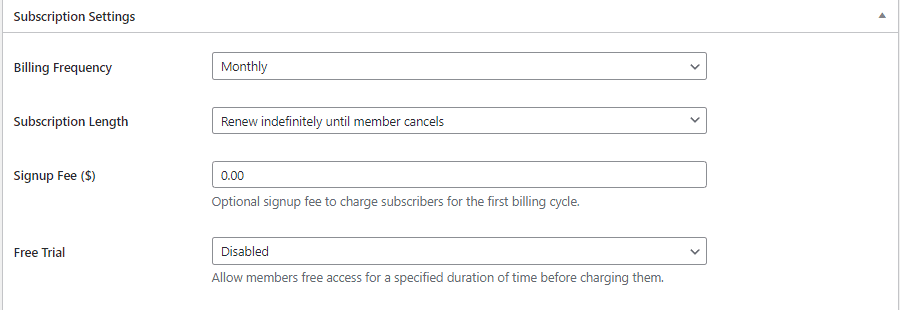
In this section, you can set the following:
Billing frequency: You can choose from monthly, weekly, daily, quarterly, every six months, and one-time payments. For our example, we will set it to ‘Monthly,’ making it a recurring payment that subscribers will pay monthly.
Subscription Length: This option allows you to determine how the subscription will be renewed: either renew indefinitely until the member cancels or for a fixed number of payments.
Signup Fee: This option enables you to charge a one-time signup fee from subscribers during the first billing cycle.
Free Trial: This option allows you to grant members free access for a specified time before charging them. You can set it for three days, five days, one week, two weeks, three weeks, or one month.
Once you have finished customizing the plan to your liking, click ‘Save Changes.’.
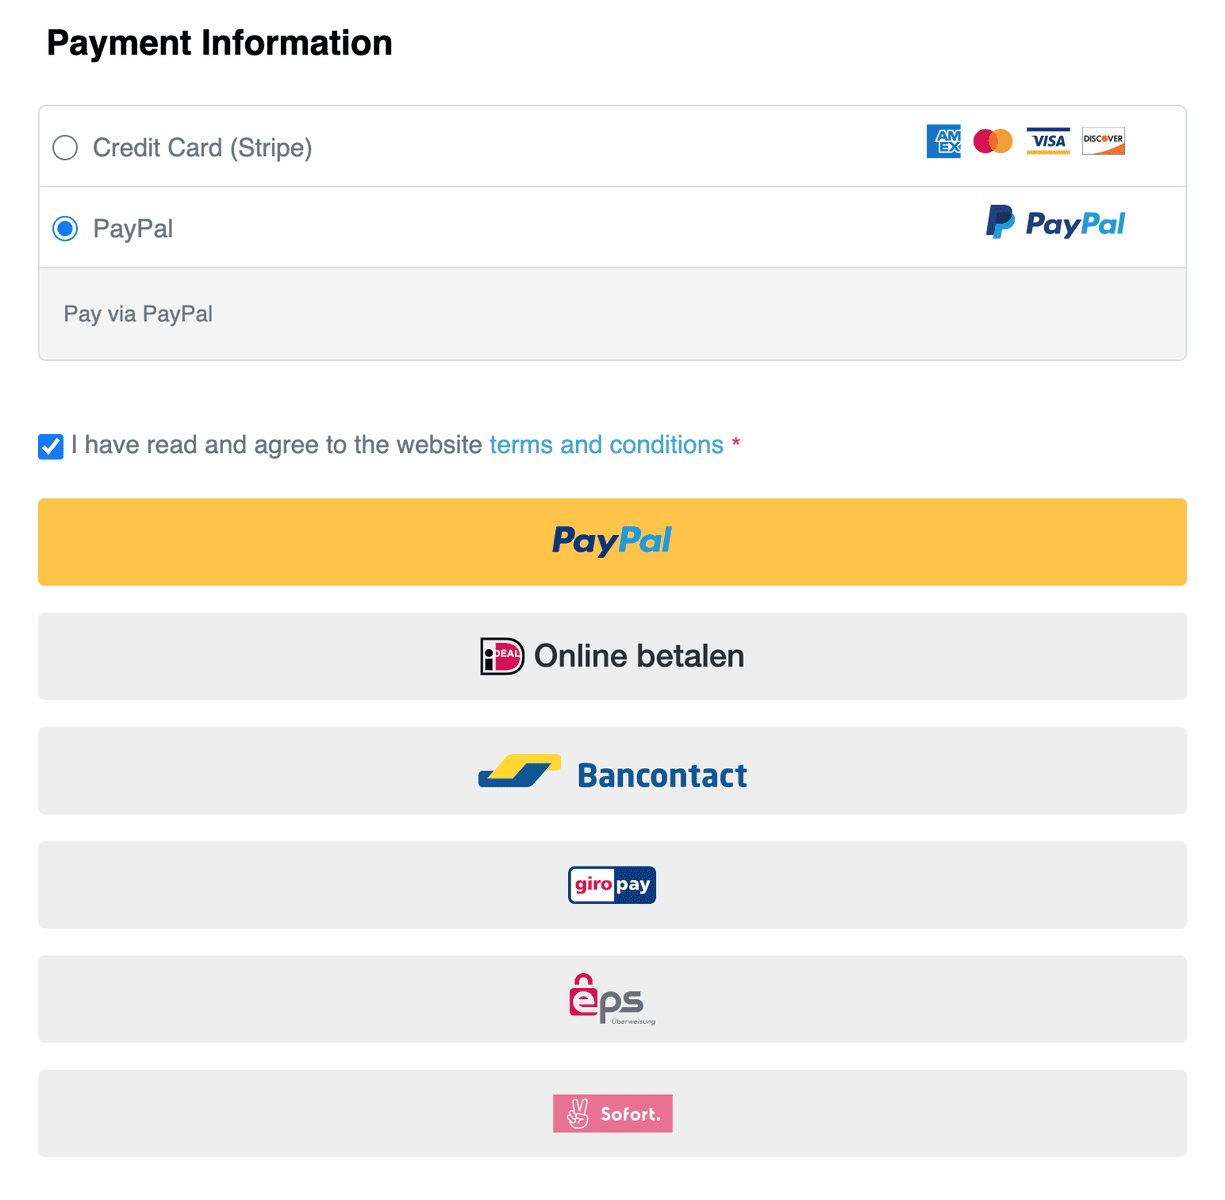
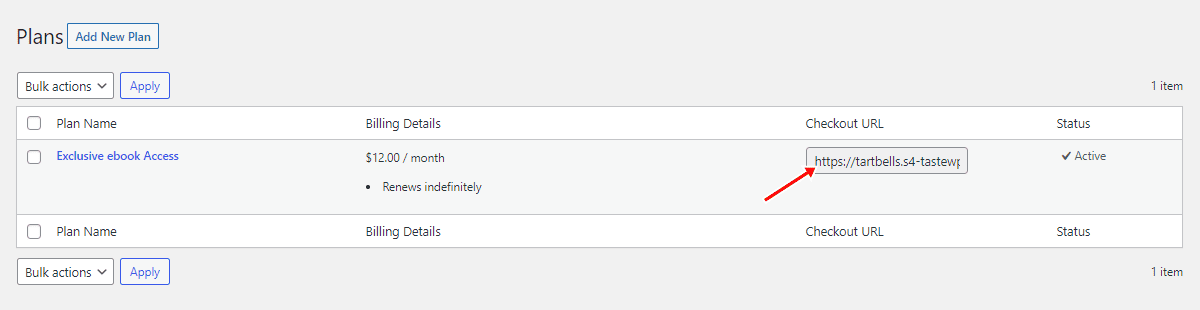
You can find the checkout URL on your ProfilePress Membership Plan page.
Below is a screenshot of the checkout page from our demo website.
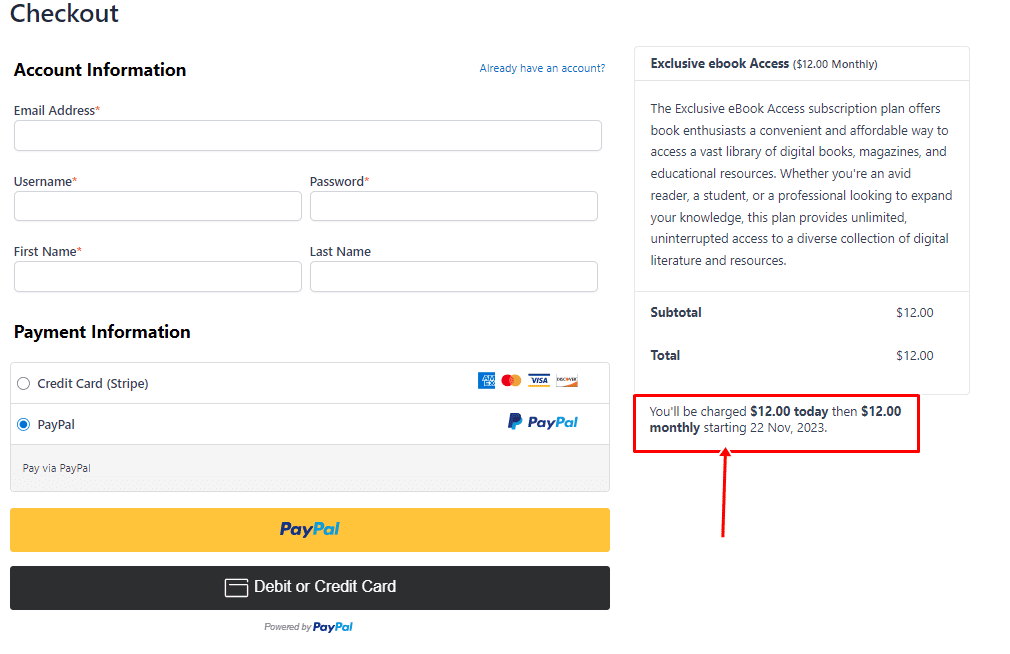
The screenshot above shows that the Stripe and PayPal payment gateway are fully active on the website. This will allow your subscribers to pay with their preferred payment platform.
Conclusion
Setting up recurring payments on your WordPress website using the ProfilePress plugin integrated with Stripe and PayPal is an innovative and strategic move. It allows you to automate your revenue collection, provide an excellent customer checkout experience, and maintain a predictable income flow. With Stripe’s and PayPal’s reputation for reliability and security, you can trust that your payment processing is in good hands.
This article has walked you through the essential steps to implement these payment gateways, allowing you to offer your customers seamless, recurring billing options.
Please get in touch with our team if you require further assistance with integrating PayPal or Stripe or encounter any challenges during the setup process. We are more than willing to provide the support you need.