How to Optimize Your Images & Photos in WordPress the Easy Way
If you think optimizing images in WordPress is just a minor thing when it comes to the overall SEO and loading speed of your website, you couldn’t be more wrong about it.
In fact, there are few things that affect the speed of your WordPress website more than its images. Similarly, image SEO is pretty real and can not only help you get a lot of additional traffic through Google Images but also go a long way in ranking your website higher in the search engines.
Simply put, optimizing images on your WordPress website is a must. More so because by default, they are rather poorly optimized and often lead to a higher loading time for your website while not being SEO-friendly.
So with that long introduction out of the way, we will now walk you through simple ways of optimizing images on a WordPress website that even beginners can implement without going crazy.
SEO Optimizations
The SEO optimizations for your images are easy. You just need to do the following:
- Name the image files and make them relevant to the topic the post is about
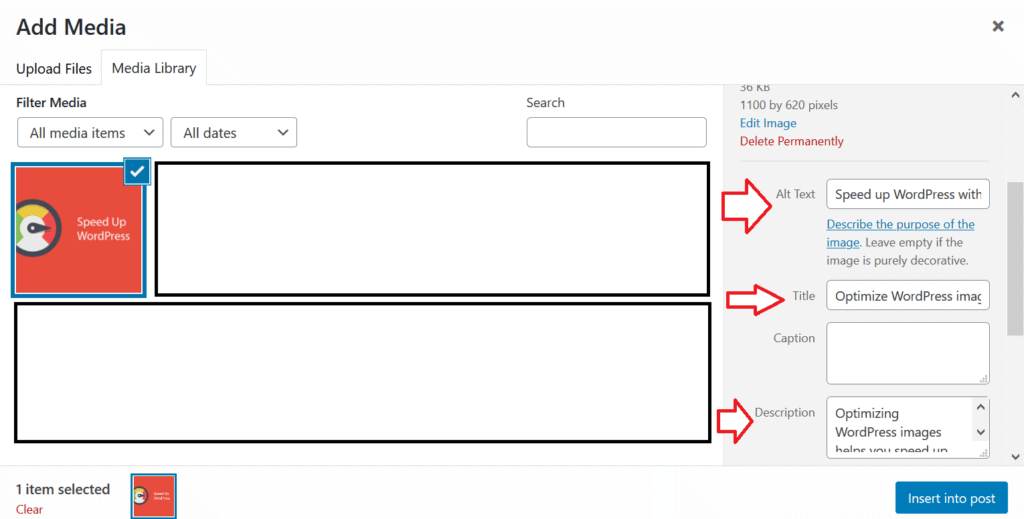
- After uploading it in the media of your WordPress website, you need to put the alt text describing the purpose of the image
- The next step is to put the description, which needs to be a little more detailed than the alt text or filename
- Check our screenshot below as we just did all the things we listed above to help you get a better idea

As we have highlighted in the screenshot above with arrows, you need to have some descriptive text in these three sections. When you optimize and put a relevant file name to your images, however, they automatically appear in the title section.
For the alt text, you need to put a small sentence describing the image in brief. The description, however, can be more detailed.
There are also plugins like the Auto image alt text if you want the alt text for your images to be taken care of automatically. This could come in handy if you’re uploading a lot of images, as the alt text is actually the most important element of your images with respect to SEO (even more important than the description).
However, if you’re only uploading a few images, it’s better to avoid using a separate plugin for it as having too many plugins can slow down your WordPress site too.
Speed Optimizations
Images are one of the most common elements of your WordPress website that are responsible for slowing it down. If you don’t optimize your images well and are uploading too many of them, it could lead to a longer loading time for your website, which will inevitably affect the SEO of your WordPress website as well.
So let us walk you through some important image optimizations that you need to make that would help your WordPress website load faster and also achieve better rankings in the search results.
Choosing the Right Format
If you’re new to WordPress SEO or image optimization, you probably don’t even bother to check the format you’re using for your images. However, when it comes to making sure your images load fast, the file format turns out to be one of the most important factors.
Now, there are mainly three common formats for image files. We will give you a quick overview of them below.
- JPEG: It’s the most common image file format and must be used for images with a lot of different colors. JPEG images are slightly lower quality than their PNG counterparts but come in a much lower file size, which is great for your site’s loading time.
- PNG: PNG files are uncompressed and hence higher quality but they are also much larger than other file formats. They must only be used for simple images or when you want the images to be transparent.
- GIF: This image file format is commonly used for animated files. This format is compressed as well and the file sizes are typically on the lower side.
Compressing Your Images
Compressing your images is the biggest optimization you can make to them in most cases. Image compression basically means lowering the size of your images.
Images can be compressed in different ways and at different levels. You would want to make sure you choose a type and level that helps you reduce your image file size as much as possible without compromising much on the quality of your images.
Compressing your images the right way usually has very little impact on the quality of your images, while still lowering the file size quite a bit. For this reason, lossless compression is believed to be the most effective way of optimizing your images.
Tools like Adobe Photoshop and GIMP allow you to compress the images the way you want right before saving them. However, as many WordPress users may not be using these tools and getting their images from other sources, there are other tools like TinyPNG and JPEG Mini that let you compress your images online on the web with little to no quality loss.
In addition, there’s also a fairly long list of WordPress plugins that allow you to compress your images. Almost all the popular WordPress image compression plugins like Imagify, Kraken, Smush and EWWW offer the following three basic but useful features at a minimum.
- Lossless image compression: As the name suggests this type of image compression helps you lower the size of your image files with no noticeable loss in the quality at all
- EXIF data removal: The EXIF data (which is useless in most cases) adds to the image file size as well, and the plugins mentioned above help you remove it
- Resizing images: Many times, the images on your WordPress site are oversized which make them larger and heavier than they need to be, so these plugins also allow you to resize both your existing and future images to the right sizes and prevent additional load on your website’s resources when loading
Lazy Loading
If your using a lot of images on your website – or have many images spread throughout in your important posts – then using lazy loading for your images would turn out to be very useful.
By default, WordPress loads all the images on your website’s pages together whenever a user visits it. And as it can take a while to load all the images together, it often leads to a slower loading time for your website.
Lazy loading helps prevent this by only loading the images on the part of your webpage that’s visible to the user. In other words, all the images on the page wouldn’t load at once, but only the ones that are going to be visible to the user as they scroll down the page.
A good plugin to do this for you is Smush, which also offers the basic useful features that we explained above.
However, if you want to avoid multiple plugins and instead go with a more complete plugin to do this all for you, then WP Rocket is probably your best bet. It not only offers all the image optimization features you would ever need – including caching and CDN – but is also a complete speed optimization plugin for your WordPress website as a whole.
Caching
Just like webpages, it’s a good idea to implement caching for your images too. What it does is saves the images on your website into your visitors’ browser when they see them for the first time.
So the next time they visit those webpages, the images on them don’t need to be loaded again. This saves a lot of time and ensures a much faster loading time for repeat visitors.
As you can tell, this is particularly recommended for websites with a lot of repeat visitors.
Swift Performance is a good free WordPress plugin to use for basic caching, as it also offers other useful features like minifying CSS and HTML, eliminating elements that cause image optimization issues, as well as reducing server response time to some extent.
If you decide to use WP Rocket as suggested above, though, you don’t need to use any other plugin for this as WP Rocket offers image caching as one of its features.
Resizing Images
As mentioned above, oversized images can affect your WordPress website’s loading time more than you think. We have already discussed some plugins that help you resize your images, but you can also do this using any image editing tool out there before you upload the images to your website.
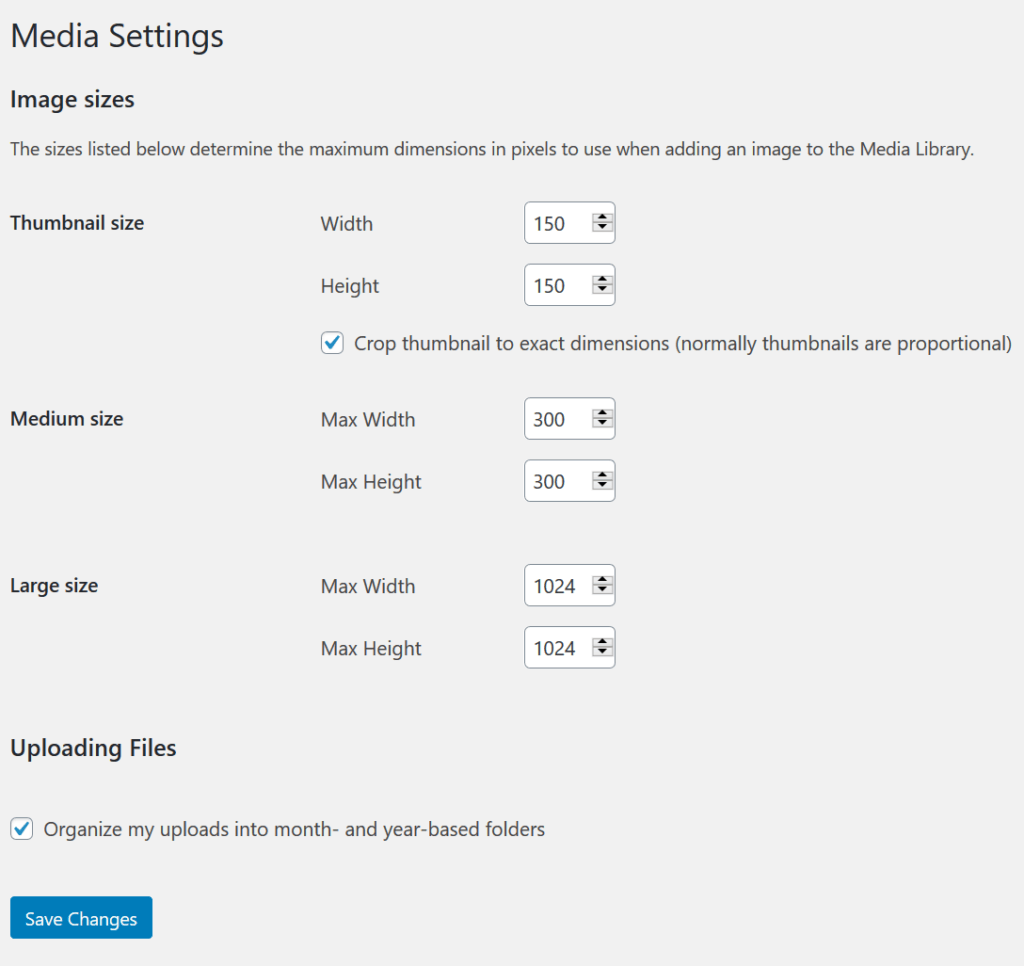
Furthermore, you can also change the image dimensions for the images you upload to your WordPress website from directly the media settings under your WordPress dashboard.

However, this change will only be effective for the images you upload in the future, and not the ones you have already uploaded to your website. You can use one of the image optimizations plugins we discussed above like Smush to bulk resize the images you have uploaded in the past.
In addition to putting more load on your server’s resources, oversized images can also cause your site to break on smaller screens like smartphones and tablets. So it may also lead to poor user experience.
A Final Word
It’s surprising that most WordPress users don’t bother optimizing their images in any way, including even those using a lot of images on their WordPress website. This is especially true in current times when website speed and loading time has become a crucial SEO factor.
And not many things can affect your website’s loading speed more than the images on your website. While there are a few other advanced things you can do to make some further minor optimizations to your images, the ones we explained in this post are the most important, would have the most significant impact, and most importantly, are surprisingly easy to implement even for beginners.
