How to Create a WooCommerce Membership Site
Are you looking to create a WooCommerce membership site?
As the e-commerce market becomes more competitive, brands must devise new ways to differentiate themselves. To do this, many create a membership program.
Setting up memberships for your WooCommerce store offers many benefits. Not only can you provide VIP access to special discounts, premium content, or member-only products, but you can also foster stronger relationships with your audience.
Customers who feel valued stick around longer, spend more, and often become brand ambassadors, recommending your business to others.
This article will guide you through creating a WooCommerce membership website using ProfilePress, a versatile and user-friendly WooCommerce membership plugin.
Why ProfilePress for WooCommerce Membership Sites?
ProfilePress is an ideal solution for creating and managing WooCommerce membership sites due to its powerful features and seamless integration with WooCommerce.
Here are some reasons to consider using ProfilePress to add memberships to your WooCommerce online store.
Easy WooCommerce Integration: ProfilePress integrates directly with WooCommerce, simplifying the setup of membership products and the management of subscriptions. This ensures that membership functionality fits smoothly into your existing WooCommerce store without the need for complex coding or extra tools.
Customizable Membership Levels: You can create multiple membership tiers with ProfilePress, allowing various access levels, pricing, and perks. This is perfect for businesses offering users different content levels or benefits, from essential to premium subscriptions.
Content Restriction and Access Control: With ProfilePress, you can easily restrict access to certain pages, posts, or products based on membership levels. This feature is handy for businesses offering exclusive content, digital products, or member-only deals.
Creating a WooCommerce Membership Site
To create a WooCommerce membership site, you must first ensure WooCommerce is installed, activated, and running on your WordPress website.
Once that’s set, the next step is to install and activate the ProfilePress membership plugin. You can start by visiting the ProfilePress website to choose and purchase a plan that suits your needs.
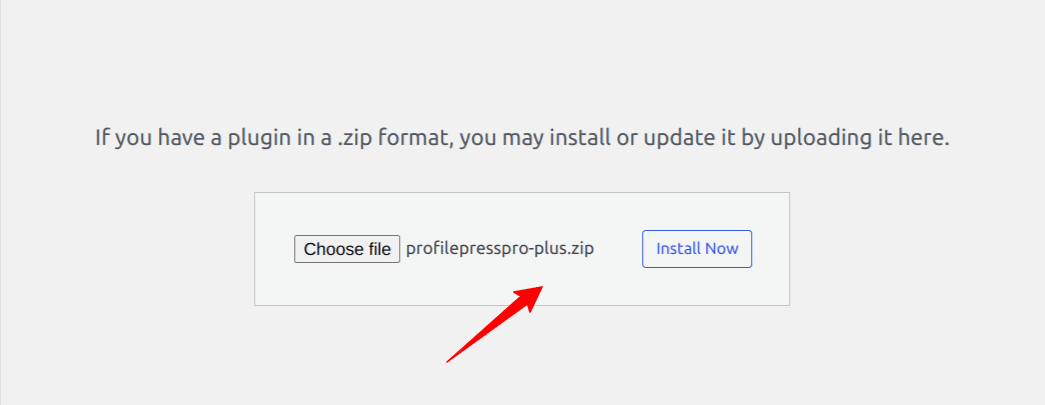
After purchasing, download the plugin’s ZIP file from your ProfilePress account to your computer. Next, log in to your WordPress dashboard and navigate to the Plugins section.
Click the Add New button, followed by Upload Plugin. Then, select the downloaded ZIP file.
Once uploaded, click Install Now.
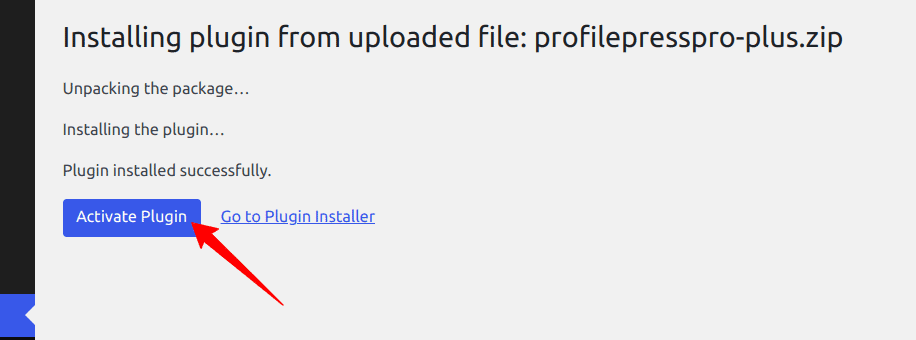
Wait a few seconds for the installation to be completed. Once the plugin is installed, click on Activate Plugin to activate it on your site.
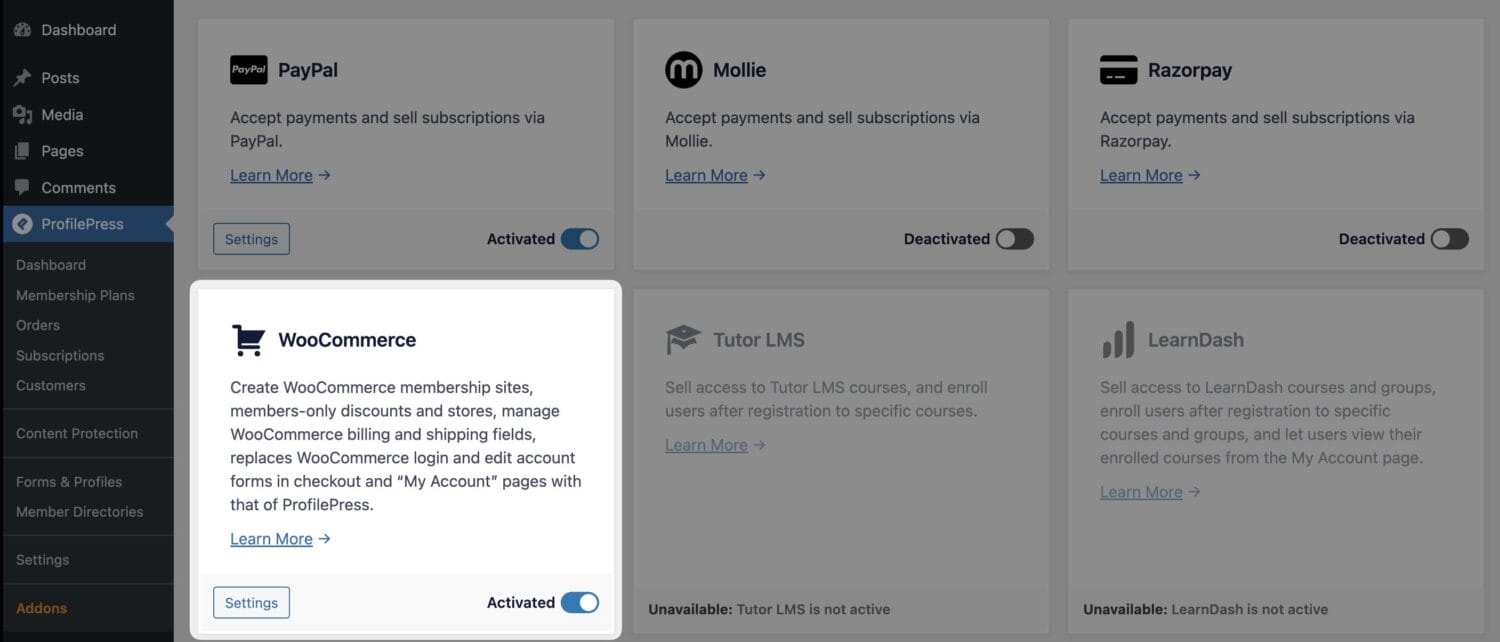
The next step is to activate the WooCommerce addon. To do this, go to ProfilePress > Addons and switch the toggle to enable it.
The way WooCommerce membership websites created with ProfilePress work is that you will need to create a product in WooCommerce with a fee, then create a corresponding membership plan in ProfilePress and map the WooCommerce product to it such that any users of your website who purchase the product will automatically be subscribed to the membership in ProfilePress.
Now, we need to create products in WooCommerce that users must purchase before they are subscribed to specific membership plans in ProfilePress.
For example, if we want to offer a ‘Premium Membership’ plan, we need to create a corresponding product in WooCommerce and a membership plan in ProfilePress so that when users purchase this product, they will automatically subscribe to it.
Selling Paid Memberships with WooCommerce
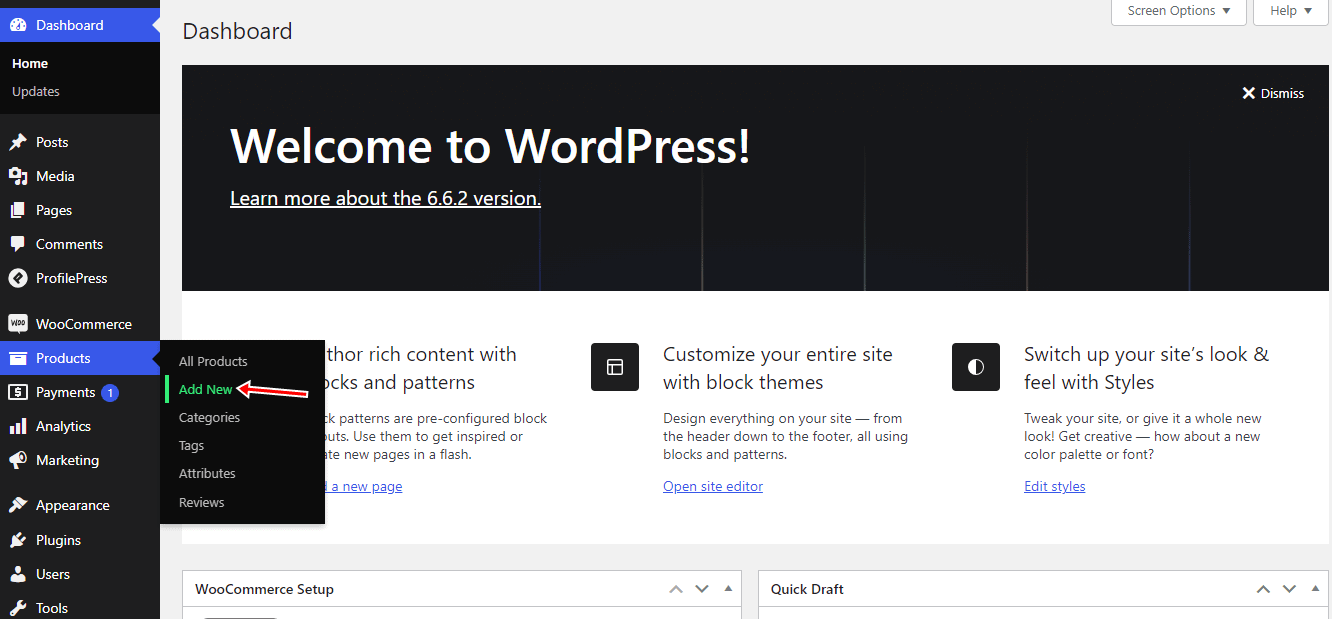
To set up a WooCommerce product for your Premium Membership, log in to your WordPress dashboard and navigate to Products > Add New.
Give the product a title, assign a price, and set the visibility to ‘hidden.’
Setting a product to ‘hidden’ means it won’t be visible on your site unless someone accesses it via a direct link or you embed it in an article or pricing page.
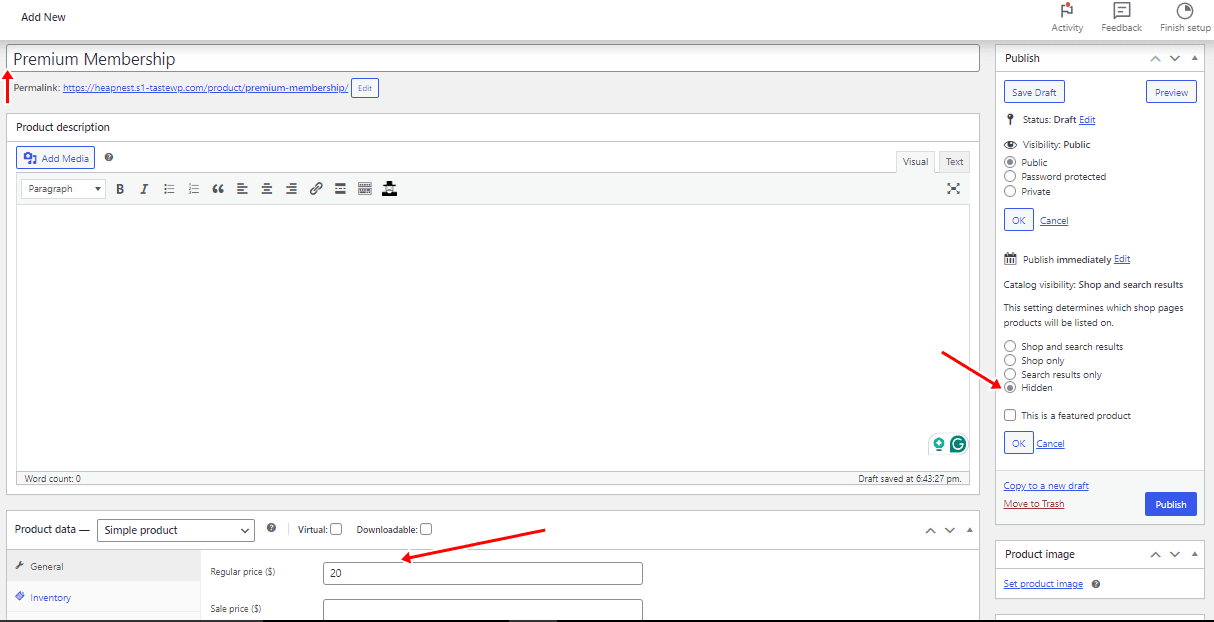
Publish the product once you’re finished.
Next, we need to create the membership plan that users of your website will subscribe to.
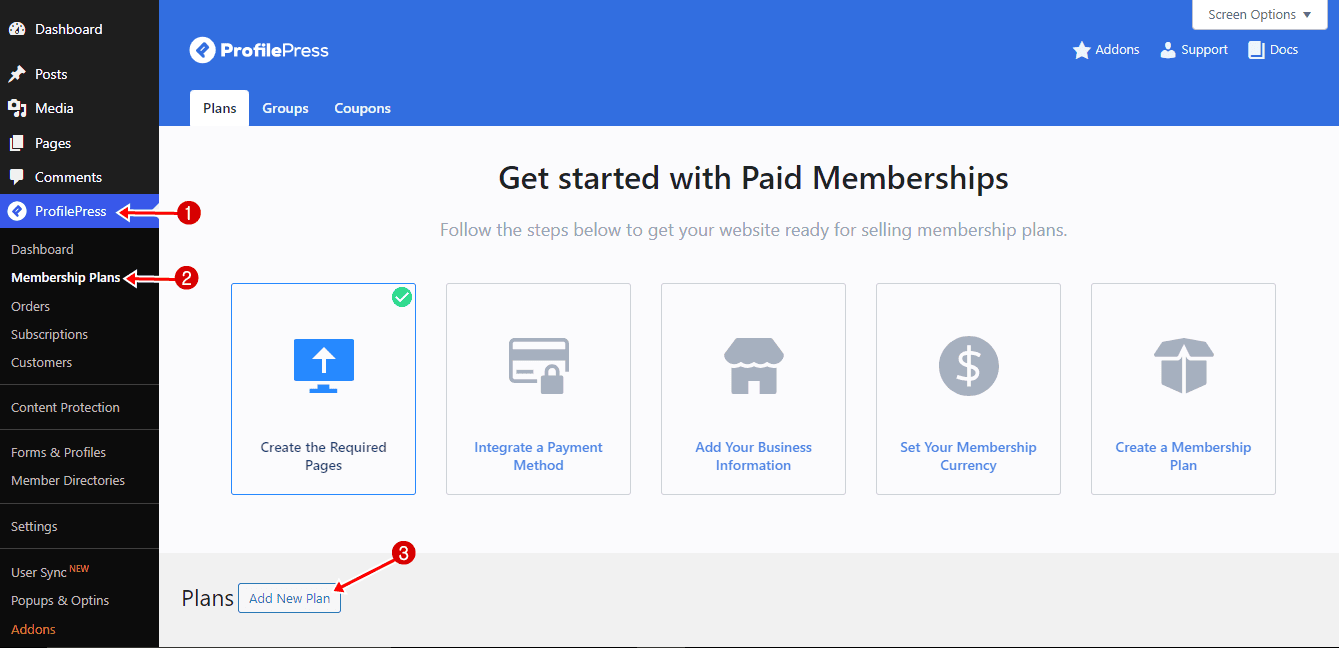
Creating a Membership Plan in ProfilePress
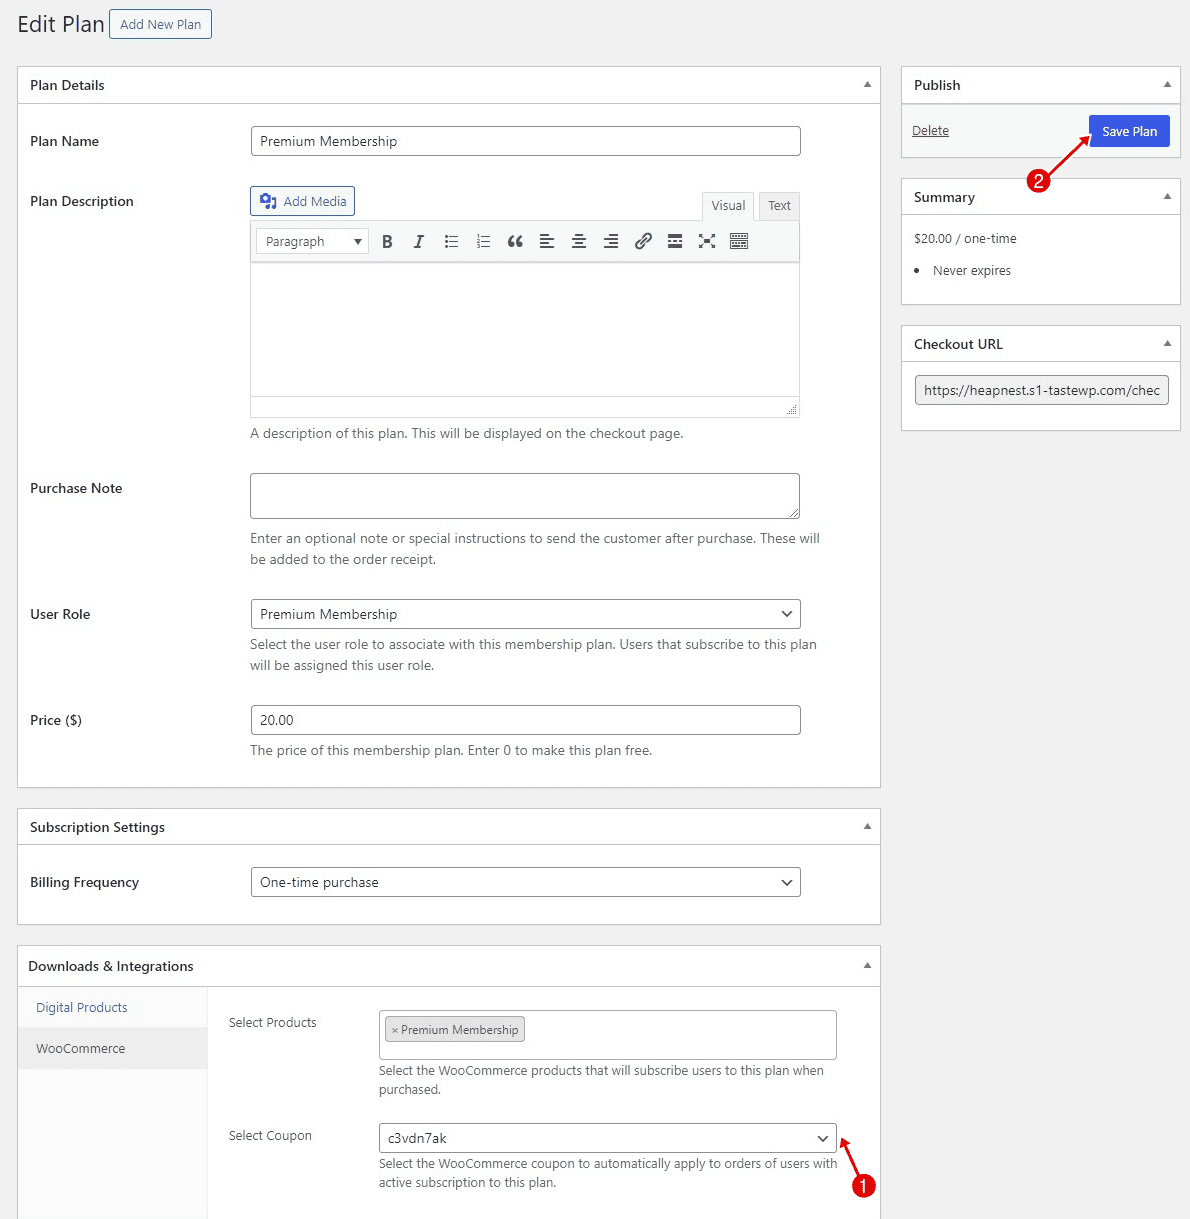
To create a membership plan to be sold by the above WooCommerce product, navigate to ProfilePress >> Membership Plans and click on Add New.
Enter a name for the membership plan and set the price to match the WooCommerce product price. Select ‘One-time purchase’ for the billing frequency, as this product is not a subscription.
We’ll cover how to sell recurring memberships later.
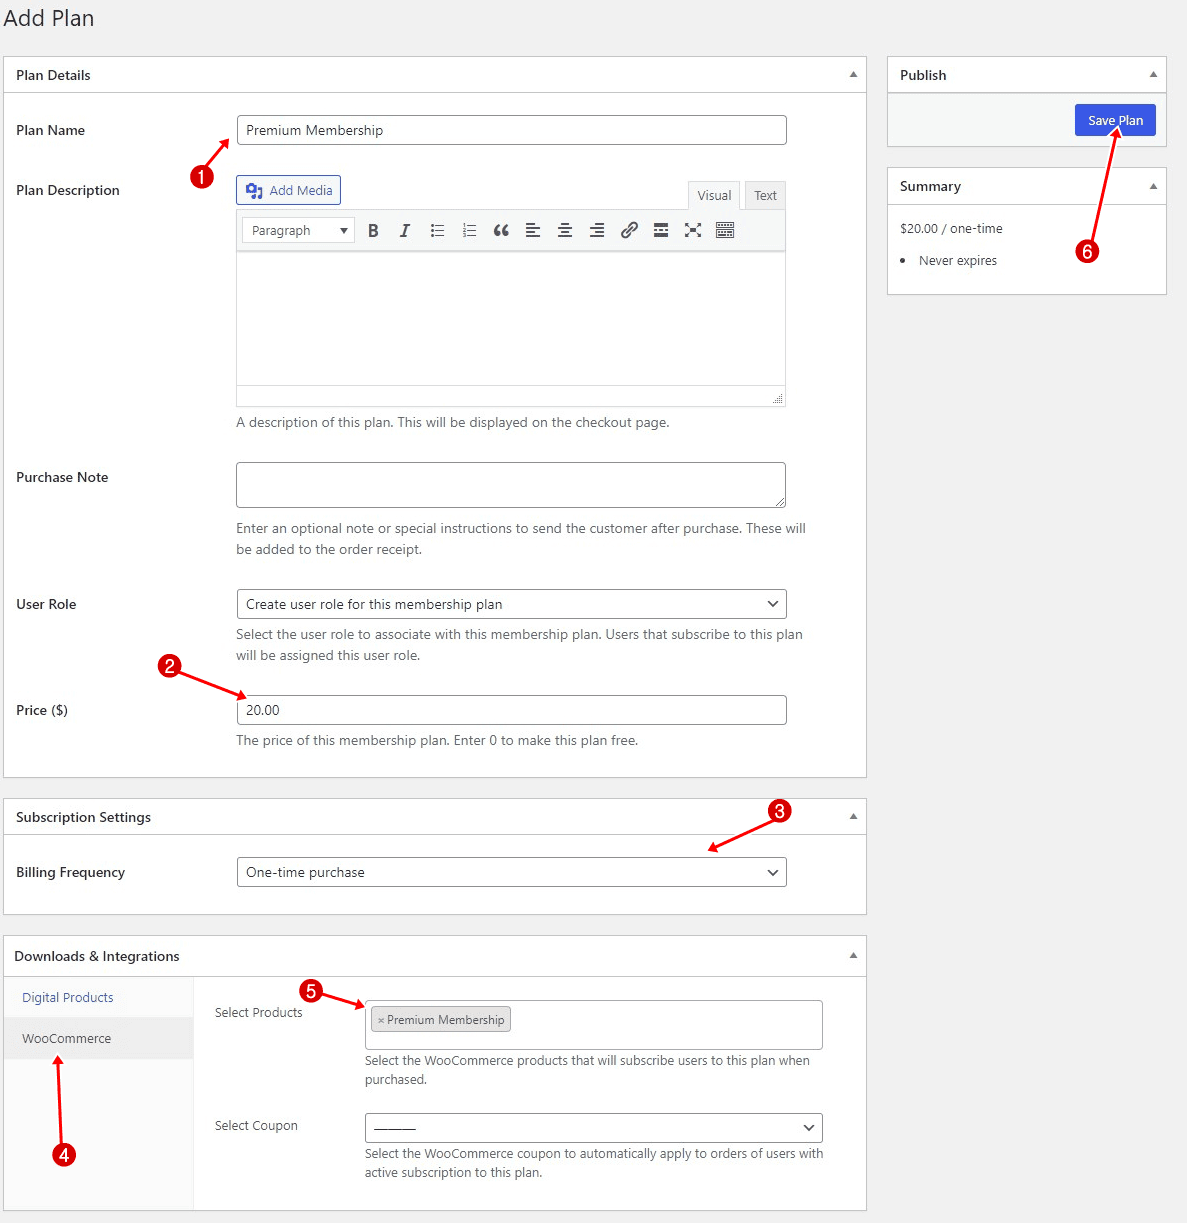
Next, go to ‘Downloads & Integration,’ open the WooCommerce tab, and select the ‘Premium Membership’ product we previously set up. This way, when customers buy this WooCommerce product, they will be automatically enrolled in the ProfilePress membership plan.
Once finished, click the ‘Save Plan’ button.
How the WooCommerce and ProfilePress Integration Works
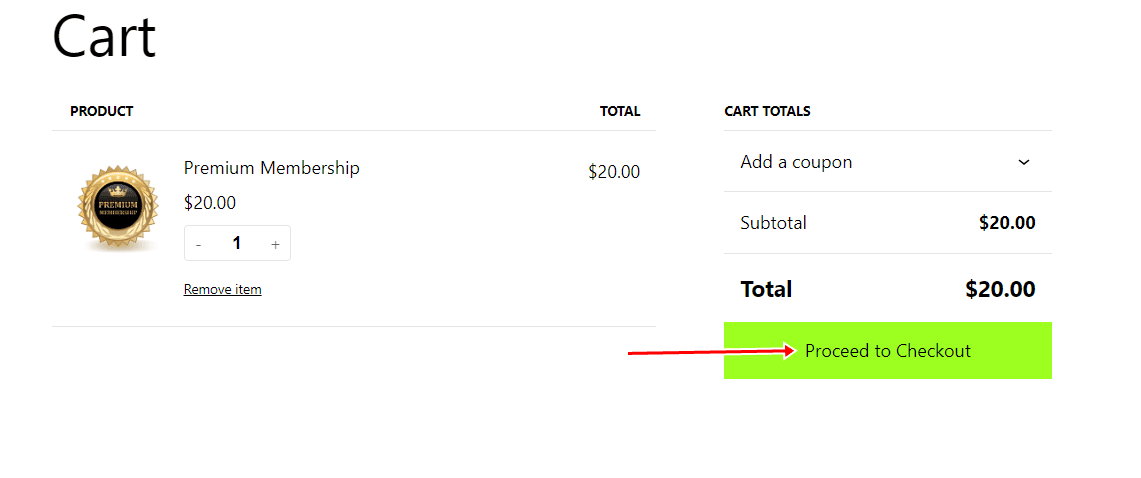
The process of integrating WooCommerce and ProfilePress is simple. You need to create a landing page, sales page, or pricing page on your website and link it to the WooCommerce membership product.
When a customer decides to purchase a membership plan, they will click the link, which will take them to the WooCommerce product page for the membership. From there, they can add the product to their cart and proceed through the checkout process, just like any other WooCommerce product.
Once the payment is processed, WooCommerce automatically finalizes the order, and the customer is instantly enrolled in the corresponding membership plan in ProfilePress.
It is important to note that if an order is canceled or refunded, the customer’s membership will automatically expire in ProfilePress. This ensures that only active paying members retain access to your WooCommerce membership site.
This seamless integration guarantees a smooth experience for your customers, enabling them to easily purchase memberships through WooCommerce while ProfilePress manages subscription activation and management.
Selling Recurring Memberships with WooCommerce and ProfilePress
WooCommerce offers a subscription extension that enables customers to regularly subscribe to your products or services—whether weekly, monthly, or annually. By combining this extension with ProfilePress, you can seamlessly sell recurring memberships through your WooCommerce store, providing your customers with continuous access to exclusive content, products, or services while generating a steady income stream for your business.
Let’s walk through a practical example of setting up a Gold Membership plan that charges users a monthly fee of $10.
For this setup, you’ll need the WooCommerce Subscriptions extension activated on your website, allowing you to create subscription-based products easily.
Next, go to WooCommerce >> Product >> Add New.

Enter a name for your membership.
In the Product Data section, choose “Simple Subscription” as the product type. This tells WooCommerce that it’s a subscription-based product. Then, set the subscription terms.
The price should be $10, and the billing interval should be monthly (or adjusted weekly or annually as needed). You can also specify if you want to include a sign-up fee for an initial payment. Decide if you will offer a free trial period, like a 7-day or 30-day trial, to attract more sign-ups.
Then, set the catalog visibility to hidden to prevent the product from appearing on the Shop and Search Results pages.
Once you’ve finished these steps, please publish the product.
Assigning the Subscription Product to the ProfilePress Membership Plan
Now that your subscription product is created, the next step is linking it to a membership plan in ProfilePress so that when customers subscribe, they’re automatically enrolled in the membership program in your WooCommerce membership site.
To do this, go to ProfilePress > Membership Plans > Add New.
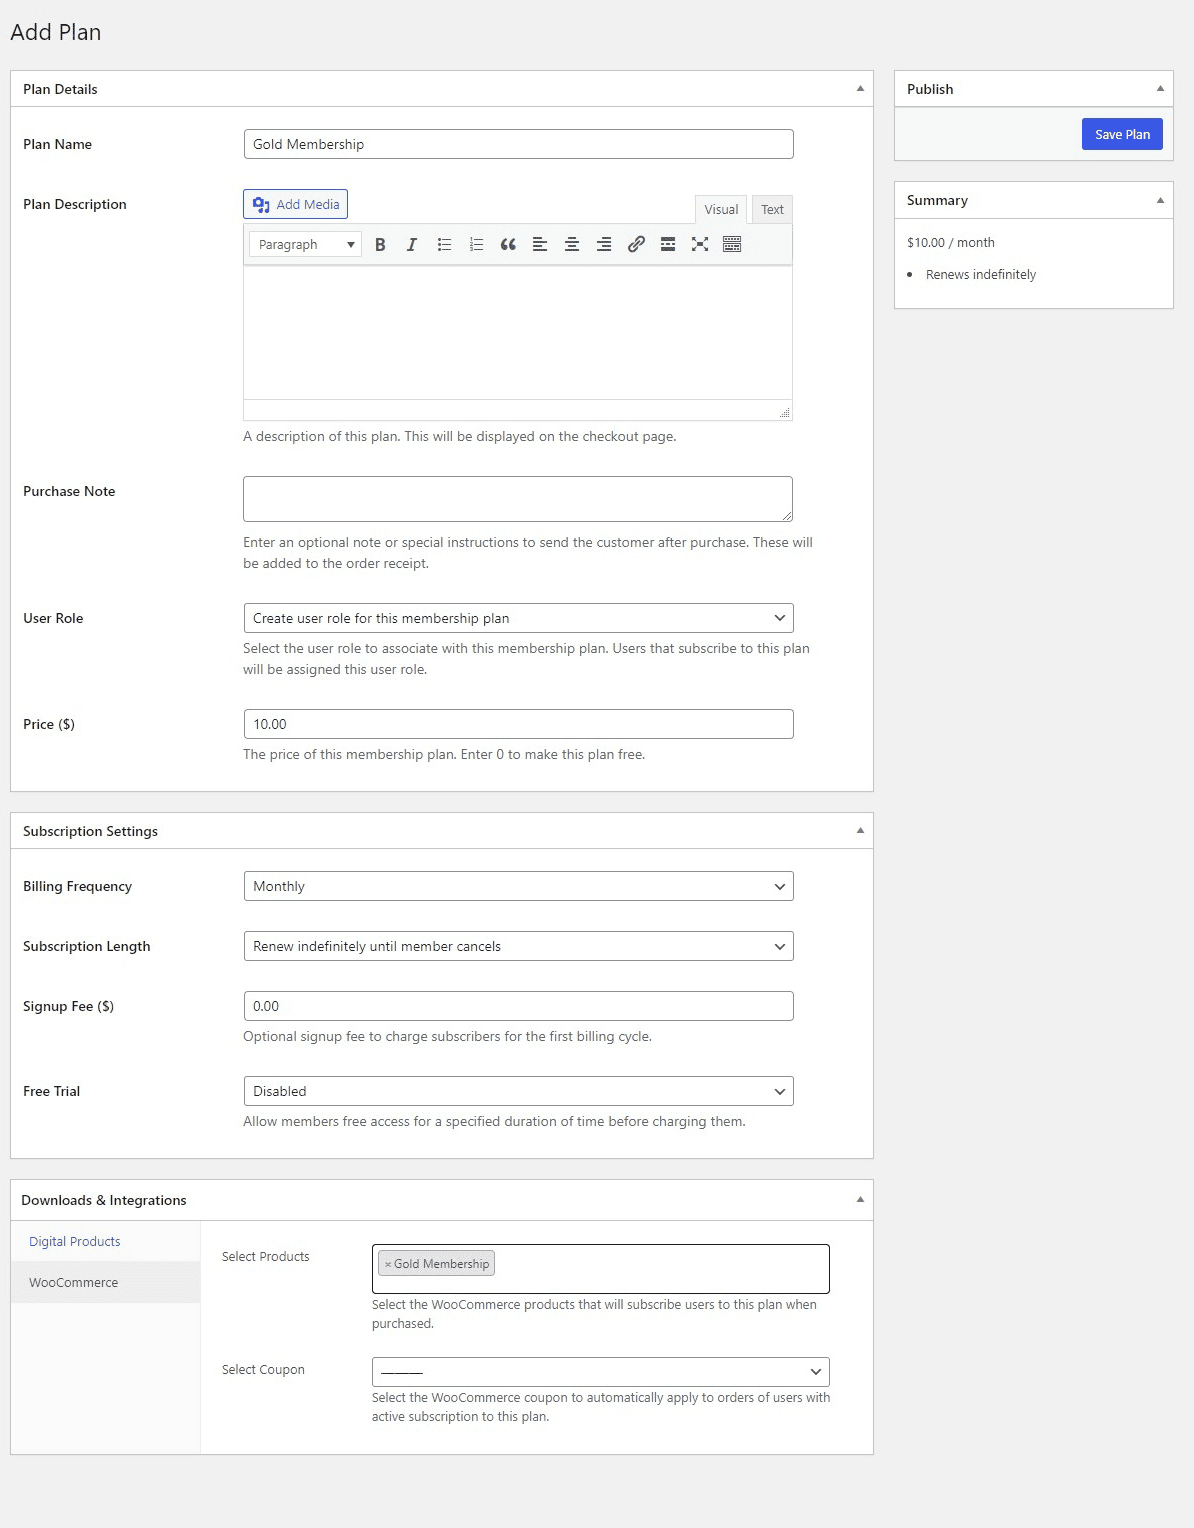
Enter a title and price and set the Billing Frequency to Monthly – same as the WooCommerce subscription product created above.
Then scroll down to the Downloads & Integration section. Under the WooCommerce tab, select the Gold Membership product you created in WooCommerce. This ensures that the customer is automatically enrolled in the membership plan once the product is purchased.
Finally, could you save the plan?
Setting Up Discounts for WooCommerce Members
ProfilePress WooCommerce addon allows you to reward your WooCommerce members with exclusive discounts.
Setting up members-only coupon codes allows you to automatically apply discounts to WooCommerce products for customers with active subscriptions to specific membership plans in ProfilePress.
This method allows you to provide member benefits without the hassle of distributing discount codes or requiring customers to enter them at checkout manually.
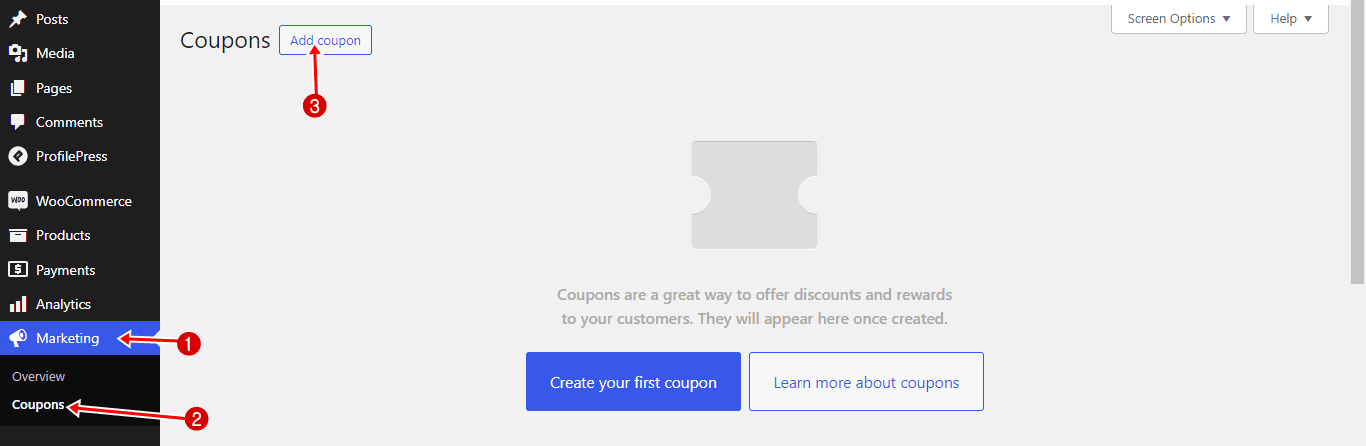
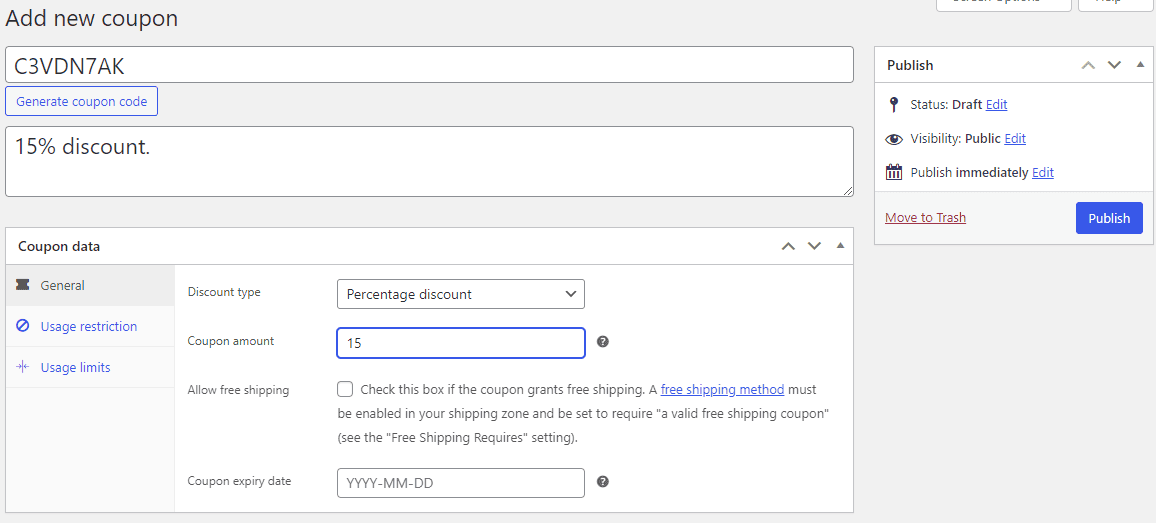
To set this up, start by creating a discount in WooCommerce. Navigate to Marketing in your WordPress dashboard, select Coupons, and click Add New.
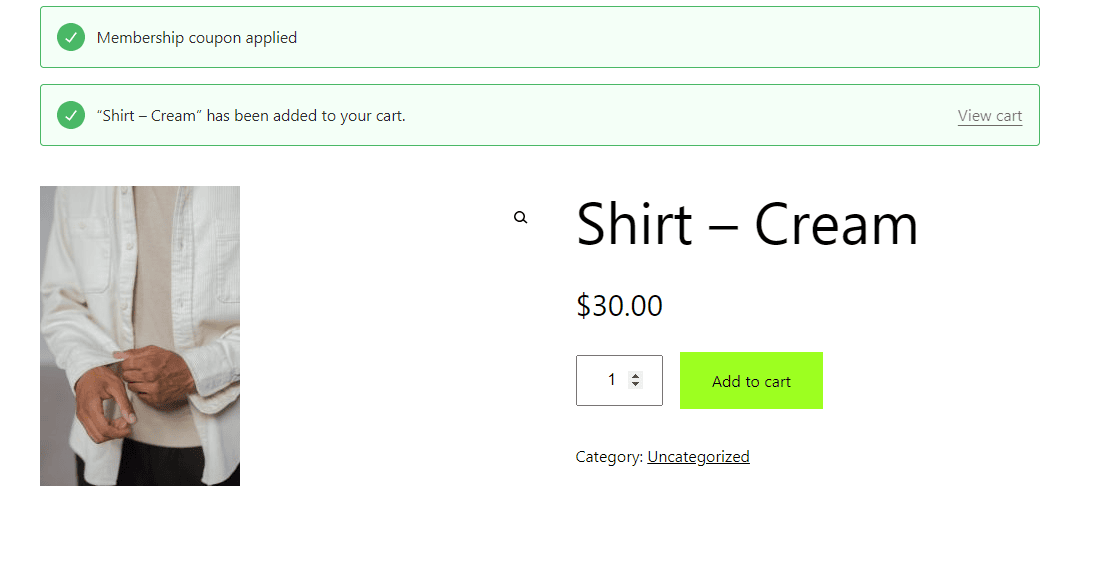
You can just enter or generate a code for the coupon, along with a description and configuration of the coupon benefits. The screenshot below offers a 15% discount. C3VDN7AK
After creating the coupon, you need to link it to a membership plan in ProfilePress to automatically apply the discount to users with active subscriptions during WooCommerce checkout.
To assign the coupon to a membership plan, navigate to ProfilePress > Membership Plans. Click on the title of the plan to open the edit screen. In the Downloads & Integrations section, select the coupon code you created and save your changes.
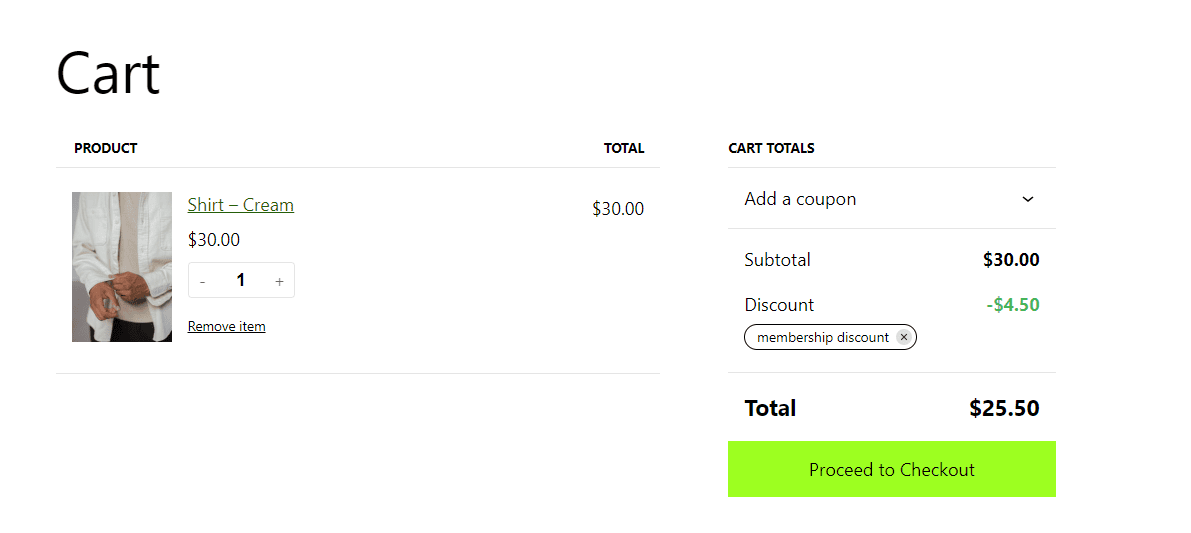
Below is a screenshot of the coupon code automatically applied to a user cart with an active subscription to the Premium membership plan on your WooCommerce membership site.
Once you click ‘View Cart,’ you will see the discount amount subtracted from the total price.
Providing Free Shipping to Members
Studies show that free shipping can significantly boost conversions, as many customers abandon their carts when faced with unexpected shipping fees. Free shipping as a member-only benefit increases customer satisfaction, reduces cart abandonment, and builds stronger long-term relationships.
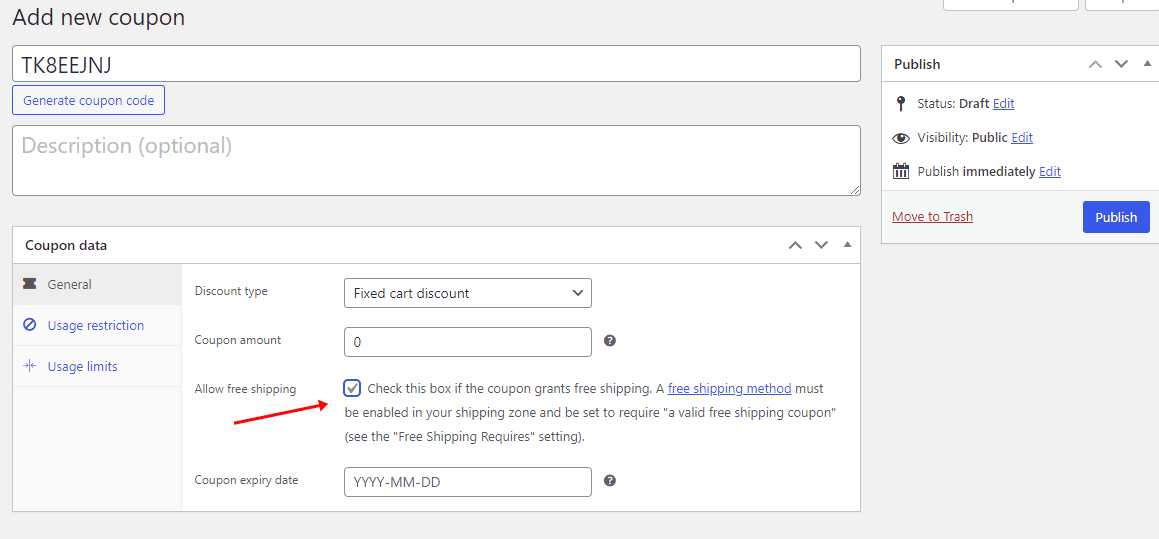
You can implement this by creating a coupon code that grants free shipping to your members.
To do this, go to WooCommerce > Marketing > Coupons and click on Add New.
In the coupon settings, enable the free shipping option.
Once the coupon is created, link it to your membership plan in ProfilePress so only members with active subscriptions will benefit from the free shipping offer.
You can do this by navigating to ProfilePress > Membership Plans, selecting the plan to which you want to apply the coupon, and assigning the newly created free shipping coupon.
Creating Members-Only WooCommerce Stores
ProfilePress offers an excellent way to create a private WooCommerce store that caters exclusively to loyal customers. This strategy strengthens customer loyalty and creates a sense of exclusivity, enticing more users to join.
Why Create a Members-Only Store?
A members-only store allows you to offer exclusive products or services unavailable to non-members. This approach is efficient for businesses that want to provide premium or limited-edition items, early access to new products, or unique discounts. By restricting access, you create an environment where members feel privileged, which can encourage more frequent purchases and greater engagement with your brand.
Setting Up a Members-Only WooCommerce Store
Using the ProfilePress content protection feature, you can quickly transform your WooCommerce store into a private, members-only shopping experience. This feature allows you to restrict access to certain products so that only logged-in members with active subscriptions can view or purchase them.
Here’s how to set it up:
Say we want to prevent non-members from viewing the pages of WooCommerce products your website sells. Navigate to ProfilePres >> Content Protection and add a new protection rule.

Enter a name for this rule, and in the “Content to protect” section, click the dropdown menu and select All Products.
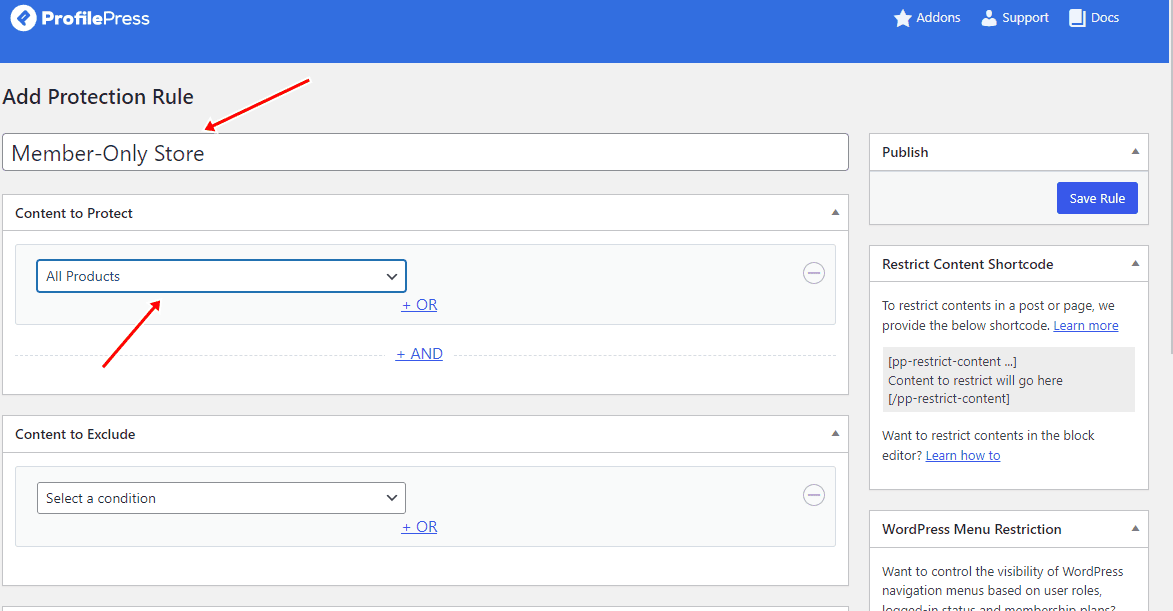
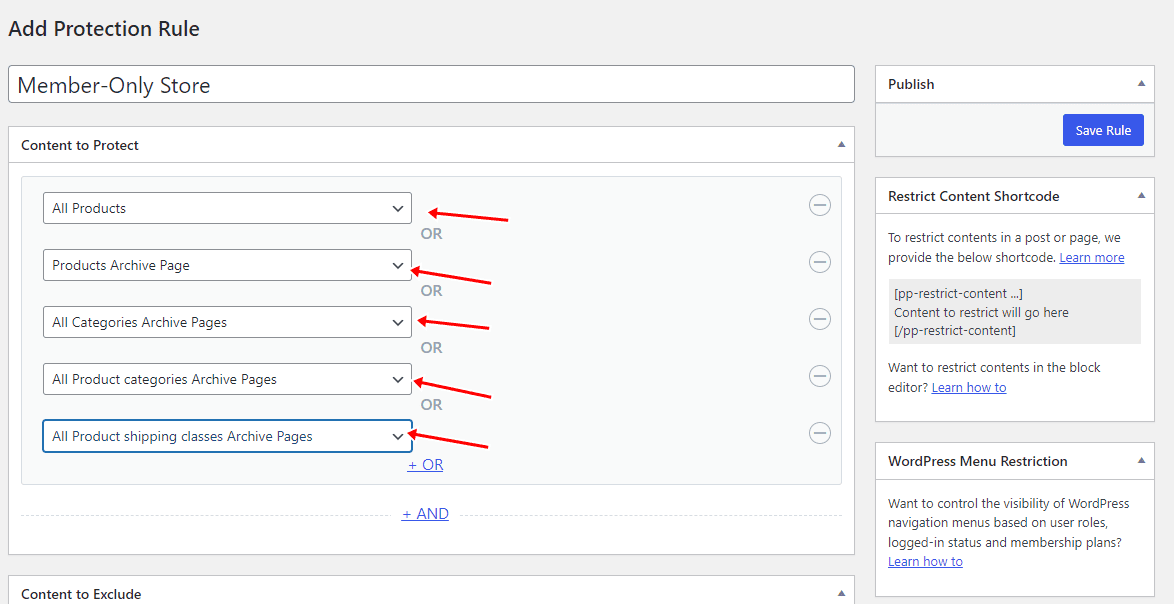
Click the ‘OR’ option to add additional WooCommerce product pages for hiding. A new dropdown menu will appear; click on it and select all product archive pages.
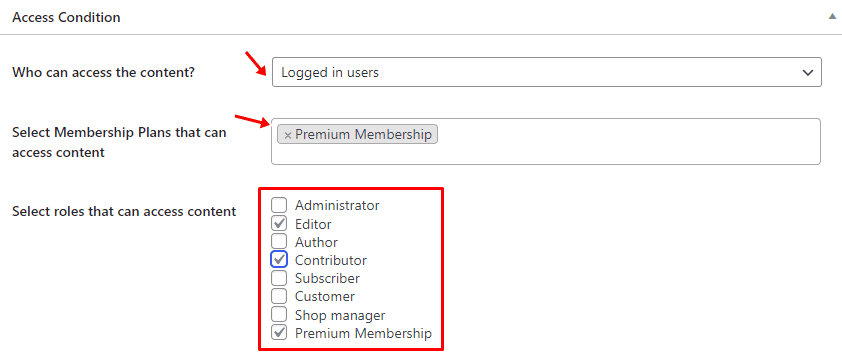
Navigate to the “Access Condition” section to define which users can view your WooCommerce store and product pages.
In the dropdown menu, choose “Logged in users,” then specify the membership plans and/or user roles that will be granted access to your store.
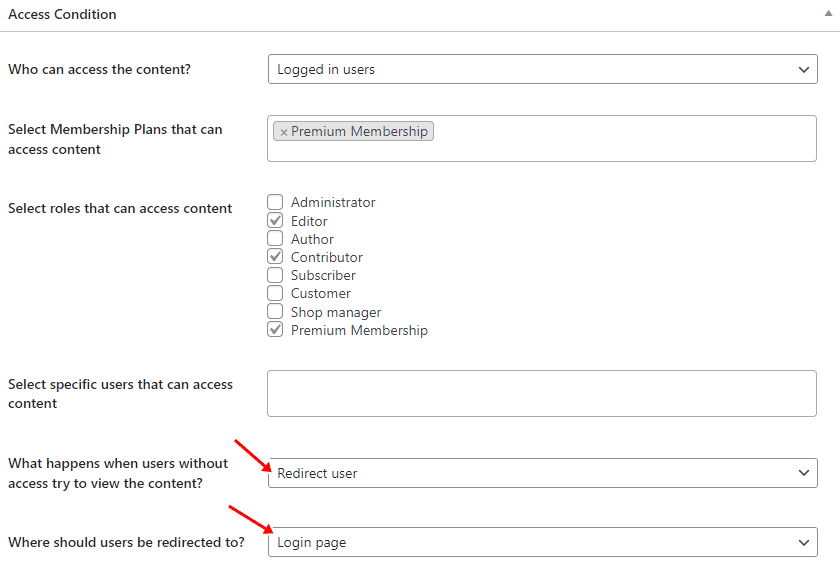
To make sure non-members are redirected to our login page, please adjust the remaining settings, as shown in the screenshot below.
Next, save your changes.
Alternatively, instead of redirecting the user, you can choose “Show access restricted message” for “What happens when users without access try to view the content?”.
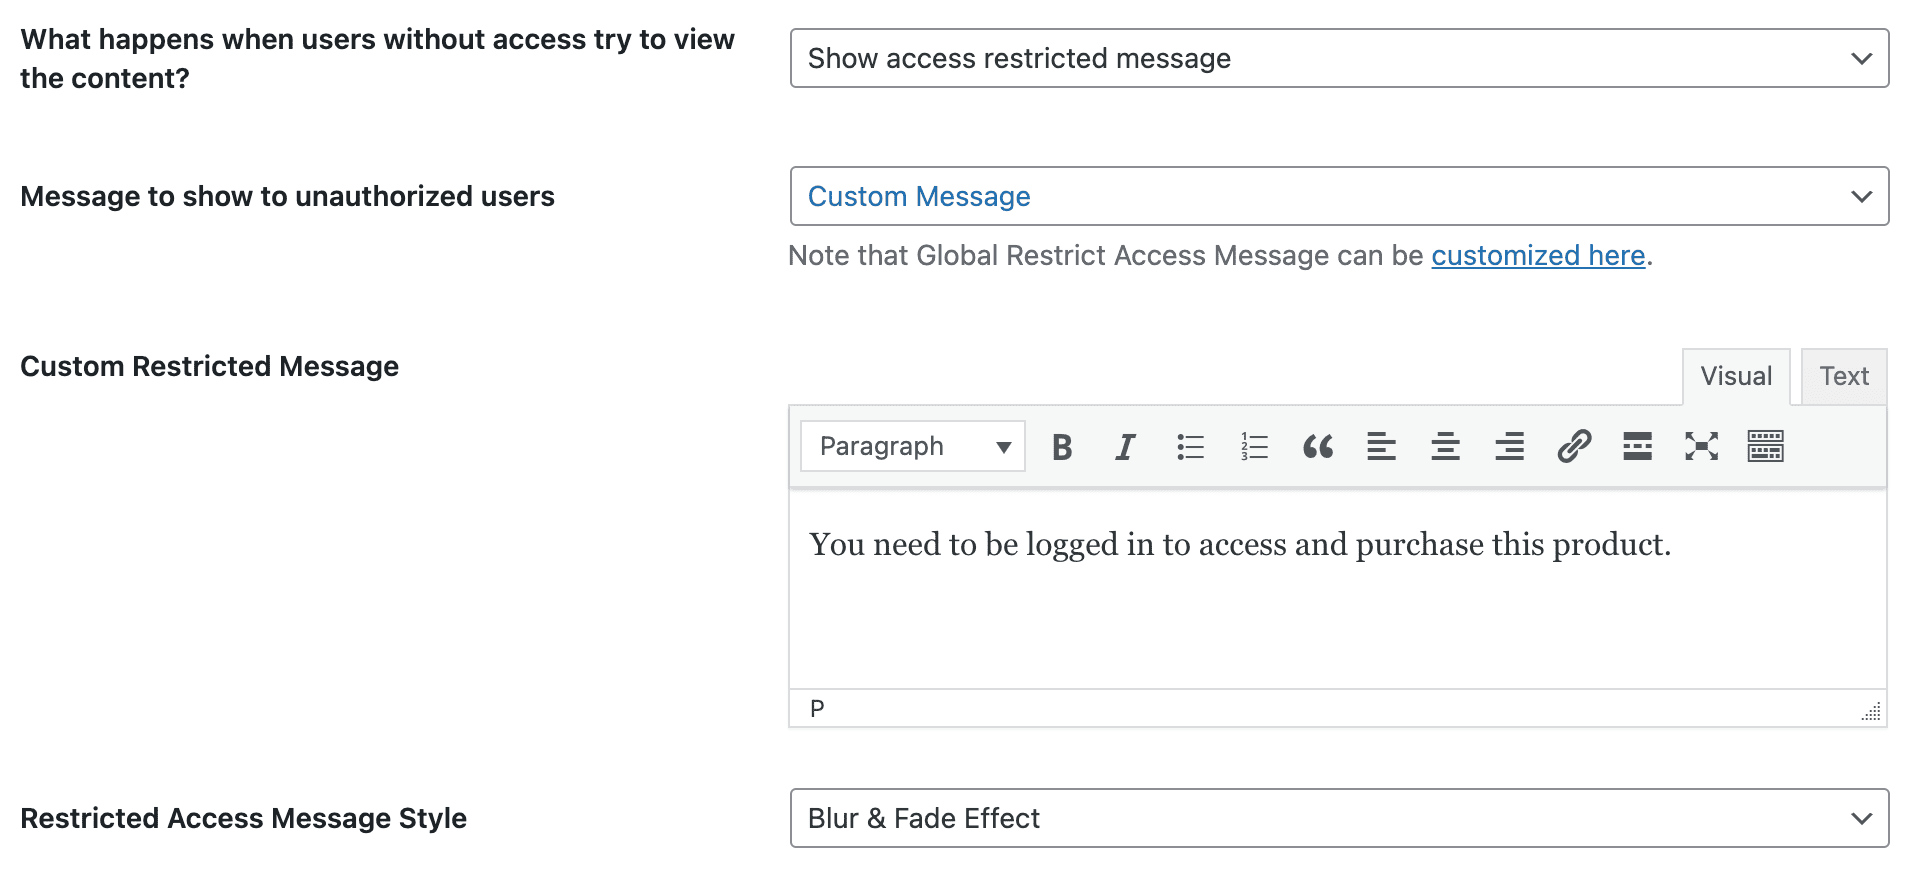
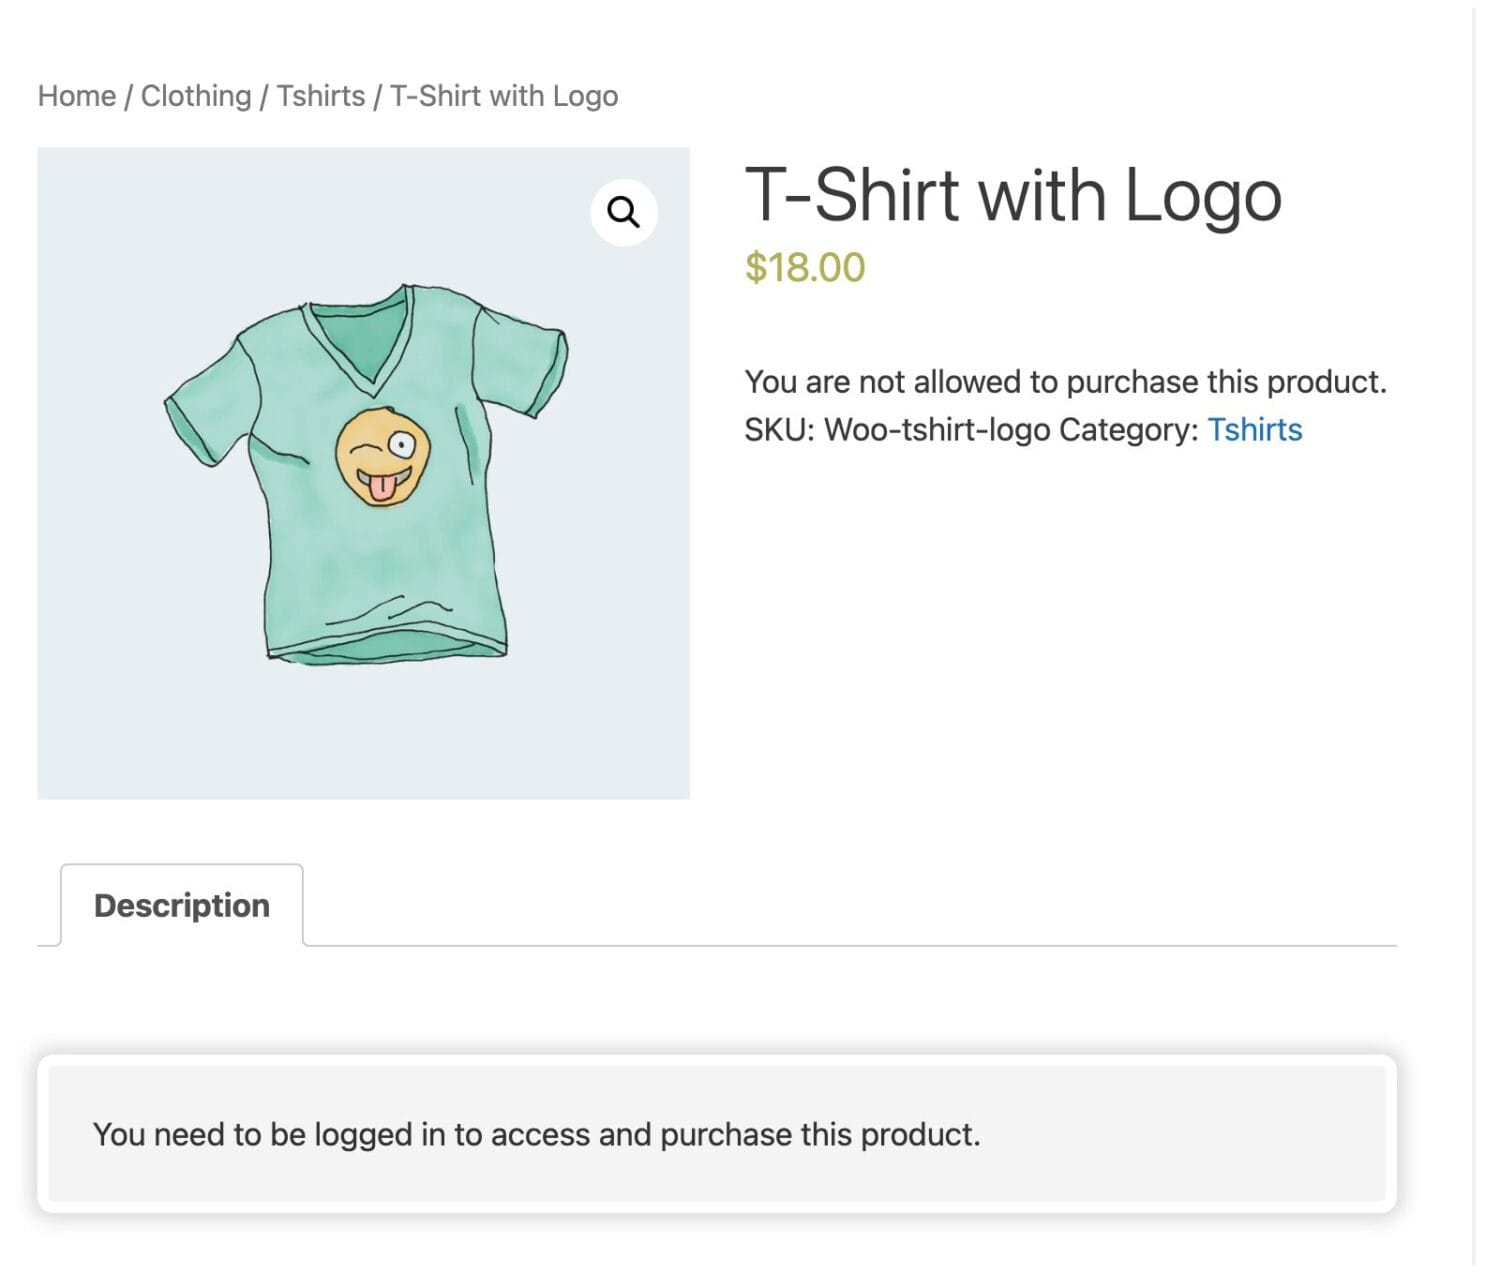
When visitors access a restricted or protected WooCommerce product page, they will encounter a message that you have configured. Additionally, the “Add to Cart” button for the product will be hidden, accompanied by an error message notifying them that the product cannot be purchased.
Note: You can restrict access to other types of content on your website, such as posts, pages, and custom post types.
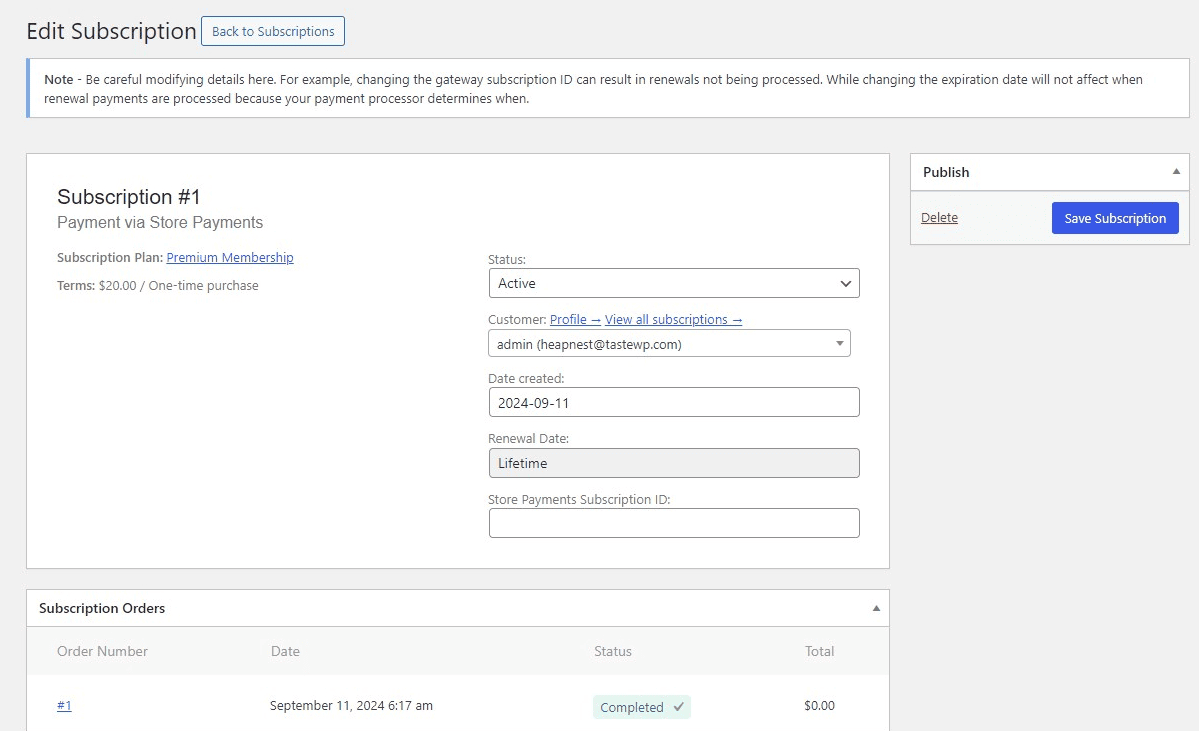
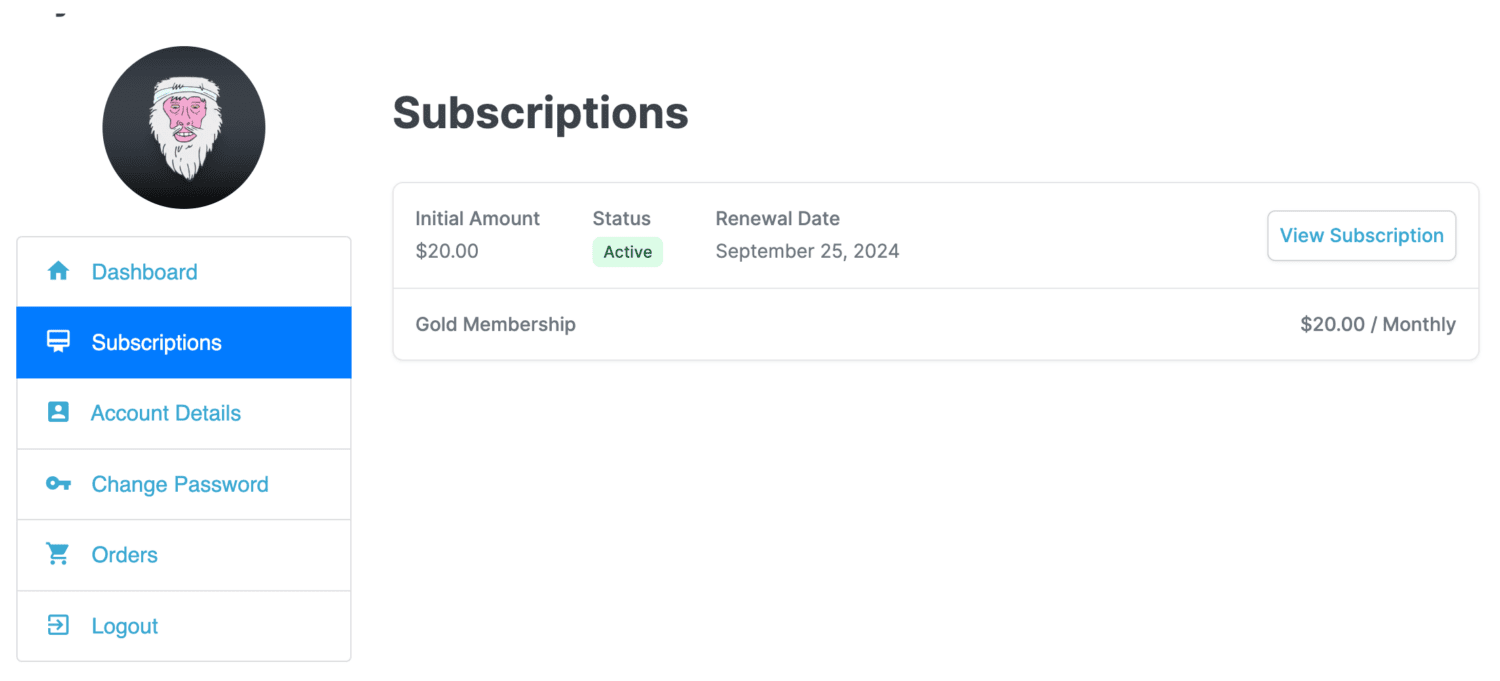
Configuring the Member Area
ProfilePress offers a Member Area (My Account) feature where users can manage their profiles, update passwords, and more. Since you’re creating a WooCommerce membership site, it’s crucial that users can also access their orders, memberships, and subscriptions (if the WooCommerce Subscriptions plugin is active) from the My Account page.
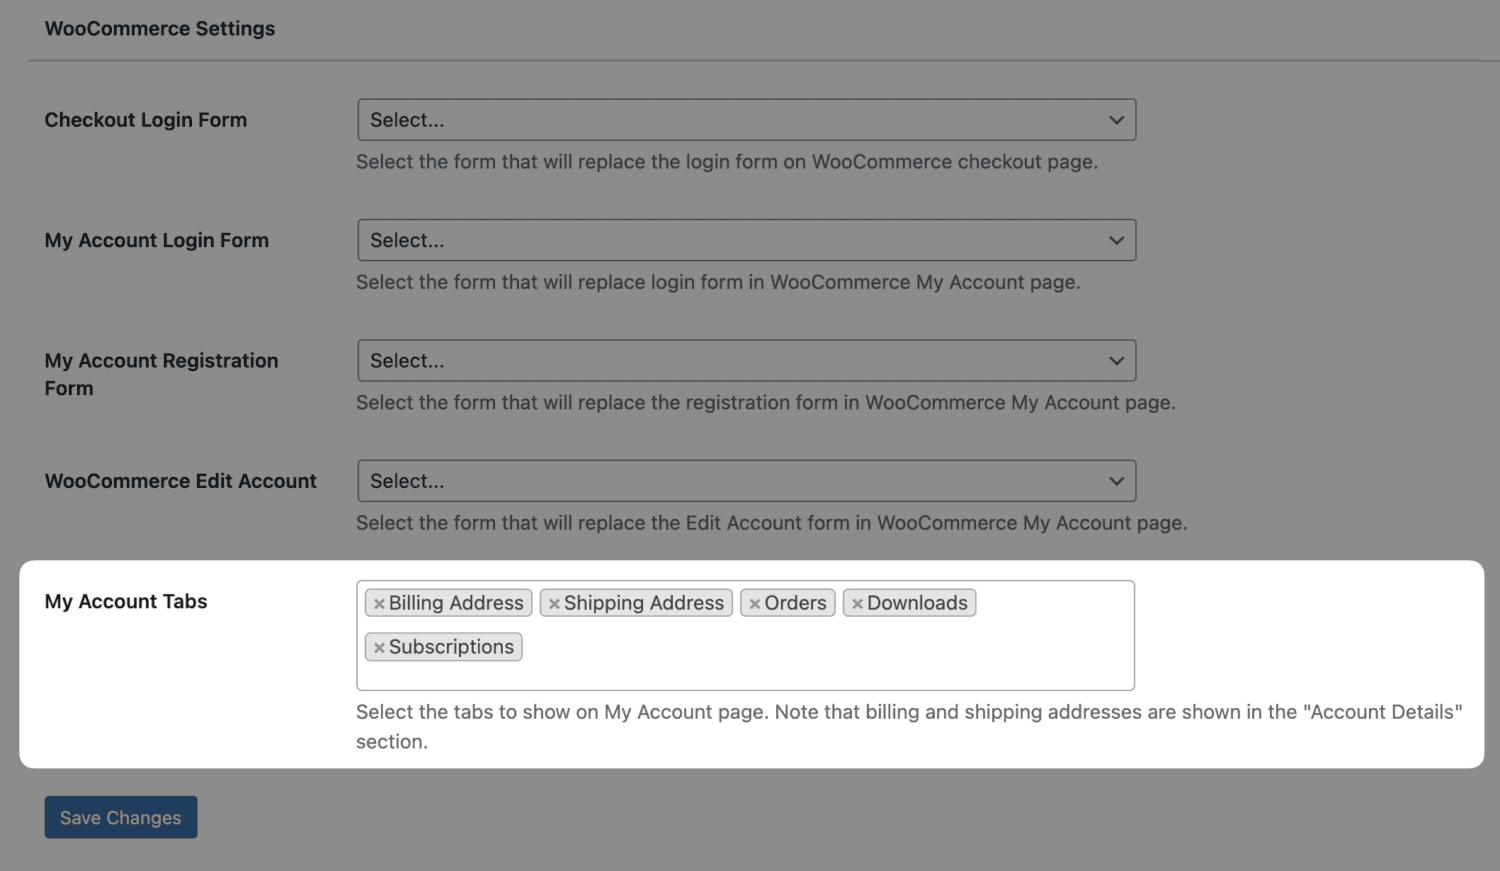
To enable these additional tabs in the My Account section, navigate to ProfilePress > Settings > WooCommerce > My Account Tabs, and select the relevant options to display these features for your users.
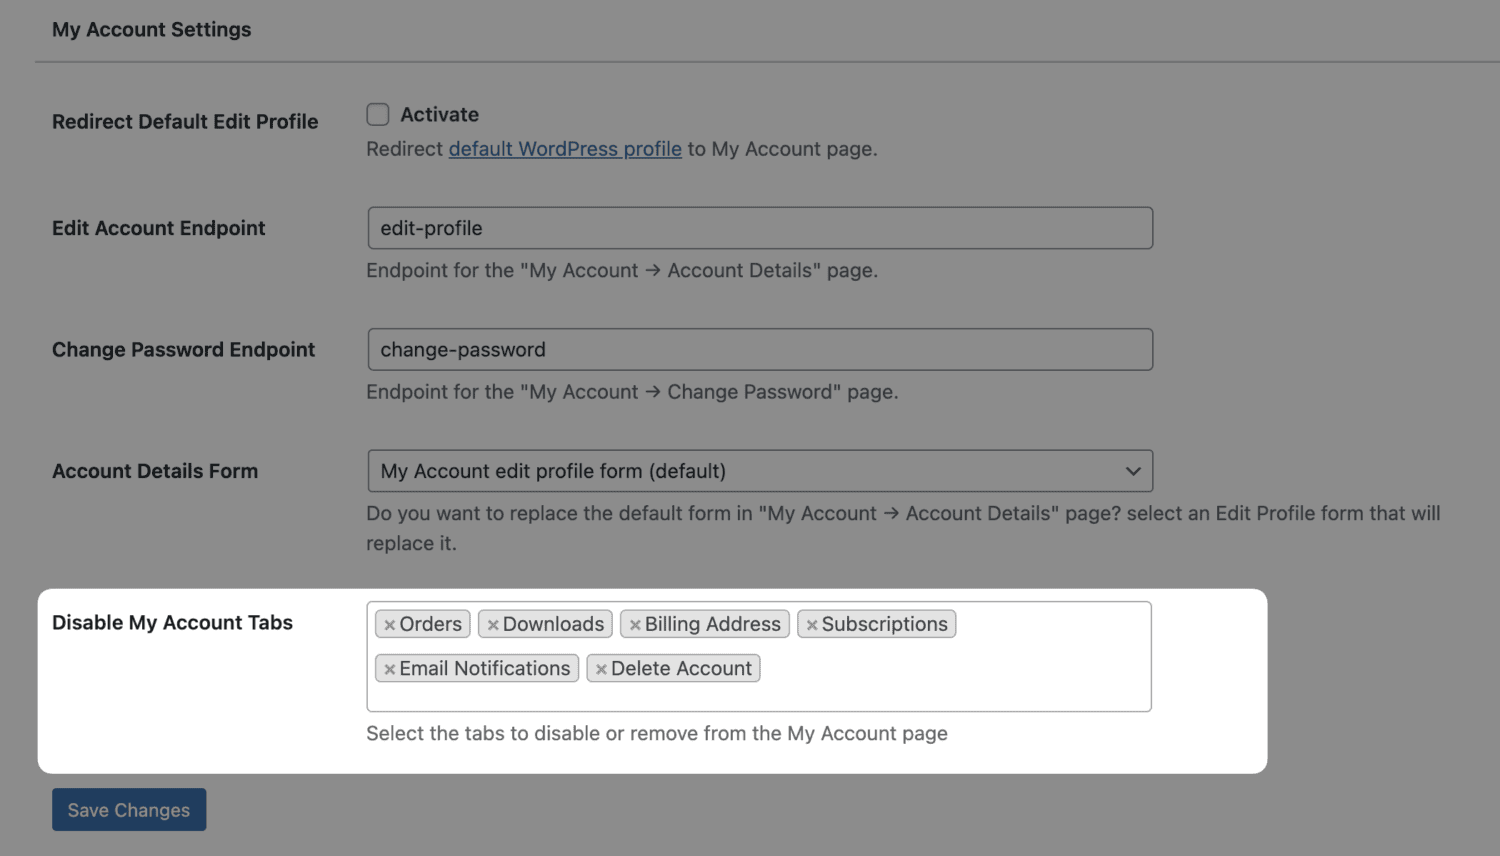
As WooCommerce manages payments, the Orders and other ProfilePress tabs on the My Account page are unnecessary. To remove these tabs, navigate to ProfilePress > Settings > My Account > Disable My Account Tabs.
Here’s a demo of the ProfilePress My Account page, featuring menu tabs for users to view their membership subscriptions, WooCommerce orders, and more.
That’s how to create a WooCommerce membership site.
Learn how to effectively build and manage a WooCommerce membership site by integrating ProfilePress with WooCommerce. From creating membership plans to offering exclusive discounts and free shipping, ProfilePress simplifies the process and ensures an exceptional user experience.
Use this guide to create a successful WooCommerce membership site that meets your customers’ needs and supports sustainable growth for your business.
Get the ProfilePress WooCommerce membership plugin and put your newfound knowledge into action today!