How to Backup Your WordPress Website the Right Way
WordPress is the world’s most popular CMS (Content Management System) for its functionality, ease of use and customizability. However, it has its own drawbacks too.
One of the major issues associated with WordPress is that there can be many vulnerabilities, and they can put your WordPress website at risk.
Your website’s hosting provider, an outdated plugin, poorly designed theme or a hacking attempt can all be factors that may bring your WordPress website down. If you don’t have a backup, you risk losing all your website’s files and database, meaning you may have to start it from scratch again.
This is why it’s so important to create a backup of your website, preferably regular backups so that you can restore the latest version of your website when it goes down and all the data is lost.
So let’s find out the different ways of creating a backup for your WordPress website, as well as a step-by-step process that you can follow to create a backup of your website in just a few minutes.
Automatic Backups by Your Website Host
Some of the more premium hosting services offer automatic backups as an additional feature when you purchase one of their hosting plans. Many of them even do it for you daily, so that you’re always prepared in case your site goes down and the data is lost.
However, these premium hosting services are expensive and you likely wouldn’t get these free backups with cheaper shared hosting services, which is usually what most small site owners use.
So you will probably have to find out your own way to backup your WordPress website unless you’re with a premium web host offering free automatic backups.
Manual Backup Using cPanel
Most hosting services have a cPanel or a similar system that allows you to manage your website’s files, databases and other technical stuff.
If your hosting provider doesn’t offer automatic backups and you want to backup your WordPress website manually, you can do so by logging into the cPanel provided by your hosting provider.
This is not going to be the easiest method of creating a backup of your website, but if you’re an advanced user you should be able to do it fairly easily.
Once you’re in the cPanel, you need to find the “public_html” or Home directory folder. You will then find the WordPress directory folder there. You need to compress and download this folder to create a backup of your website’s files.
This process can also be performed using a file manager, but you will likely find it easier to do it from within cPanel.
The next step would be to download your WordPress database. You need to click on the PhpMyAdmin option in your cPanel.
Some hosting providers may have your database files stored elsewhere or you will have to find the PhpMyAdmin section in some other area of your hosting account. This may be especially true for hosting providers that do not offer a cPanel.
Once you’re there, click on the database menu of your WordPress website, click on the Export option at the top, make sure the download format is SQL, and then download the file.
You will need to put these files back into the same locations when restoring your website. The database file will have to be imported.
However, this process can be too technical and confusing for many users. If you’re after an easier and straightforward backup process for your WordPress website, then you can use a WordPress backup plugin that can do the job for you with a few simple clicks.
There are quite a few backup plugins available out there, but we recommend UpdraftPlus for its simplicity and ability to get the job done just as well with its free version itself.
How to Backup Your WordPress Website for Free with UpdraftPlus?
If you just want to have a simple backup of your WordPress site, you only need the free version of this plugin and don’t need to spend a single penny to backup your website.
So let us walk you through the entire process of backing up your WordPress website using UpdraftPlus in a step-by-step way.
Installing UpdraftPlus
If you don’t already know how to install a plugin on your WordPress site, then follow the instructions we have outlined below. If you do know how to install a plugin, you can go ahead and install UpdraftPlus and move to the next step.
Log in to the WordPress dashboard of your site. Hover your mouse on the Plugins option on the left side of your dashboard, and click on Add New.
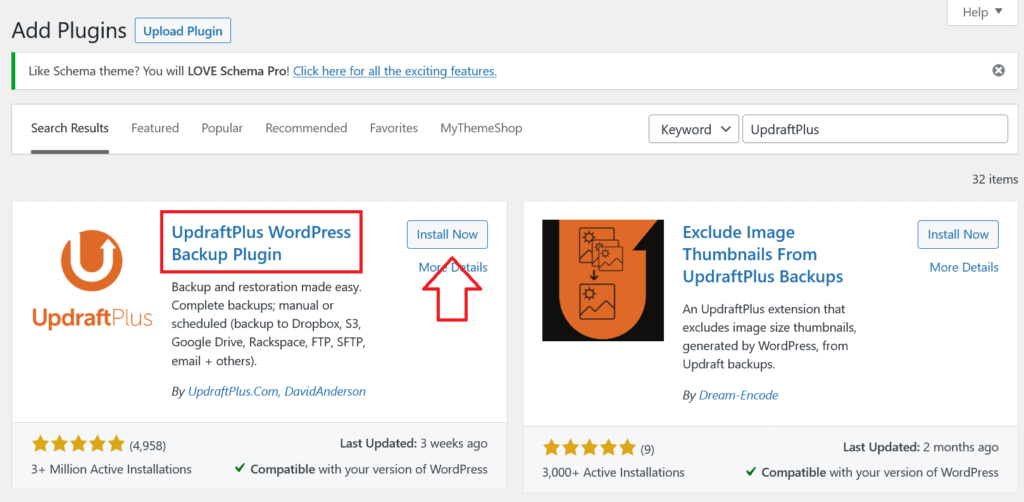
Type “UpdraftPlus” into the search bar and click on Install Now when it appears in the search results.
Once installed, click on the Activate button that appears right where the Install Now button did.
Starting the Backup with UpdraftPlus
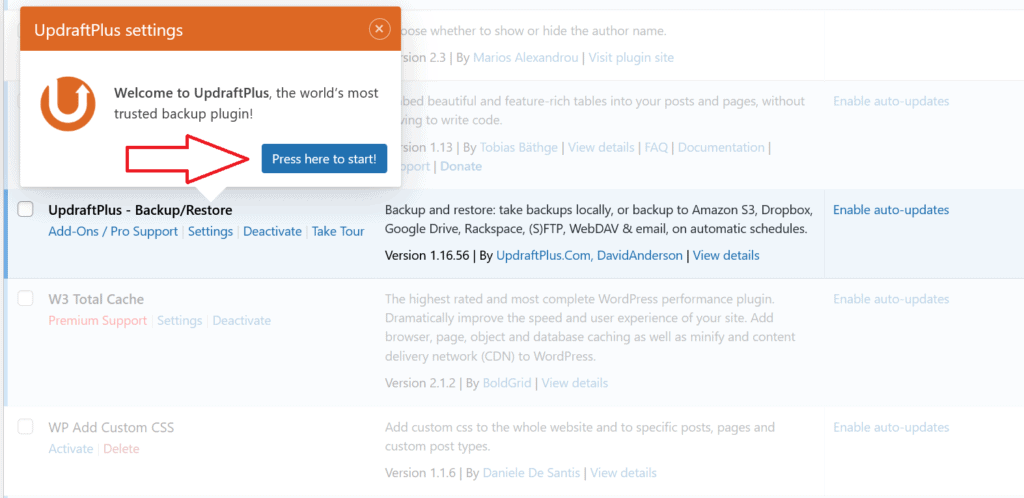
After activating UpdraftPlus, you will land on your plugins page with a UpdraftPlus popup asking you to click on a button to start the backup process as you can see below. Click on the “Press here to start!” button.
You will then land on the UpdraftPlus settings page where you will be able to start the backup process for your WordPress website. Alternatively, you will also have the option to schedule the backups for your website and store them directly to remote locations like Google Drive and more.
This is a great feature to have in a free plan, as schedule backups are a great way to keep your website safe and the latest backups ready to restore your website to life whenever something brings it down.
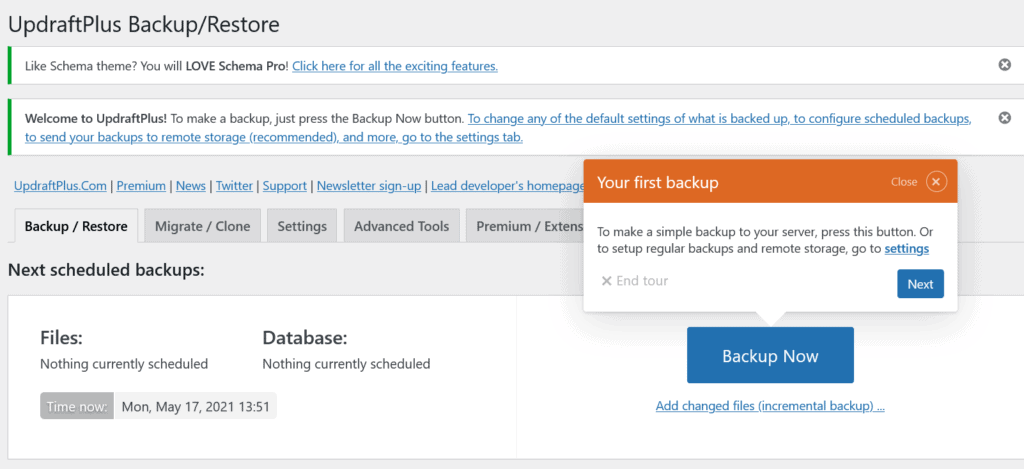
You can click on the Backup Now option to immediately create a backup for your WordPress website right away. Let us first create a backup before exploring the other features and other ways of creating a backup with UpdraftPlus.
On clicking the Backup Now button, you will need to review a few options or settings before you can proceed with creating the backup for your WordPress website. Take a look at the below image to understand the different settings you will need to confirm or review before UpdraftPlus creates a backup for your site.
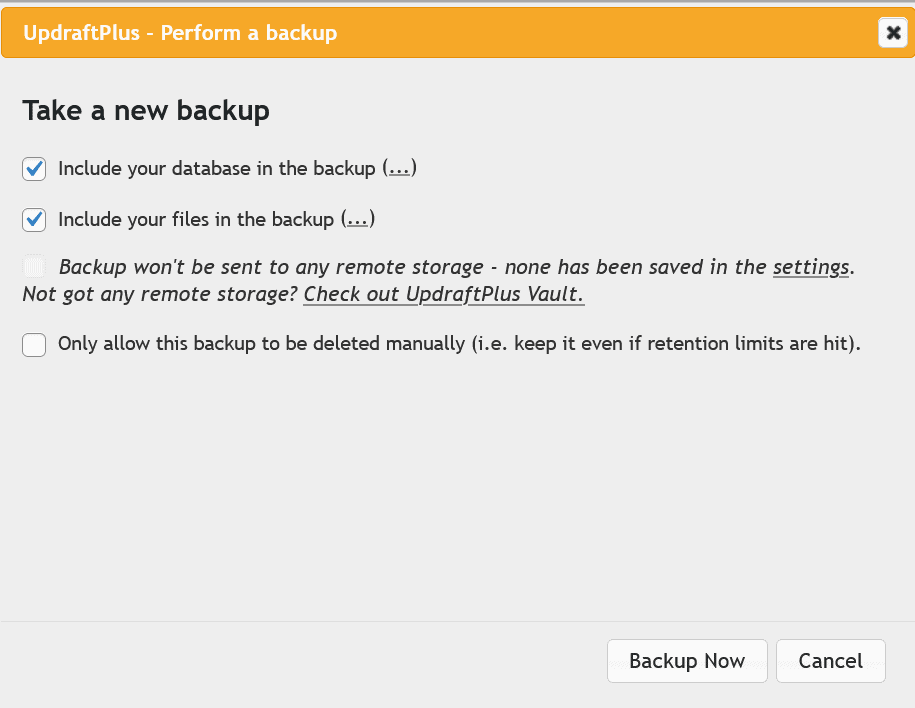
As far as the first two checkboxes are concerned, you will need to leave them ticked on. This is because when creating a backup for your WordPress website, you will need both the database and your website files to use your backup to restore your website.
Now, as we have not yet saved remote storage like Google Drive in the settings, UpdraftPlus is telling us that the backup will not be stored to any remote location but the same server as where your WordPress website is being hosted on.
There’s no harm in creating this backup, but you will ideally need to link your Google Drive account to UpdraftPlus so that you can store your website’s backups there. More on this in a bit.
Coming to the last option, UpdraftPlus is asking you whether you want this backup to be there forever until you delete it, even if the retention limits are hit. The retention limits are basically the limits set to limit the number of backups stored on your server.
When you have more and newer backups stored on your server, the older ones might automatically get deleted. However, if you don’t want this backup to be deleted from your server regardless of how many new backups you create, then tick this checkbox before clicking on the Backup Now button.
Managing the Backups
Once the backup process is finished, you will see the backup created in UpdraftPlus, with some handy options like the ability to restore it, upload it to some remote location, as well as delete it.
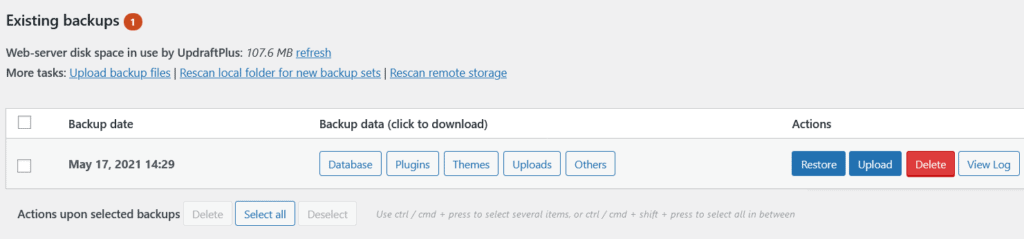
Whenever you need to use this backup, you need to log into your WordPress dashboard, go to UpdraftPlus Backups under the Settings tab, and then click on the Restore option to restore this backup and bring your website back to the point it was at when this backup was created.
However, the problem with this type of backup is that it’s stored on the same server as your website. In case your hosting server goes down for some reason and loses all the data stored on it, then this backup will be lost too along with your website’s data, essentially leaving you with no backup to restore your website from.
In other words, you need to upload it to a remote location like Google Drive to make sure that the backup is stored in a safe place independent of your website’s hosting server. This will help prevent you from losing your backup even when the entire hosting server goes down and you will be able to restore your website even with a different hosting provider.
Setting Up a Remote Backup Storage Location
Google Drive is probably the easiest and safest remote locations to store your website’s backup. To set it up, click on the Settings tab.
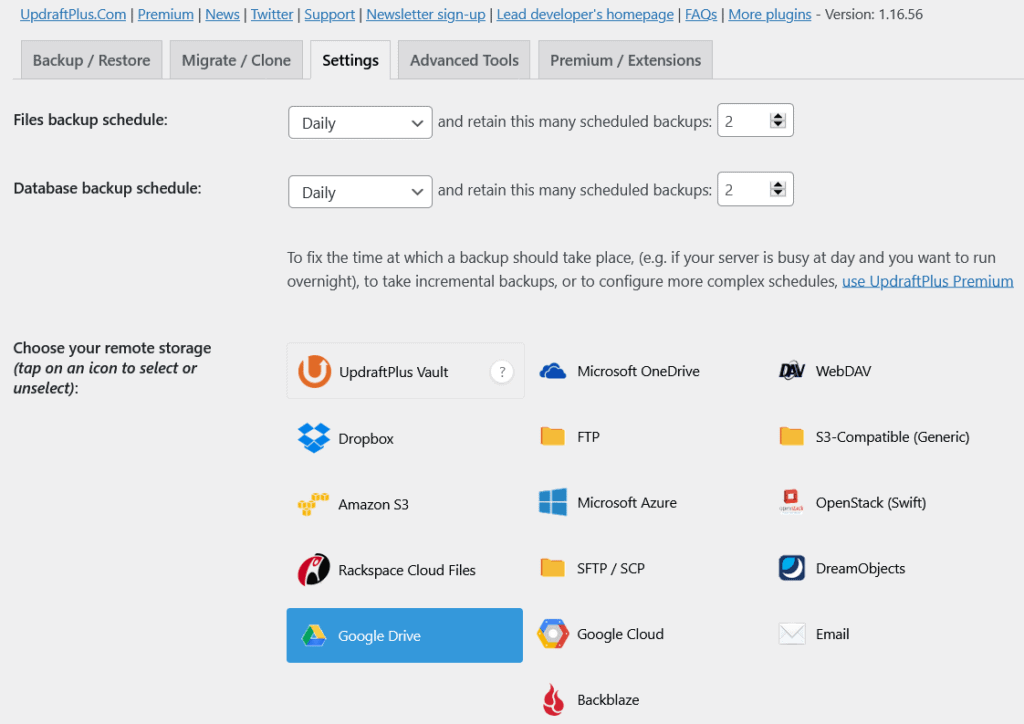
Before choosing one of the remote storage options, you can also enable scheduled backups if you would like. UpdraftPlus would then create a backup of your WordPress website automatically at your scheduled time.
For instance, we have set the backup schedule option to daily for both our files and database and the retention limit to 2 backups. This means that a backup would be created daily for both our website’s files and database, with the maximum number of backups being retained being 2 each, and the older ones get deleted.
Once you set your settings for the scheduled backups, you can select your preferred remote backup storage option from the many different platforms under Settings, including Google Drive, Microsoft OneDrive, Dropbox, Amazon S3 and more.
Now, assuming Google Drive is going to be the most convenient option for most people, you can simply click on it, go all the way down to the end of the page, and then click on the Save Changes button.
But as we have not linked our Google Drive account to UpdraftPlus, we will get a pop up asking us to do so before our settings can be saved and implemented.
Just click on the given link, sign in to your Google account, grant the required permission, click on the “Complete setup” button on the final screen and that would be all. The scheduled backups would automatically be uploaded to your Google Drive account.
You can also go back to the backup we created above and upload it to Google Drive or your preferred storage platform.
Restoring Your Backup
Of course, you must also know how to restore the backup you create when it’s needed. Restoring backups is simpler than you may think.
Whenever you need to restore the backup, just click on the Restore button on the Backups tab in UpdraftPlus. If you want to restore a backup that you have stored elsewhere, then click the “Upload backup files” link under the Existing backups section.
You will then be asked to choose the components of your website that you need to restore. If you want to fully restore your WordPress website, then check all the boxes and then click on Next.
You just need to click Restore again on the next screen and then wait for the restoration to finish. Finally, you will get a confirmation screen telling you that your website has been successfully restored.
However, in case the restoration goes wrong or something seems to be missing, you need not panic. You still have the backup files and they can be used to manually restore your WordPress website. You may just need some professional help in the worst-case scenario.
But most of the time, there likely wouldn’t be anything to worry about and the restoration will be completed smoothly and without any issues.
UpdraftPlus Premium
While the free version of UpdraftPlus would get the job done for most people, some may want to go for the premium features it offers.
One of the major features includes cloning and migration, which can turn out to be very useful when moving to a new hosting provider or implementing major changes to your WordPress website.
Then there’s an incremental backup option that allows you to backup only the part of your website that has changed, such as a new image being added, instead of creating a new backup all over again. This not only helps save time and storage but also a lot of server load if you’re creating the backups on your website’s hosting server.
Similarly, there’s also the functionality to automatically create a backup before performing any updates, such as to any plugins, themes or even WordPress itself.
The cheapest plan is $70 per year, and it covers 2 WordPress websites.
A Look at Other WordPress Backup Plugins
Well, UpdraftPlus isn’t the only WordPress backup plugin out there, although it’s our favourite for the features and functionality it offers in its free version and how simple it makes the process of creating a backup of your website as well as restoring it.
But let us take a quick look at some of the other popular WordPress backup plugins as well.
BackupBuddy
BackupBuddy is one of the most popular WordPress backup plugins as well alongside UpdraftPlus. Just like the latter, it allows you to create a backup for your WordPress website with great ease as well as scheduling the backups as you want.
It also offers a number of remote storage options for your backup files.
If you want premium features without breaking the bank, BackupBuddy can be a good alternative as it doesn’t have a recurring subscription option like other similar backup plugins.
BlogVault
BlogVault is a more unique backup plugin for WordPress websites. Unlike most other plugins, it directly stores the backup files on its own servers, meaning that they would be completely safe even if your website’s hosting servers are compromised in any way.
It creates automatic daily backups while allowing you to create as many backups manually as you would like as well.
In addition, it also offers some advanced additional features such as staging, which lets you test your website when implementing major changes or moving to a new host without affecting the frontend of your website.
Duplicator
If you’re looking to create a backup of your WordPress website just to move it to a new host, then you can use Duplicator instead. It’s specifically designed to help migrate WordPress websites.
That said, it also allows just creating a backup of your website if that’s all you want.